Hi everyone! It's been a long time I know, since my last post here!
Was watching some YouTube vids today and came across one in particular that reminded me I have collected some helpful resources for 911 owners that I should post! In particular, when removing and re-installing the rear emblems / badges on the rear bumper cover.
So here goes - First everyone should know that across the P-car line all of the Porsche emblems are individual letters and numbers. They aren't letters on a plaque, background, or anything else to make it simple for us DIY'ers. If you order a new set of badges for your car they will arrive all in order "mounted" on a paper backing, but there isn't a guide provided. You have to sort that out yourself!
Also it is important to note that the "PORSCHE" on the rear bumper cover is NOT aligned along bottom-edges in a straight line across the surface. Rather there is a subtle curve to the mounting. I can't tell you how many 911's I've come across that have the word PORSCHE straight across the bumper cover... To most people they'll never notice. But to P-car owners and those who know -- it stands-out like a sore thumb! Also this tells me that if I am interested in the car, to check-into whether the badges were reinstalled after a repaint due to damage or accident.
Many body shops simply don't take the time to notice the curve....
So, many of us will typically come to the conclusion that there must be a template out there somewhere, right? On the Inter-Web, just ask Google and you'll find one. Well Yes, and No.
There are many DIY'ers that have created their own templates for the purpose of removing and installing badges -- and if done with care it works perfectly just using painters tape and a pencil!
These posts from Rennlist might help, as well as the diagram below (courtesy of Porschefection).
Please note that the emblem is NOT straight and has a slight curve to it.
https://rennlist.com/forums/991/8105...-emblem-5.html BUT, note that there are factory templates that you can obtain.... albeit they are very pricey! At the factory, they install the badges / lettering using a rubber template holder that hangs in a precise position over the rear bumper cover, attached to the top under the spoiler. Many good indy shops may have this template, and many Porsche dealers as well -- but any certified Porsche repair center should have the holder. Here's a pic of the template holder:
Note that there is a hole in the center... .that is where the selected Logo template is inserted. Here is a picture of a Logo template for a C4 and C4S:
There are logo templates for every model combination that they offer! So how to obtain one of these Holders and Logo Templates???? Well, you can order them from your P-car dealer or online from any authorized retailer of P-car parts. The holder will set you back anywhere from $500 US to $1000 US, depending on who you are buying from. The retail list price is in the $900's, but I've found it offered on sale at $570. You then also need to order the logo template - they are more reasonably priced between $75 and $220, depending on the model selected. Here are the factory Part #'s: Logo Template Holder: 000-721-986-70 Logo Template (I will just list one - you will need to check the part number for each logo): 000-721-986-74 Hope you find this helpful! I'll post more information on this topic as I get time. Please comment and let me know if you have other helpful resources, links, or videos! Cheers! Plenum
First, full disclosure: I am not a Porsche technician, and I am not an Engineer. I just like to think like one! So my description of the "inner-workings" of the Porsche Doppelkupplung or PDK transmission are more of a component perspective and reflective of my own technical knowledge, taking a shot at describing how the various parts work together. Feel free to disagree, or point out what I've missed, by commenting below! I am sure there are much more technically details, accurate descriptions than what I attempt here -- but the average person out there should be able to follow-along.
Brief history of the PDK: As many Porsche fans know, P-cars have offered automatic and semi-automatic transmissions over the years. Going back to the late 1960's, the first "clutchless automatic" Porsche offered is known as the "Sportomatic." This was an option on cars through about 1970... It wasn't until 1990 that Porsche offered a new generation of transmission known as the "Tiptronic." This was a more successful option, and the innovation was the electronic control the driver had over the transmission.
In 2009 Porsche released the Porsche Doppelkupplung, or PDK transmission. For a brief demonstration of how it works, enjoy the following video:
While that animation does a great job "showing" you how the dual-clutch setup auto-magically works, it DOESN'T talk at all about the component relationships - and most importantly, the how do you tell the transmission what you want from it??? It's all fine and dandy that the technology is capable of pre-selecting gears and taking inputs from the ECU and stability management systems -- but what about input from the driver? That's what we'll focus on in the rest of this post.
And, by the way, "Doppelkupplung" translates from German to English as "two-clutches!"
PDK "System" of Components:
From a humanoid perspective, there are really three, arguably five components to the transmission system:
The driver compartment center console PDK selector lever (aka "the human");
The Transmission Control Unit (TCU);
The PDK transmission;
and, the engine control unit or ECU, and ABS/PSM controller -- to optimize shift strategy and match engine revs during shifting;
Here is an illustration of the driver-compartment PDK selector from the Porsche PET catalog:
Looking at the illustration, you can see that there is a physical cable that will transmit selector position or activity to the transmission.
And an illustration of the TCU location (upper left corner, #6 shown next to the mounting bracket or cage):
#6 in this diagram is the control unit
For reference, since that illustration is so awful and includes a bunch of other unrelated control units, here is a photograph of an actual TCU:
Control Unit from a 991
991 Control Unit showing connectors
The transmission control unit is located in the passenger compartment, in the rear seating area under the seat cushions ahead of the engine bay.
And finally, here is a PET diagram showing the PDK transmission and related parts:
PDK transmission parts
#22 in the above illustration is the connection point between the PDK selector lever in the cabin, and the transmission. The cable (#6 in previous illustration) connects here, and transmits the selector position or action (in the case of manually up-or-down-shifting) to the transmission.
Here are some photographs of a PDK transmission out of a 991 C4S (photos from LADismantlers):
PDK Side View
PDK clutch housing
Of course, the TCU takes input not only from the driver, but also from the Engine Control Unit (ECU) as well as data from the ABS/PSM (Porsche Stability Management) systems as well.
Now that we've covered the basic components of the system, let's consider the end-to-end system of a driver controlling the transmission...
At the most basic level, the driver selects a driving mode upon starting-up the car. Settings include full-automatic in base or sport modes, and in cars equipped with Sport Chrono option an additional Sport Plus mode. Each selection changes the shifting behavior of the transmission (and in some cases other features of the car, such as the exhaust valves or engine mounts....).
How? The driver signals a choice of mode, gear, and so on by moving the PDK lever. This action transmits a signal to the transmission control unit (described above), which in turn communicates directly to the transmission. How quickly the choice is executed is determined by the selected mode, in other words what software "mapping" is selected. In some cases with Sport and Sport + modes shifts up and down the gearing range are executed more rapidly. There is also apparently a version of the PDK in the GT3 991 cars that has been called PDK+ and which comes from the factory with gear change mappings in the TCU that are faster than the GTS, S and base 991 Carrera's.
So that's it in a very simple summary. The driver signals a mode and gear selection through the PDK lever, through a cable that runs to the TCU under the rear seating area, which in turn communicates with the PDK.
In Part 3 we will go into description of what options PDK owners have to increase the performance of their 911 by making modifications or upgrades to the transmission.....
If you are only interested in how the PDK works, you can jump to Part 2
If you want to skip all the boring stuff and get right to the possible upgrade solutions, you'll have to wait until I publish Part 3!
PART 1
Recently I've been participating in a discussion thread on Rennlist 991 forum that I found interesting, and wanted to capture more details -- and additional resources -- for the blog. The thread started with question from one member about whether it would be possible to change the + / - or up-shift / down-shift direction of the PDK selector. For some reason, Porsche had decided that despite what nearly all other brands out there are doing, and even the 991 TT and GT3/GT3RS models have, that the PDK selector would work in opposite. Meaning, the direction you push the PDK lever is "opposite" for upshifts and downshifts in the 991.1 model line (except for the more exclusive versions listed above). Why is a great question, and I would love to hear from Porsche gear-heads as to what the reason was to do this... but perhaps we will never know!
Also note that (and I can't prove this at the moment) in the case of the GT3 models, the PDK software settings are more "aggressive" than the other lesser 991 models. This may also be the case with the RS, and TT models. What is important to consider here is that as far as I understand (from the Porsche sales, technical guides, etc.) ALL of the PDK transmissions (including the exclusive models) are identically configured! Meaning, they all have the same mechanical specifications and gearing ratios, whether you have the base 991.1 3.4L or the 991 TT. Again, I may need to prove this somehow, but at this moment I would argue that being identical mechanically, the only real difference between say a GT3 and an S model PDK transmission is software or mapping (I am not including the selector-lever in center console in this point -- yes, I know the + / - labeling is different, and might say "GT3" or "Turbo"!).
So on that note the discussion thread on Rennlist explored the possibility of reprogramming, and what that might involve. An upgrade of sorts.... Also considered was a physical parts swap between a 991.1 with the "backwards" selector and something like a GT3 or 991.2 model PDK.
All of the discussion and speculation got me thinking -- what are the possible upgrade options for owners of PDK equipped cars? In subsequent posts, we'll address this question at a high-level. But, before we get into solution options, let's take a closer look at the PDK transmission, what components are involved, and how it all works....
Following are the steps necessary to remove the "standard" rear active spoiler on a Porsche 991. You can also remove just the "upper cover" or painted surface if you don't need to remove the entire wing assembly with motor. Most often 991 owners are removing the entire assembly to install a new "ducktail" or sport design rear spoiler.
The tools you'll need are simple -- some torx bits / screwdrivers, and if you want to protect any surfaces from risk of scratches, some painters tape.
Before you begin, raise the spoiler.
To begin removal, you'll need to
Remove tail lights
Remove fan shroud / cover from engine
Next, on the right / passenger side (LHD vehicles) remove the inner trim cover by pulling up gently, and disengage the emergency release cable. The cover is a black plastic part that covers the screws you'll need to remove. Check that you haven't damaged any of the clips that hold the trim pieces in place.
On the left or driver-side, remove the upper part of the oil filler neck. There is a fastening screw that you need to remove -- it is visible on the side closest to the center of the engine bay. You will have to remove the coolant cap as well, and to keep anything from falling-down into the coolant filler put a piece of tape over the opening.
Next, remove the fastening screws on the support plates that are at the base of the active wing extension arms. I believe there are 2 T-45 screws at each side.
Remove the fastening screws running along the top edge of the rear apron / bumper cover. These must be removed to release the spoiler assembly.
Release the electrical plug connection for the rear spoiler motor. Pull it off completely. The connection is in the engine bay over on the right or passenger side.
The rear spoiler assembly is now disconnected and ready for removal. You can do the next step by yourself, but I would recommend having a helper to be sure not to drop, scratch or damage anything as you pull the assembly out of the car.
To remove the spoiler assembly, tilt it in the direction of the rear bumper cover, then forwards towards you as shown in the following illustration:
NOTE: There is a guide pin on each side that you need to clear -- and when reinstalling (if that is what you will do) you must seat the spoiler assembly into place using the guide pin.
And that is it! You now have the rear spoiler with motor etc removed from the car.
I haven't taken any pictures of my own, so if you complete this project and would like to contribute to this DIY guide, please send any pictures to me and I'll add them to this post.... Thanks!
And our last brake service post is a general how-to bleed the brake system on a Porsche 991.... If you missed 'em, there are two other guides available (all based on my experience with the official Porsche Work Manuals....).
This brake fluid is available under the following part numbers: Quantity supplied: 1 litre = 000.043.203.66; 30 litres = 000.043.203.67.
There are two bleeder valves on each brake caliper. Brake fluid must be drained at both bleeder valves.
Observe specified sequence: Bleed the outer bleeder valve on each caliper first.
1. Place cover in service position.
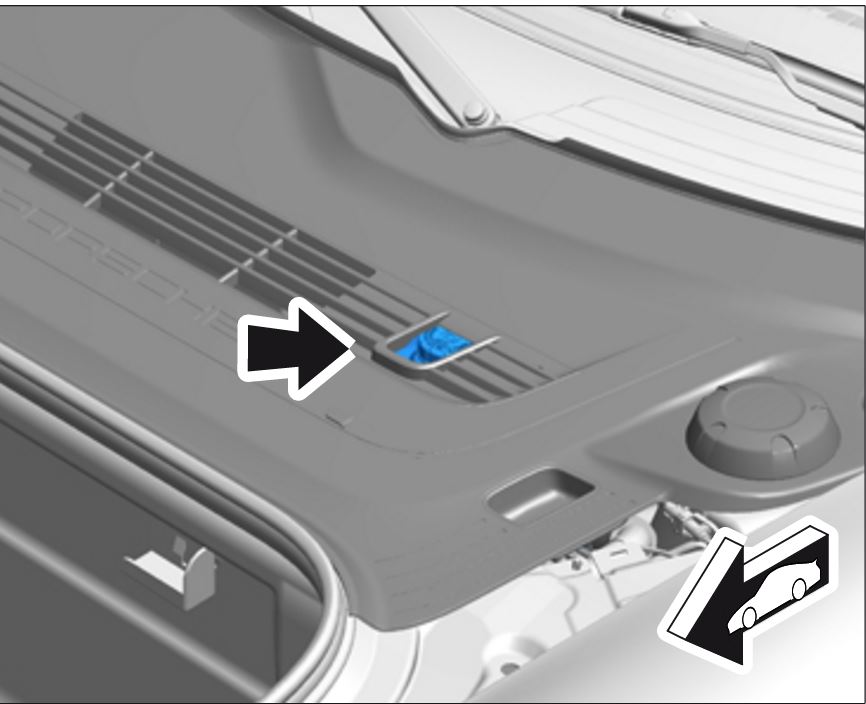
Unclip the cover at the left and right, lift it up and engage the yellow support in the luggage compartment lid 1 to secure it.
Place protective cover in service position
2. Open the cap on the brake fluid reservoir, which is located on drivers side of car.
3. Connect a bleeding device to the brake fluid reservoir.
Switch on the bleeding device. Bleeding pressure is approx. 2.0 bar.
Connect a bleeding device to the brake fluid reservoir
3. Continue the following bleeding procedures at the brake calipers (no prescribed sequence, but note sequence of bleeding from outside valve first, then inside valve...).
Use a transparent hose and a collecting bottle to check the escaping brake fluid for cleanliness, absence of air bubbles and to determine the amount of brake fluid used. The Porsche manuals don't indicate any specific time for bleeding.
Open each bleeder valve until clear, bubble-free brake fluid emerges.
NOTE: Continuously pump the brake pedal slowly during the bleeding process (second mechanic required).
4. Only when replacing the hydraulic unit: Bleed the secondary circuit using PIWIS Tester II 9818. Otherwise, continue with the concluding steps (Steps 5 and 6).
Select >>PSM>>Maintenance/repairs>>Bleeding hydraulic unit<< in the control unit overview. The four wheel brakes are bled alternately (as per Tester display).
Remove vent hoses and tighten bleeder valves to 14 Nm (10.5 ftlb.).
Remove PIWIS Tester II.
5. Switch off the bleeding device and remove the adapter at the brake fluid reservoir.
6. Visually check the brake fluid level. The brake fluid level must be between the MIN and MAX markings. Correct the brake fluid level if necessary.
Min / Max levels on fluid reservoir
7. Fit cover over the brake fluid reservoir (move out of service position).
The above details and illustrations are from the official Porsche Work Manuals for the 991 platform.
In this case the document you should obtain is "WM 470107 Bleeding the brake system"
All of the procedures I cover follow the official Porsche NA Work Manuals, to which I provide reference with each post.
So let's get on with it!
First up is a very basic How to Check your brake fluid level in the 991.
NOTE:
The brake fluid level must not exceed the MAX
marking.
Check brake fluid quality. Use only new DOT 4 brake
fluid.
Brake fluid can be ordered using
the Porsche Electronic Parts Catalogue (PET).
The brake fluid reservoir is located under the
cover that is fitted over the brake components (brake booster, brake master
cylinder and hydraulic unit)
The brake fluid level can be checked through the
opening in the cover (arrow) just forward of the (LHD) drivers position.
The brake fluid level should be between the MIN and MAX markings (shown below) which are marked on the sides of the brake fluid reservoir.
fff
1. If the brake fluid level has to be corrected,
move the protective plastic cover as shown below into the service position to expose the brake fluid reservoir.
1.1 Lift up the cover and engage the yellow support in the luggage compartment lid.
2. Correct the brake fluid level (see post Flushing Brake Fluid).
3. The cover is fitted in reverse order.
The above details and illustrations are from the official Porsche Work Manuals for the 991 platform. In this case the document you should obtain is "WM 470801 Checking brake fluid level"
I've come across soooooo many posts online asking questions about vacuum lines, exhaust valves, change-over valves and related that I thought I'd put together an overview with some pictures and illustrations....
Probably the 2 most prevalent discussions about the vacuum system in the 991 are centered on Change Over Valves (COVs), and periodic "failures" that 991 owners have reported (myself included!). Also keep in mind that the S cars, and cars with Porsche Sports Exhaust (PSE) rely on COVs to open-and-close the exhaust valving.
Here is a link to one of the Rennlist 991 conversation threads that covers COV failures / replacements: "Heater quit working again" Search Rennlist, as well as the 6Speedonline boards, for more details....
Here is an illustration and picture of the COV part:
1. Fresh Air Connection
2. Vacuum Line for the Actuator
3. Vacuum Connection
Here's a pic as posted on Rennlist 991 forums by member STG:
As you can see in this picture, the part # is clearly visible imprinted on the side of the device.
Schematic, showing the basic relationship of each COV and vacuum...
The above schematic is straight from the official Porsche Service Information Book, and posted to 6SpeedOnline forums by member SM_ATL. I'll get more into the vacuum line routing later in this post.
As for how many COVs are on a 991 (MY2012.5 through MY 2016), # ranges from 7 to 10 per below:
1. Air Cleaner Flap 2. Acoustic Simulator 3. Heater Shut-Off Valve 4. Exhaust Flaps 5. Coolant Shut-Off Valve on Engine Bypass Circuit 6. Tuning Flap 7. Shut-Off Valve on Heat Exchanger for Gear Wheel Set Oil 8. Shut-Off Valve for Clutch Fluid Heat Exchanger (PDK ONLY) 9. Tuning Flap (cars with full X-51 Power Kit ONLY) 10. Tuning Flap (cars with full X-51 Power Kit ONLY)
#9 and 10 are not a mistake on my part.... cars with X-51 option have multiple tuning flaps apparently. And here is an illustration from Porsche with locations of each of the COVs listed above:
The most common complaints of COV failures are the Exhaust Flaps and Heater Shut-Off Valve. As a 991 owner I've experienced multiple failures of both....!
Here are some vacuum line routing illustrations:
For PDK cars:
For MT cars:
Exhaust Flap line routing....
In the above, the top part of the picture is the 3.8 standard exhaust, whereas the bottom-half of the picture is for the 991 with PSE option.
Based on feedback from nearly all who've posted to 991 enthusiast forums on the topic of COV failures, it seems that no matter what the root cause, the service departments at dealers will NOT proactively replace COVs that haven't failed yet. There have been multiple part # revisions, perhaps indicating attempts at mitigate future failures -- but other than a brief campaign for the earliest MY 2012 991s there has NOT been any recall or service bulletins to replace suspect parts. The SB that I refer to here is #TI-64-12 and NHTSA ID #10048760 if you'd like to look it up.
If you'd like to replace yourself, know that there isn't a WM specific to the procedure. However, there is WM 2400IN, which provides a lot of good pictures and location detail.
I'll continue to compile other COV resources, and post updates from time-to-time. Contact me, or comment below, if you have questions or want to share any other experiences of your own! Thanks!
Recently was asked (within another DIY posting) if there were any guides to removing the diffuser trim pieces from the lower rear of the 991 rear bumper cover.... So I am providing the following DIY guide for those that want to remove the trim parts -- which by default come in matte black plastic from the factory -- for painting, replacement/repair, or to have them custom-painted.
Note that there is an official PCNA Work Manual (WM) for this (WM 636819) procedure, and my guide (along with all illustrations) is based on the instructions provided by that document.
The Porsche official term for the part we are referring to as the diffuser is "rear skirt." Here is an illustration of the part location:
Rear Diffuser location highlighted in dark blue
There are officially (ie WM 636819) three steps involved:
1) Remove both R and L "Tailpipe Shield Covers";
2) Remove bottom "retaining strip";
3) and, Remove "Rear Skirt".
In the WM the precondition is to remove the entire rear apron (or "bumper cover") but it isn't 100% necessary to do so.... I've seen 991 forum member posts where removal of the "diffuser" happened with the apron still on the car. YMMV.
STEP 1: Use a flat-head screwdriver or trim tool to release the shield cover by working around the perimeter of the part - I believe there are 5 tabs. You should be able to just pry and pull to release.
STEP 2:In the second case, and I think personally this is something others have been able to avoid -- there are at least (2) maybe more rivets that the official WM indicates should be "drilled-out" -- meaning they must be replaced if you are reusing the rear skirt parts.
STEP 3: Remove the rear skirt by pulling hard while using a screwdriver / pry tool to release the 14 or so tabs that run along the length of the trim piece.
Installation is opposite of the steps outlined here.
UPDATE: Adding pictures and some additional description of the parts and how they connect to the car... Many thanks to Rennlist member RoWa for the additional material!
Trying to help-out a fellow 991 owner... I was asked about how the footwell trim piece that surrounds the fuse panel attaches. Apparently the owner has a loose trim piece and although can feel that there is a connection point loose, isn't sure how to repair.
Here is a parts diagram showing the parts:
In particular, we are focused on parts identified in this diagram as #'s 5, 6, 7, and 8.
Part #'s and descriptions (always check your part #'s with your service dept or someplace online like SunCoast, as I've now seen couple of different #'s for the following):
(5) 991 555 101 01 Lining Fusebox (you need to add your color code for interior color, which for example in my case is black, or A75)
Again, for each of the colored parts you will need to indicate your interior color code. Additionally, in this case there are both Right and Left-side parts, so you'll also need to indicate /R /L with part # as they don't have separate #'s.
Thanks to Rennlist member RoWa, we now know that in fact the trim panel surrounding the fuse box is secured to the car with a number of small tabs and velcro. Per RoWa....
"The left side has fairly standard trim mounts. The right side is secured with 2 two-sided velcro-like fastners. One side of the velco fastner is mounted on the frame of the car, the other side, mounted on a circular plastic disc, is attached to the fuse panel trim. These discs, mounted on the fuse panel trim, are removable from it - they just pop off."
Following are some pics RoWa provides to help understand how the part attaches. NOTE that in this case all parts are from the driver's-side footwell panel. Referring to right vs left side of part means closer to door vs closer to footrest. Assume on right-hand side of car the part is simply reversed.
Entire trim piece with door attached viewed from behind, noting connection points on both sides.
Closer look at the "left-side" connectors w/velcro.
So in the case where the (5) trim lining the fusebox appears "loose" or has come-off, you'll want to focus on the connection points indicated above.
Just posted-up a reply to fellow enthusiast on RennList looking for a DIY on replacing the steering-wheel. Thought I'd share that here on my blog as well.
The DIY original post is up on 6SpeedOnline 991 forum. I am just linking to it here....
I posted a walk-through video on my YouTube Channel "GTSilver" the other day, walking through the official Porsche AG information system, known as PIWIS TSI. If you haven't already watched that video, check it out here:
Since I've posted that walk-through, I've been asked a number of times about the cost for accessing and using the application... and what plan I think is the best deal. So I thought I'd post another quick video update to the channel where I talk about pricing, show the pricing table, and my thoughts on value, etc.... So please, go check it out!
And please, subscribe to my channel, hit the "like" button and I will keep vlogging!
UPDATED October 5th, 2018: I've added links to two additional documents that are comprehensive PDF of various WMs for 2012-2015 991.1's.
I am posting a complete listing of all the "official" Porsche Work Manuals that I have saved for reference so that others may get an idea of what I have available for various DIY projects, etc. I've also included some other reference materials (such as fault code tables, after-sales training, etc.). Nearly all of the documents I have obtained from the official Porsche PIWIS TSI application, and for the most part all documents are going to be specific to my 2014 MY C4S -- but most all documents will also apply to other 991's, except in obvious cases for CABs, GT3s, and TTs. PIWIS TSI requires an account and is not for free -- there are various payment options, including unlimited annual, pay-as-you-go in blocks of time, and by-the-document.
If you have any questions about the documents, want to chat about the procedures included, etc. please comment. I'll also be posting a short video walkthrough of the PIWIS TSI application online soon so that you can observe how I've obtained the documentation over the past year or two.
Thanks!
Document #
Title
Notes
WM 3X00IN
Technical Values
A rather exhaustive listing of tightening torque settings for transmission, differential, clutch, various covers and brackets, cardan shaft, front final drive (since this is for the 4S), and many more….
WM 1X00IN
Technical Data -- Engine
Another exhausting list of technical specs and values for parts specific to the MA 103 and MA 104 (3.4 and 3.8, respectively) engines, including things like engine weight, crankshaft bearings type and diameter, diameter of intake valves, valve lift, and so so much more! LOL
WM 031400
Intermediate Maintenance (A Markets)
A market only… A long list of regular interval maintenance items, specifically referencing and WMs necessary to perform the maintenance (such as “check headlight adjustment” which in turn refers to WM 941519 “Removing and Installing Healights - section on ‘Information’.”
N/A
Maintenance Checklist
Covers a broad array of ALL maintenance items in the form of a checklist. Doesn’t provide anything additional in the way of technical specs or details.
N/A
991 + 981 MY 2012 + Diagnosis Information -- PDK
Not sure my source on this, but lists all fault codes that might appear in logs for diagnosis purposes
N/A
TCU PDK Table for Sports Cars MY14
From Porsche AG, but I can’t vouch for authenticity. Nice table of PDK fault codes specific to 2014 991
WM 3734N0
Eliminating Transmission Symptoms - Reworking PDK transmission (Repair measures in the event of various symptoms/SY0213)
Bulletin #27/12, Bulletin Group 2 2601
Sports Exhaust Install / Retrofit
This covers most 991’s, except W/ X-51 Powerkit
WM 2400IN
Overview of Vacuum System, Line Routing and Change Over Valves
Good overview, covers ALL COVs on vacuum system
PNA P95 003
AfterSales Training: Advanced Electrical Systems
This is not specific to the 991…. Ed 5/06
PNA P00 103
AfterSales Training: General Servicing & Repair -- Sports Cars
This is not specific to the 991… Ed 5/07
WM 647519
Removing and Installing Rear Side Window
WM 927219
Removing and Installing Spray Nozzle for Headlight Cleaning System
WM 405019
Removing and Installing Front Wheel Bearing Housing
WM 427119
Removing and Installing Rear Spring Strut
WM 605419
Removing and Installing Seal for Roof Assembly
WM 636819
Removing and Installing Rear Skirt
These are trim pieces around the tailpipes
WM 663319
Removing and Installing Roof Moulding
WM 665055
Replacing Rear Logo
Rear badging- You must have the Porsche Special Tools for placement of rear badging, but removal is explained as well.
WM 668919
Removing and Installing Rearview Mirror
Exterior door mirror… Standard mirror only, Non-SD and Non-Folding
WM 691119
Removing and Installing Front Three-Point Belt
WM 705919
Removing and Installing Front Door Panel
WM 707519
Removing and Installing Rear Side Trim Panel
WM 708519
Removing and Installing Rear Roof Trim Panel
WM 947119
Removing and Installing Auxiliary Headlight
LED DRLs
ATI Bulletin Group 0, #1302
PIWIS Tester II Overview
Advanced Technical Information bulletin….
WM 706719
Removing and Installing B-Pillar Trim Panel
WM 681719
Removing and Installing Centre Console
WM 706819
Removing and Installing C-pillar Trim Panel
WM 900319
Removing and Installing Dashboard Inset
WM 705819
Removing and Installing Dashboard Moulding on Driver’s Side
WM 571719
Removing and Installing Door Lock
WM 574519
Removing and Installing Door Opener
WM 963819
Removing and Installing Front Camera
I believe this is specific to 2015+ TT (NOT MY 13, 14, or 15 non-Turbo)
WM 577319
Removing and Installing Front Door Control Unit
WM 571119
Removing and Installing Front Door Handle
WM 705919
Removing and Installing Front Door Panel
WM 573019
Removing and Installing Front Door Sub-Frame
WM 340819
Removing and Installing Gearshift Bracket
WM 914319
Removing and Installing Reversing Camera
This does NOT include a retrofit guide, so it assumes the vehicle was already optioned with the necessary wiring harness. Also only applies to TT’s
WM 341220
Removing and Installing Shift and Selector Cables
WM 340419
Removing and Installing Shift-Lever Knob
This is manual tranny only...
WM 481319
Removing and Installing Trim Panel (Steering-Column Switch)
WM 665819
Removing and Installing Upper Part of Rear Spoiler
WM 4X00IN
Lifting the Vehicle
WM 0850IN
Symptoms - Body Interior
Covers some basic issues reported by owners with reference to service bulletins for resolving.