Following are the steps necessary to remove the "standard" rear active spoiler on a Porsche 991. You can also remove just the "upper cover" or painted surface if you don't need to remove the entire wing assembly with motor. Most often 991 owners are removing the entire assembly to install a new "ducktail" or sport design rear spoiler.
The tools you'll need are simple -- some torx bits / screwdrivers, and if you want to protect any surfaces from risk of scratches, some painters tape.
Before you begin, raise the spoiler.
To begin removal, you'll need to
Remove tail lights
Remove fan shroud / cover from engine
Next, on the right / passenger side (LHD vehicles) remove the inner trim cover by pulling up gently, and disengage the emergency release cable. The cover is a black plastic part that covers the screws you'll need to remove. Check that you haven't damaged any of the clips that hold the trim pieces in place.
On the left or driver-side, remove the upper part of the oil filler neck. There is a fastening screw that you need to remove -- it is visible on the side closest to the center of the engine bay. You will have to remove the coolant cap as well, and to keep anything from falling-down into the coolant filler put a piece of tape over the opening.
Next, remove the fastening screws on the support plates that are at the base of the active wing extension arms. I believe there are 2 T-45 screws at each side.
Remove the fastening screws running along the top edge of the rear apron / bumper cover. These must be removed to release the spoiler assembly.
Release the electrical plug connection for the rear spoiler motor. Pull it off completely. The connection is in the engine bay over on the right or passenger side.
The rear spoiler assembly is now disconnected and ready for removal. You can do the next step by yourself, but I would recommend having a helper to be sure not to drop, scratch or damage anything as you pull the assembly out of the car.
To remove the spoiler assembly, tilt it in the direction of the rear bumper cover, then forwards towards you as shown in the following illustration:
NOTE: There is a guide pin on each side that you need to clear -- and when reinstalling (if that is what you will do) you must seat the spoiler assembly into place using the guide pin.
And that is it! You now have the rear spoiler with motor etc removed from the car.
I haven't taken any pictures of my own, so if you complete this project and would like to contribute to this DIY guide, please send any pictures to me and I'll add them to this post.... Thanks!
UPDATE: Adding pictures and some additional description of the parts and how they connect to the car... Many thanks to Rennlist member RoWa for the additional material!
Trying to help-out a fellow 991 owner... I was asked about how the footwell trim piece that surrounds the fuse panel attaches. Apparently the owner has a loose trim piece and although can feel that there is a connection point loose, isn't sure how to repair.
Here is a parts diagram showing the parts:
In particular, we are focused on parts identified in this diagram as #'s 5, 6, 7, and 8.
Part #'s and descriptions (always check your part #'s with your service dept or someplace online like SunCoast, as I've now seen couple of different #'s for the following):
(5) 991 555 101 01 Lining Fusebox (you need to add your color code for interior color, which for example in my case is black, or A75)
Again, for each of the colored parts you will need to indicate your interior color code. Additionally, in this case there are both Right and Left-side parts, so you'll also need to indicate /R /L with part # as they don't have separate #'s.
Thanks to Rennlist member RoWa, we now know that in fact the trim panel surrounding the fuse box is secured to the car with a number of small tabs and velcro. Per RoWa....
"The left side has fairly standard trim mounts. The right side is secured with 2 two-sided velcro-like fastners. One side of the velco fastner is mounted on the frame of the car, the other side, mounted on a circular plastic disc, is attached to the fuse panel trim. These discs, mounted on the fuse panel trim, are removable from it - they just pop off."
Following are some pics RoWa provides to help understand how the part attaches. NOTE that in this case all parts are from the driver's-side footwell panel. Referring to right vs left side of part means closer to door vs closer to footrest. Assume on right-hand side of car the part is simply reversed.
Entire trim piece with door attached viewed from behind, noting connection points on both sides.
Closer look at the "left-side" connectors w/velcro.
So in the case where the (5) trim lining the fusebox appears "loose" or has come-off, you'll want to focus on the connection points indicated above.
I am always looking to "tinker" with my toys, and can't leave well enough alone! Hence the following DIY.
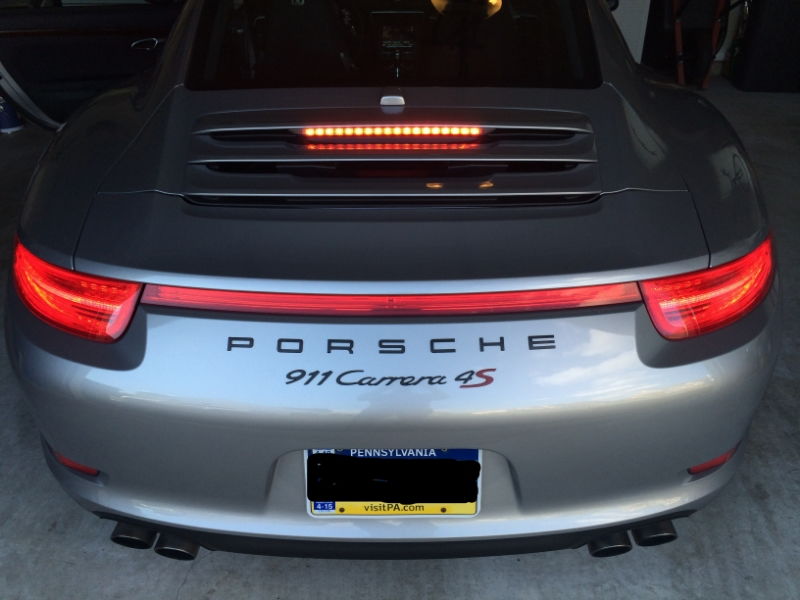
I completed the following project about a year ago, never had a chance to post this up, but recent questions by members PorscheCrazy and others reminded me. Maybe someone will find this useful... If you'd like to see a video of the blinking upper brake light in action, jump to the bottom of this post for a link to my YouTube channel GTSilver....
This DIY covers modification to my upper third brake light wiring to alter the LED from a single constant "on" steady state to a blinking light when brakes are applied.
I actually got this idea from a member of a non-6Speedonline Porsche forum that is very popular. ;-)
I had always thought that having a blinking third brake light would be a great safety enhancement, and more so for smaller sports cars. SUV and mini-van drivers don't realize they just can't stop in the same short distance, this is for them or even those tailgaters and morons who love to ride up as close as possible to prove a point or something...
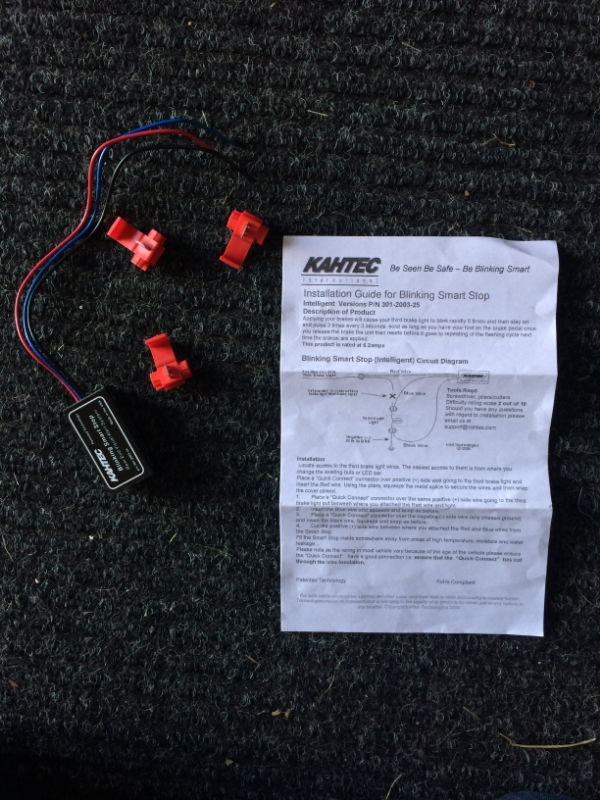
Anyways, I found a small company that produces a controller that when tapped-into your brake light wiring modify from steady to blinking. The company is Kahtec Technologies International. www.kahtec.com This US company produces several products all focused on safety modifications for brake lighting. Someone recently mentioned that there are other products out there -- I do not have any knowledge of them or experience.
I went with the Kahtec "Intelligent" product, which when added claims to flash the third brake light 6 times rapidly when first hitting the brakes, then a steady 3 blinks every 6 seconds for as long you keep your foot on the pedal.
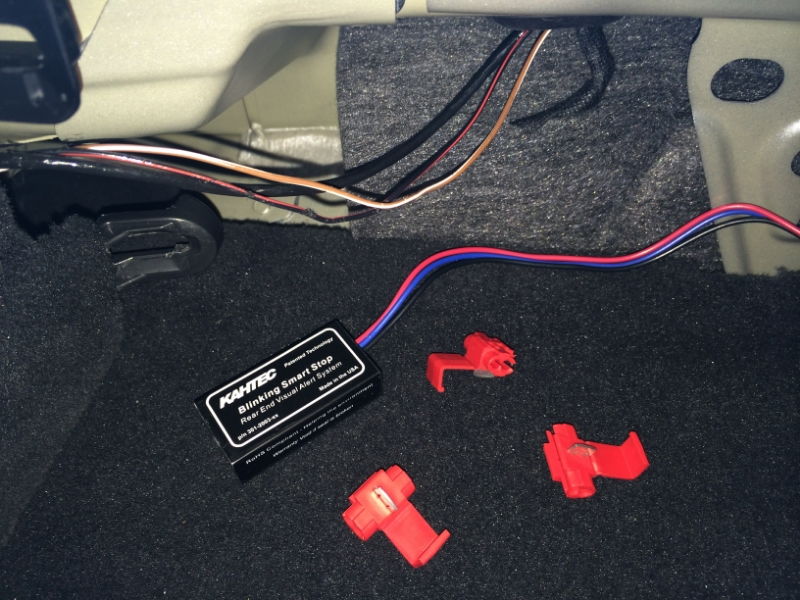
I ordered on the Kahtec web site, and in a couple of days the small box arrived as advertised. The box contained a small wired black box with Red, Black, Blue wires, set of wire taps, and instruction sheet.
The instructions are very clear, easy to read and I felt comfortable that tapping into my wiring would be reversible should I have to switch back. So I set off in search of the best location to grab the wires in my car ('14 C4S coupe). I originally went about pulling the third brake light entirely from the rear vent grill lid (see my other DIY DIY: 991 Upper Third Brake Light Removal but after doing so, decided that there just wasn't a good location back there to mount the Kahtec black box. Also, Kahtec states that the box is NOT weather proof.
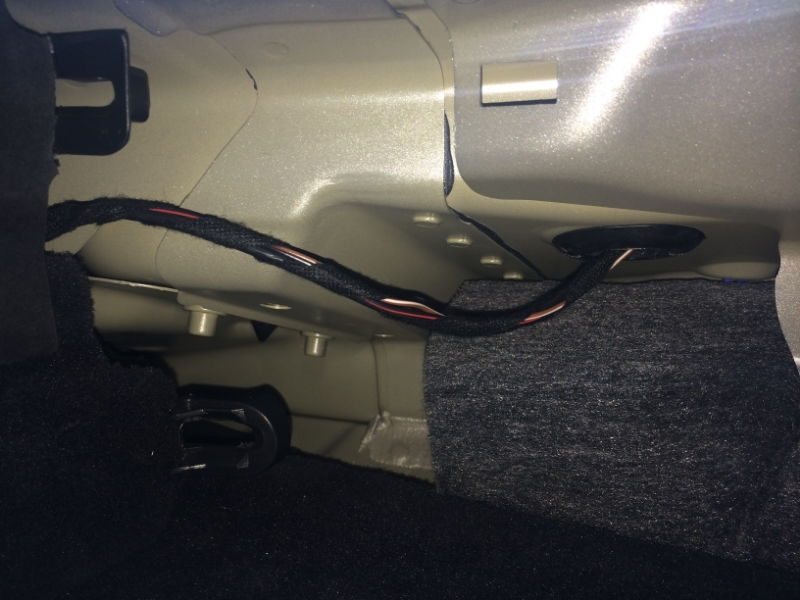
So, I recalled locating the wiring harness for the third brake light and antennae bump back when I was wiring my car for the back-up camera. I went back into the interior, passenger side under the back window... I pulled the trim off, and right in front of me was the wiring bundle I needed! It was great not to have to dig and search for wires for once!!
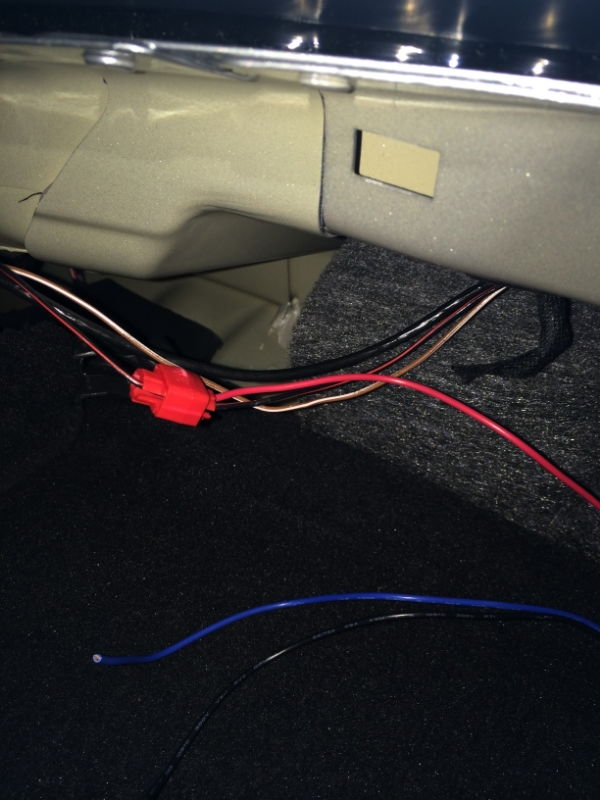
Here's the bundle -- there are three wires. Black/Red, Brown/White, and a larger solid black cable. The cables run from the passenger side of the car up into a rubber grommet (upper right side of pic below), which leads into the trunklid area and up to the grill where the upper third brake light resides.
For reference - in the pic below, LEFT is the passenger-side rear corner under window, RIGHT is near the Sound Symposer opening under the center of the rear window.
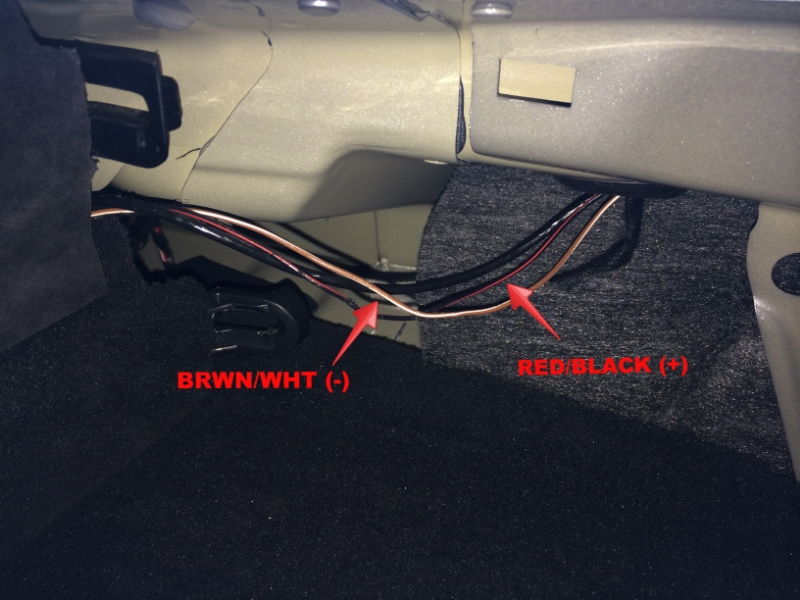
You'll need to slit the wrapping-tape to separate the wires...
I quickly determined that BLK/RED is power (+) and the BRWN/WHT is ground (-). The solid black cable is for SAT/NAV antennae so I didn't mess with it (hmmm.... what project might I need THAT wire for???).
With the wires separated, the next few steps are easy to follow right from the Kahtec instructions included...
Get the Kahtec black box, and the three red plastic wire taps ready. (NOTE: I've since modified the wires further. I don't like using the clamp wire taps, so I went back and replaced with soldered bullet disconnects. Much more reliable, easy to disconnect if necessary, and will maintain a much "cleaner" connection. I'll post some new pics of the modification to the connectors when I get a chance.)
Hold the BLK/RED wire, pull it into the red wire tap.
Take the RED wire from the Kahtec black box and push it into the red wire clamp.
Clamp down on the red tap until you hear it "snap" and use a pair of pliers to make sure you've pushed through both wires.
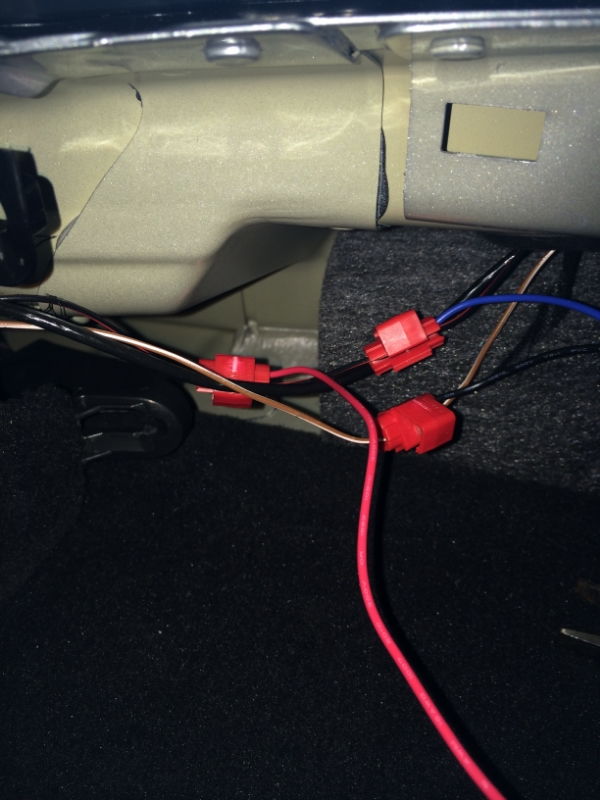
Now take hold of the BLK/RED wire about an inch away from the tap you just installed, and push the wire into another red wire tap.
Take the BLUE wire from the Kahtec black box and push the end into the red wire tap.
Clamp down to complete the splice connection.
Take the third red tap, and holding the BRWN/WHT wire push it into the tap.
Take the BLACK wire from the Kahtec box and push it into the red tap and clamp down.
The last very important step? Make sure you follow the directions, and CUT the BLK/RED wire somewhere between the first and second red taps you just added in the steps above. Doing so now causes all power to run through the Kahtec black box to the upper third brake light. If you forget this last step, your brake light will continue to function as normal, without the blinking.
If for some reason you didn't get the wiring correct, you can disconnect the taps and re-try. Try to leave as much wire length as possible in case you need to restore to original state without the module. Also, when using clamp taps, it is possible that you didn't get a clean cut through both wires -- so if you are not getting the module to work, or you get any dash warnings about "third brake light not functioning" you can start your troubleshooting with the clamps.
If you take-on this project, please post your end results and experience here for all to share!
I have a video of the brake light blinking... As well as the removal and setting everything back to "stock". More on that later - but short story is I wanted to return the light to original factory before selling the car.... ;-)
The other day I removed the 3M vinyl wrap from the hood of my 2014 991 C4S... Created a short, "fast-forward" video for my YouTube channel (GTSilver - Please follow!).
As always, Thank You to everyone for their support! Please comment below, and for more pictures, videos, and other stuff subscribe to my Twitter feed @GTSilver991!
Just posted-up a reply to fellow enthusiast on RennList looking for a DIY on replacing the steering-wheel. Thought I'd share that here on my blog as well.
The DIY original post is up on 6SpeedOnline 991 forum. I am just linking to it here....
I've put together a YouTube video showing how to remove the full inner-door panel of my 2014 991 C4S. The procedure for ALL 991 model years and configurations is the same, and I believe this also applies to the 981 platform as well.
I had to add narration after the video was shot -- too much background noise at the time made it hard to record. If you need additional guidance, let me know. I also have step-by-step written instructions.
The procedure is really quite simple, and even for the novice is very low-risk and you should be able to get the full panel off within 10-15 minutes using this video...
Enjoy!
Porsche 911 991 C4S Inner Door Panel Removal & Installation
I just posted a new video up on my YouTube Channel:
This is a somewhat rambling walkthrough / overview of the official Porsche PIWIS TSI, or Porsche Integrated Workshop Information System - Technical Service Information.
I posted an index recently of all the Work Manuals and some other reference documents I've used over the past year or two working on my own 991 -- thought this might also be helpful to others who like to get their own hands dirty.
UPDATED October 5th, 2018: I've added links to two additional documents that are comprehensive PDF of various WMs for 2012-2015 991.1's.
I am posting a complete listing of all the "official" Porsche Work Manuals that I have saved for reference so that others may get an idea of what I have available for various DIY projects, etc. I've also included some other reference materials (such as fault code tables, after-sales training, etc.). Nearly all of the documents I have obtained from the official Porsche PIWIS TSI application, and for the most part all documents are going to be specific to my 2014 MY C4S -- but most all documents will also apply to other 991's, except in obvious cases for CABs, GT3s, and TTs. PIWIS TSI requires an account and is not for free -- there are various payment options, including unlimited annual, pay-as-you-go in blocks of time, and by-the-document.
If you have any questions about the documents, want to chat about the procedures included, etc. please comment. I'll also be posting a short video walkthrough of the PIWIS TSI application online soon so that you can observe how I've obtained the documentation over the past year or two.
Thanks!
Document #
Title
Notes
WM 3X00IN
Technical Values
A rather exhaustive listing of tightening torque settings for transmission, differential, clutch, various covers and brackets, cardan shaft, front final drive (since this is for the 4S), and many more….
WM 1X00IN
Technical Data -- Engine
Another exhausting list of technical specs and values for parts specific to the MA 103 and MA 104 (3.4 and 3.8, respectively) engines, including things like engine weight, crankshaft bearings type and diameter, diameter of intake valves, valve lift, and so so much more! LOL
WM 031400
Intermediate Maintenance (A Markets)
A market only… A long list of regular interval maintenance items, specifically referencing and WMs necessary to perform the maintenance (such as “check headlight adjustment” which in turn refers to WM 941519 “Removing and Installing Healights - section on ‘Information’.”
N/A
Maintenance Checklist
Covers a broad array of ALL maintenance items in the form of a checklist. Doesn’t provide anything additional in the way of technical specs or details.
N/A
991 + 981 MY 2012 + Diagnosis Information -- PDK
Not sure my source on this, but lists all fault codes that might appear in logs for diagnosis purposes
N/A
TCU PDK Table for Sports Cars MY14
From Porsche AG, but I can’t vouch for authenticity. Nice table of PDK fault codes specific to 2014 991
WM 3734N0
Eliminating Transmission Symptoms - Reworking PDK transmission (Repair measures in the event of various symptoms/SY0213)
Bulletin #27/12, Bulletin Group 2 2601
Sports Exhaust Install / Retrofit
This covers most 991’s, except W/ X-51 Powerkit
WM 2400IN
Overview of Vacuum System, Line Routing and Change Over Valves
Good overview, covers ALL COVs on vacuum system
PNA P95 003
AfterSales Training: Advanced Electrical Systems
This is not specific to the 991…. Ed 5/06
PNA P00 103
AfterSales Training: General Servicing & Repair -- Sports Cars
This is not specific to the 991… Ed 5/07
WM 647519
Removing and Installing Rear Side Window
WM 927219
Removing and Installing Spray Nozzle for Headlight Cleaning System
WM 405019
Removing and Installing Front Wheel Bearing Housing
WM 427119
Removing and Installing Rear Spring Strut
WM 605419
Removing and Installing Seal for Roof Assembly
WM 636819
Removing and Installing Rear Skirt
These are trim pieces around the tailpipes
WM 663319
Removing and Installing Roof Moulding
WM 665055
Replacing Rear Logo
Rear badging- You must have the Porsche Special Tools for placement of rear badging, but removal is explained as well.
WM 668919
Removing and Installing Rearview Mirror
Exterior door mirror… Standard mirror only, Non-SD and Non-Folding
WM 691119
Removing and Installing Front Three-Point Belt
WM 705919
Removing and Installing Front Door Panel
WM 707519
Removing and Installing Rear Side Trim Panel
WM 708519
Removing and Installing Rear Roof Trim Panel
WM 947119
Removing and Installing Auxiliary Headlight
LED DRLs
ATI Bulletin Group 0, #1302
PIWIS Tester II Overview
Advanced Technical Information bulletin….
WM 706719
Removing and Installing B-Pillar Trim Panel
WM 681719
Removing and Installing Centre Console
WM 706819
Removing and Installing C-pillar Trim Panel
WM 900319
Removing and Installing Dashboard Inset
WM 705819
Removing and Installing Dashboard Moulding on Driver’s Side
WM 571719
Removing and Installing Door Lock
WM 574519
Removing and Installing Door Opener
WM 963819
Removing and Installing Front Camera
I believe this is specific to 2015+ TT (NOT MY 13, 14, or 15 non-Turbo)
WM 577319
Removing and Installing Front Door Control Unit
WM 571119
Removing and Installing Front Door Handle
WM 705919
Removing and Installing Front Door Panel
WM 573019
Removing and Installing Front Door Sub-Frame
WM 340819
Removing and Installing Gearshift Bracket
WM 914319
Removing and Installing Reversing Camera
This does NOT include a retrofit guide, so it assumes the vehicle was already optioned with the necessary wiring harness. Also only applies to TT’s
WM 341220
Removing and Installing Shift and Selector Cables
WM 340419
Removing and Installing Shift-Lever Knob
This is manual tranny only...
WM 481319
Removing and Installing Trim Panel (Steering-Column Switch)
WM 665819
Removing and Installing Upper Part of Rear Spoiler
WM 4X00IN
Lifting the Vehicle
WM 0850IN
Symptoms - Body Interior
Covers some basic issues reported by owners with reference to service bulletins for resolving.


 If you'd like to see a video of the blinking upper brake light in action, jump to the bottom of this post for a link to my YouTube channel GTSilver....