Tuesday, October 11, 2016

How to Remove a Porsche 991 Rear Spoiler

Following are the steps necessary to remove the "standard" rear active spoiler on a Porsche 991.  You can also remove just the "upper cover" or painted surface if you don't need to remove the entire wing assembly with motor.  Most often 991 owners are removing the entire assembly to install a new "ducktail" or sport design rear spoiler.

The tools you'll need are simple -- some torx bits / screwdrivers, and if you want to protect any surfaces from risk of scratches, some painters tape.

Before you begin, raise the spoiler.

To begin removal, you'll need to
  1. Remove tail lights
  2. Remove fan shroud / cover from engine
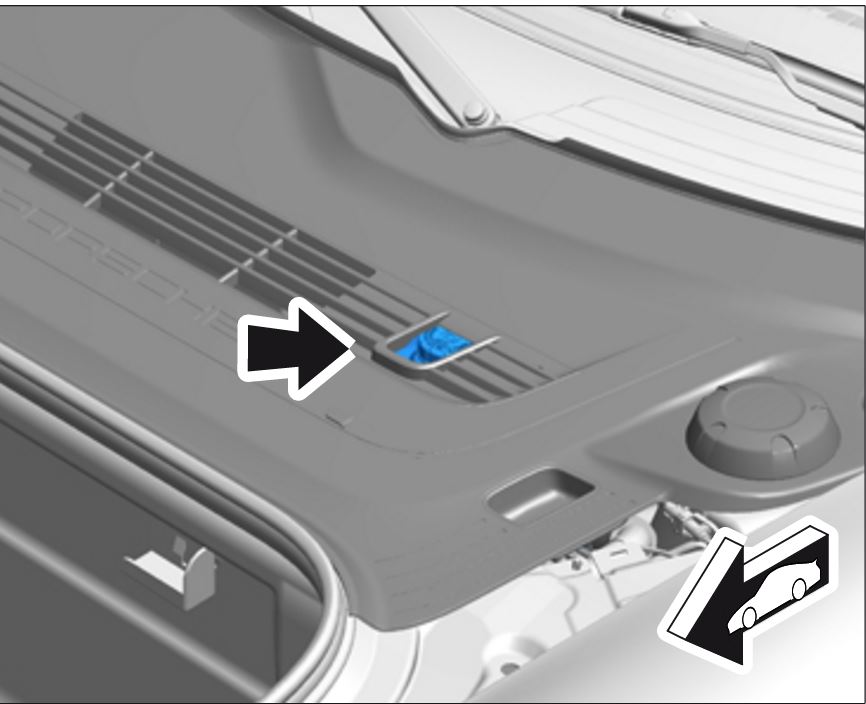
Next, on the right / passenger side (LHD vehicles) remove the inner trim cover by pulling up gently, and disengage the emergency release cable.  The cover is a black plastic part that covers the screws you'll need to remove. Check that you haven't damaged any of the clips that hold the trim pieces in place.

On the left or driver-side, remove the upper part of the oil filler neck.  There is a fastening screw that you need to remove -- it is visible on the side closest to the center of the engine bay.  You will have to remove the coolant cap as well, and to keep anything from falling-down into the coolant filler put a piece of tape over the opening.

Next, remove the fastening screws on the support plates that are at the base of the active wing extension arms.  I believe there are 2 T-45 screws at each side.

Remove the fastening screws running along the top edge of the rear apron / bumper cover.  These must be removed to release the spoiler assembly.

Release the electrical plug connection for the rear spoiler motor.  Pull it off completely.  The connection is in the engine bay over on the right  or passenger side.

The rear spoiler assembly is now disconnected and ready for removal. You can do the next step by yourself, but I would recommend having a helper to be sure not to drop, scratch or damage anything as you pull the assembly out of the car.

To remove the spoiler assembly, tilt it in the direction of the rear bumper cover, then forwards towards you as shown in the following illustration:


NOTE:  There is a guide pin on each side that you need to clear -- and when reinstalling (if that is what you will do) you must seat the spoiler assembly into place using the guide pin.

And that is it!  You now have the rear spoiler with motor etc removed from the car.

I haven't taken any pictures of my own, so if you complete this project and would like to contribute to this DIY guide, please send any pictures to me and I'll add them to this post....  Thanks!

For reference:
  • Fastening screw securing rear spoiler to rear apron tightening torque 3.2 Nm (2 ftlb.) +/-0.5 Nm (+/-0.5 ftlb.) 
  • Fastening screw securing support plate to body. Tightening torque 23 Nm (17 ftlb.)


Thursday, October 6, 2016

Porsche 991: Bleeding Brake System

And our last brake service post is a general how-to bleed the brake system on a Porsche 991....  If you missed 'em, there are two other guides available (all based on my experience with the official Porsche Work Manuals....).
Bleeding Brake Fluid

First, some important Notes:
  • Observe brake fluid quality. 
  • Use only new DOT 4 brake fluid. 
  • This brake fluid is available under the following part numbers: Quantity supplied: 1 litre = 000.043.203.66; 30 litres = 000.043.203.67. 
  • There are two bleeder valves on each brake caliper. Brake fluid must be drained at both bleeder valves. 
  • Observe specified sequence: Bleed the outer bleeder valve on each caliper first.
1.  Place cover in service position.
  • Unclip the cover at the left and right, lift it up and engage the yellow support in the luggage compartment lid ­1­ to secure it.
    Place protective cover in service position
2.  Open the cap on the brake fluid reservoir, which is located on drivers side of car.

3.  Connect a bleeding device to the brake fluid reservoir.
  • Switch on the bleeding device. Bleeding pressure is approx. 2.0 bar.
    Connect a bleeding device to the brake fluid reservoir
3. Continue the following bleeding procedures at the brake calipers (no prescribed sequence, but note sequence of bleeding from outside valve first, then inside valve...).
  • Use a transparent hose and a collecting bottle to check the escaping brake fluid for cleanliness, absence of air bubbles and to determine the amount of brake fluid used.  The Porsche manuals don't indicate any specific time for bleeding.
  • Open each bleeder valve until clear, bubble-­free brake fluid emerges.
  • NOTE:  Continuously pump the brake pedal slowly during the bleeding process (second mechanic required).
4.  Only when replacing the hydraulic unit: Bleed the secondary circuit using PIWIS Tester II 9818. Otherwise, continue with the concluding steps (Steps 5 and 6).
  • Select >>PSM>>Maintenance/repairs>>Bleeding hydraulic unit<< in the control unit overview.  The four wheel brakes are bled alternately (as per Tester display).
  • Remove vent hoses and tighten bleeder valves to 14 Nm (10.5 ftlb.).
  • Remove PIWIS Tester II.
5.  Switch off the bleeding device and remove the adapter at the brake fluid reservoir.

6.  Visually check the brake fluid level.  The brake fluid level must be between the MIN and MAX markings.  Correct the brake fluid level if necessary.
Min / Max levels on fluid reservoir

7. Fit cover over the brake fluid reservoir (move out of service position).

The above details and illustrations are from the official Porsche Work Manuals for the 991 platform.

In this case the document you should obtain is "WM 470107 Bleeding the brake system"

Porsche 991: Checking Brake Fluid

This is first in a short series of posts covering brake fluid service procedures for the Porsche 991 model line...

Checking Brake Fluid

All of the procedures I cover follow the official Porsche NA Work Manuals, to which I provide reference with each post.

So let's get on with it!

First up is a very basic How to Check your brake fluid level in the 991.

NOTE:
  • The brake fluid level must not exceed the MAX marking.
  • Check brake fluid quality. Use only new DOT 4 brake fluid.
  • Brake fluid can be ordered using the Porsche Electronic Parts Catalogue (PET).
  • The brake fluid reservoir is located under the cover that is fitted over the brake components (brake booster, brake master cylinder and hydraulic unit)
The brake fluid level can be checked through the opening in the cover (arrow) just forward of the (LHD) drivers position.


The brake fluid level should be between the MIN and MAX markings (shown below) which are marked on the sides of the brake fluid reservoir.
fff

1.  If the brake fluid level has to be corrected, move the protective plastic cover  as shown below into the service position to expose the brake fluid reservoir.

     1.1  Lift up the cover and engage the yellow support in the luggage compartment lid.

2.  Correct the brake fluid level (see post Flushing Brake Fluid).

3.  The cover is fitted in reverse order. 

The above details and illustrations are from the official Porsche Work Manuals for the 991 platform.  In this case the document you should obtain is "WM 470801 Checking brake fluid level"

Porsche 991: Flushing Brake Fluid (replacing)

This is my second blog post in a short series covering brake fluid service procedures for the Porsche 991 model line...

Flushing Brake Fluid (replacing)

All of the procedures I cover in this series follow the official Porsche NA Work Manuals, to which I provide reference with each post.

You don't need to take the wheels off, or jack-up the car...  BUT, getting to the inner bleeder valves will be very tricky and I would highly recommend removing the wheels.  In my case, I chose to get the car up on stands and remove all the wheels.  This way as I begin bleeding I can move from caliper to caliper without having to stop and remove each wheel along the way.  My own preference, YMMV and I am sure some are very content with other ways of doing a brake fluid flush....

So here is my car up on stands:


So let's get on with it!

If you are planning to replace the brake fluid in your 991, you should do the following....
1.  Place cover in service position.

     1.1  Unclip the cover at the left and right, lift it up and engage the yellow support in the luggage                 compartment lid -1- .

Open Servic

2.  Open the cap on the reservoir, which is located on the driver-side under the service cover.
3.  Connect a bleeding device to the brake fluid reservoir.
4.  Switch on the bleeding device. Pressure when changing brake fluid should be ~ 2.0 bar (29 psi).

Connect Bleeding Device
NOTE:
  • Check brake fluid quality. Use only new DOT 4 brake fluid. 
  • Brake fluid can be ordered using the Porsche Electronic Parts Catalogue (PET). 
  • There are two bleeder valves on each brake caliper. Brake fluid must be drained at both bleeder valves.   
NOTE:   The official WM from Porsche doesn't indicate any sequence or order to which (inner or outer) bleeder valve to start with -- just that you need to drain from BOTH.

5.  Continue to change the brake fluid at the brake calipers (no prescribed sequence, although some would suggest that you start at the farthest wheel from the master cylinder and work "towards" it...).

  • Use a transparent hose and a collecting bottle to check the escaping brake fluid for cleanliness, absence of air bubbles and to determine the amount of brake fluid used.
  • Drain brake fluid at both bleeder valves on each brake caliper. Per brake caliper: → Change brake fluid (on each wheel): approx. 250 cm3
  • The shop manual doesn't indicate any amount of time to let bleed, or anything like that.  Just that you should capture the old fluid at each wheel, measure, and when all done replace with same amount (roughly).

6.  After fluid no longer flows tighten bleeder valves to the stipulated tightening torque and remove bleeder hoses. Tightening torque 14 Nm (10.5 ftlb.)

Move to next wheel.... and when done all 4,

7.  Switch off the bleeding device and remove the adapter at the reservoir.

  • Visually check the brake fluid level.  The brake fluid level must be between the MIN and MAX markings. Correct the brake fluid level if necessary.

6. Fit cover over the brake fluid reservoir (move out of service position).

The above details and illustrations are from the official Porsche Work Manuals for the 991 platform.

In this case the document you should obtain is "WM 470855 Changing brake fluid"

Monday, October 3, 2016

Porsche 991 COV & Vacuum Lines Overview

UPDATE:  I'm adding links to couple of documents from Porsche specific to the article below....


I've come across soooooo many posts online asking questions about vacuum lines, exhaust valves, change-over valves and related that I thought I'd put together an overview with some pictures and illustrations....

Probably the 2 most prevalent discussions about the vacuum system in the 991 are centered on Change Over Valves (COVs), and periodic "failures" that 991 owners have reported (myself included!).  Also keep in mind that the S cars, and cars with Porsche Sports Exhaust (PSE) rely on COVs to open-and-close the exhaust valving.

Here is a link to one of the Rennlist 991 conversation threads that covers COV failures / replacements:  "Heater quit working again"  Search Rennlist, as well as the 6Speedonline boards, for more details....

Here is an illustration and picture of the COV part:


1. Fresh Air Connection
2. Vacuum Line for the Actuator
3. Vacuum Connection

Here's a pic as posted on Rennlist 991 forums by member STG:


As you can see in this picture, the part # is clearly visible imprinted on the side of the device.

Schematic, showing the basic relationship of each COV and vacuum...


The above schematic is straight from the official Porsche Service Information Book, and posted to 6SpeedOnline forums by member SM_ATL.  I'll get more into the vacuum line routing later in this post.

As for how many COVs are on a 991 (MY2012.5 through MY 2016), # ranges from 7 to 10 per below:

1. Air Cleaner Flap
2. Acoustic Simulator
3. Heater Shut-Off Valve
4. Exhaust Flaps
5. Coolant Shut-Off Valve on Engine Bypass Circuit
6. Tuning Flap
7. Shut-Off Valve on Heat Exchanger for Gear Wheel Set Oil
8. Shut-Off Valve for Clutch Fluid Heat Exchanger (PDK ONLY)
9. Tuning Flap (cars with full X-51 Power Kit ONLY)
10. Tuning Flap (cars with full X-51 Power Kit ONLY)


#9 and 10 are not a mistake on my part.... cars with X-51 option have multiple tuning flaps apparently. 

And here is an illustration from Porsche with locations of each of the COVs listed above:


The most common complaints of COV failures are the Exhaust Flaps and  Heater Shut-Off Valve.  As a 991 owner I've experienced multiple failures of both....!

Here are some vacuum line routing illustrations:

For PDK cars:

For MT cars:

Exhaust Flap line routing....

In the above, the top part of the picture is the 3.8 standard exhaust, whereas the bottom-half of the picture is for the 991 with PSE option.

Based on feedback from nearly all who've posted to 991 enthusiast forums on the topic of COV failures, it seems that no matter what the root cause, the service departments at dealers will NOT proactively replace COVs that haven't failed yet.  There have been multiple part # revisions, perhaps indicating attempts at mitigate future failures -- but other than a brief campaign for the earliest MY 2012 991s there has NOT been any recall or service bulletins to replace suspect parts.  The SB that I refer to here is #TI-64-12 and NHTSA ID #10048760 if you'd like to look it up.

If you'd like to replace yourself, know that there isn't a WM specific to the procedure.  However, there is WM 2400IN, which provides a lot of good pictures and location detail.  

I'll continue to compile other COV resources, and post updates from time-to-time.  Contact me, or comment below, if you have questions or want to share any other experiences of your own!  Thanks!