Friday, January 23, 2015

DIY - Porsche 991 911 Side Mirror Removal

(UPDATED:  Added my YouTube video)

Following is a DIY on how to remove the exterior side mirrors from the 991 doors. In my case I have a '14 991 C4S with standard mirrors (NOT Sport Design/GT3 style). I also don't have the power folding option. Not sure how much different the removal steps would be other than perhaps additional wires in the harness...


As I started this project, I was amazed at just how easy it is to get to the single bolt holding the mirror to the door!

Tools required:
  • Torx T-40 with long / extension bar
  • Interior Panel Tools

SAFETY: You shouldn't have anything to worry about with this little DIY, but CYA you can disconnect the negative (-) terminal connection on your battery to be sure that the side door airbag doesn't trigger.... This is a very very remote possibility in this case -- I would be more concerned with this if I were removing the entire door panel!

SHORTCUT:  If you would rather see someone doing the DIY, rather than describing it, check out my YouTube video:


You may also want to put down some towels, other bits to protect any surfaces you are worried about. As always, just take your time, don't force anything (unnecessarily!), and you shouldn't have any worries.

SORRY for the shadows and some blurry pics! car was partially in the sun in my garage, and I was holding my iPhone with one hand.... 

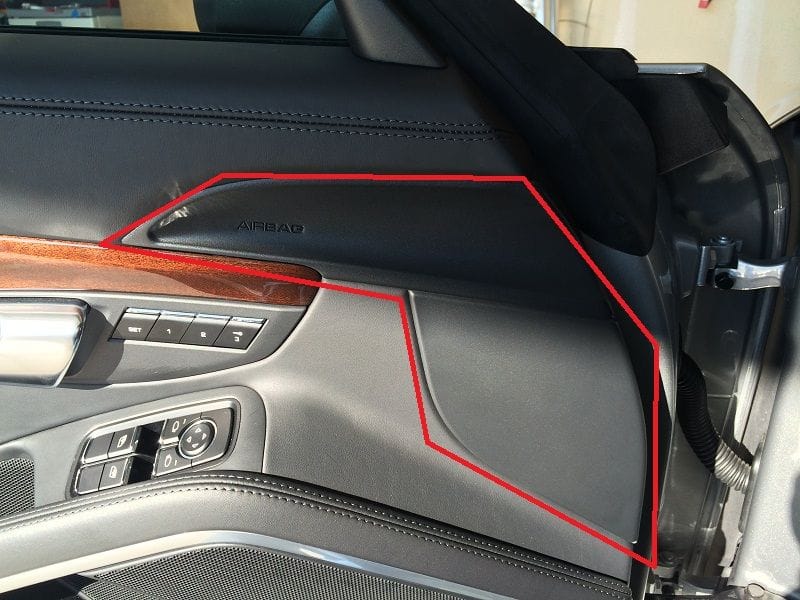
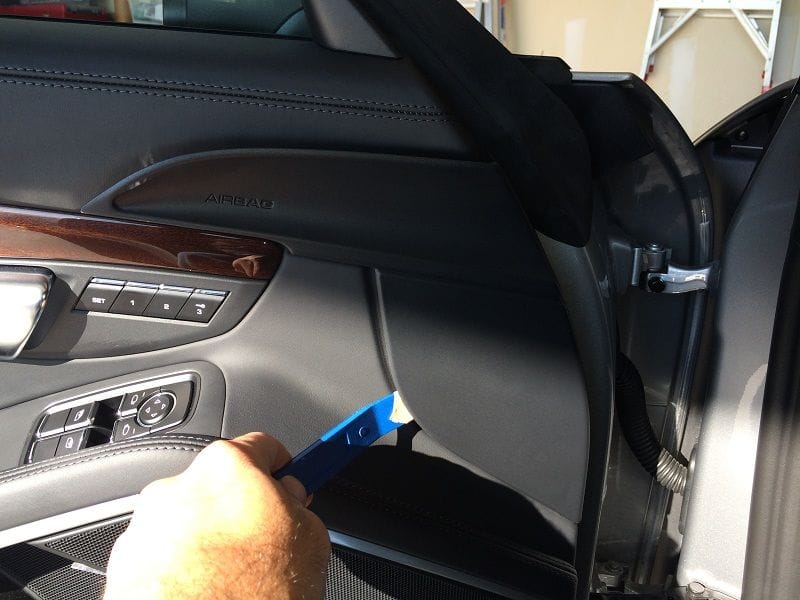
Step 1: Open the door. At the front edge, there are what appear to be two plastic panels - they are actually one large panel - where you see "Airbag". In this pic I've indicated the panel.

Click the image to open in full size.

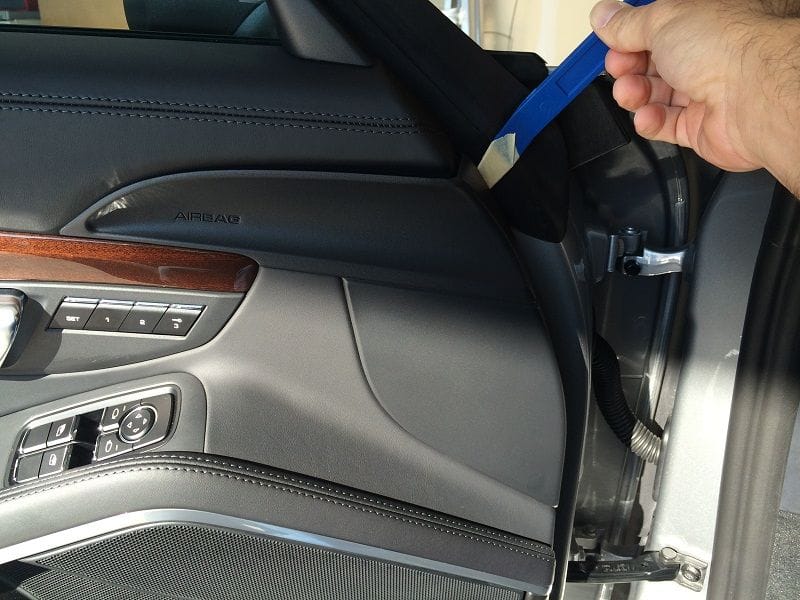
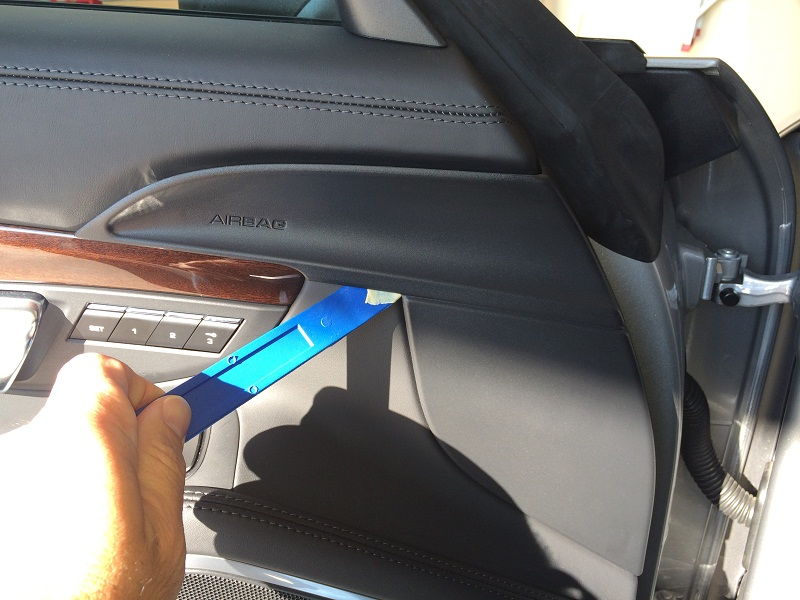
Step 2: Remove the Plastic Panel. Get one of your panel tools -- you could probably do this with your hands only, but I found the tools to be a safe way to go. Start where you see in the picture below, slide your tool edge under the plastic edge where it meets the metal of the door frame, and pry it up from the door. It should "pop" free just a bit.

Click the image to open in full size.

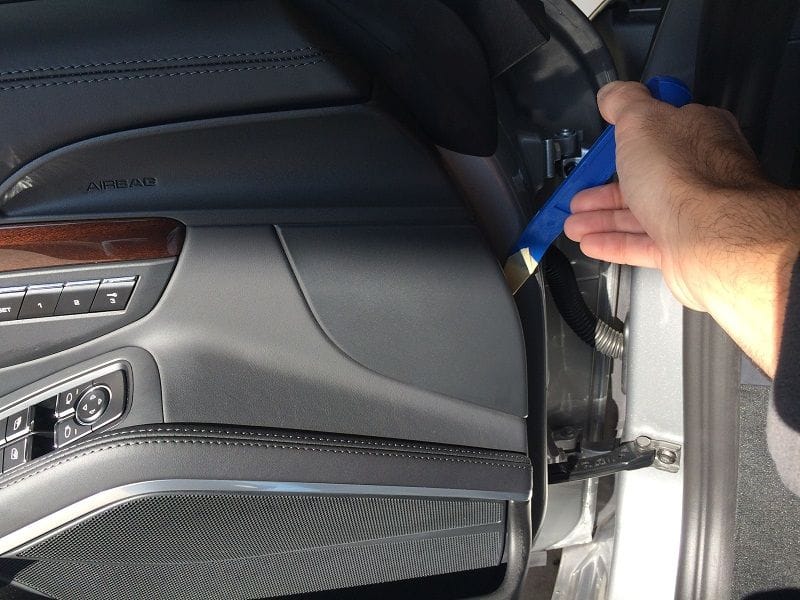
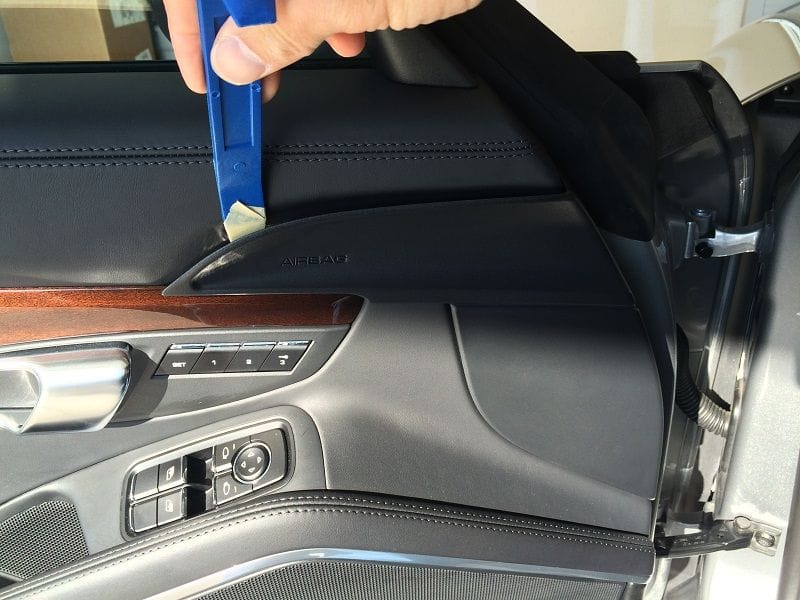
Now follow the pictures in order below to gently pop-free all of the connecting tabs under the panel....

Click the image to open in full size.

Click the image to open in full size.

Click the image to open in full size.

Click the image to open in full size.

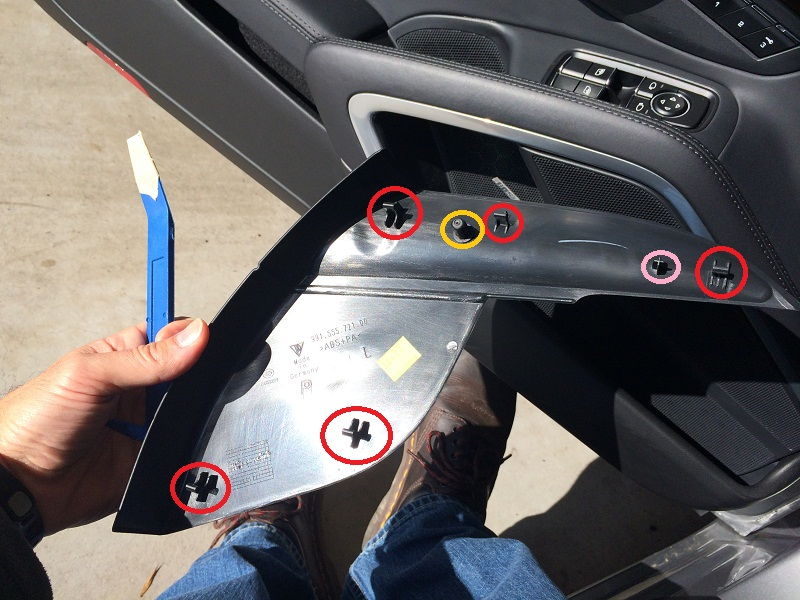
When you get to the last spot around the panel edge, it should just pop-off in your hand. Here is a shot of the rear of the panel, indicating the connecting tabs (red circles).

Click the image to open in full size.

I've also indicated two pins on the rear, in Orange and Pink (what the heck?) circles. These two pins are a bit different, and one has a rubber cover over it that you don't want to lose, or worse, drop in behind the door panel!

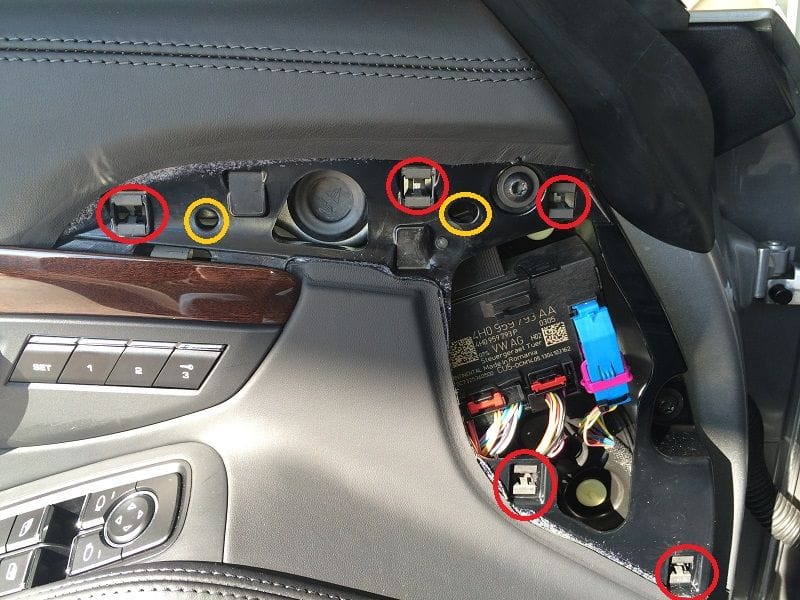
Step 3: Expose Bolt. Now that you have the plastic trim panel removed, look at the door. In the pic below I've first indicated where all the tabs and two pins on the trim piece attach to the door panel...


Click the image to open in full size.

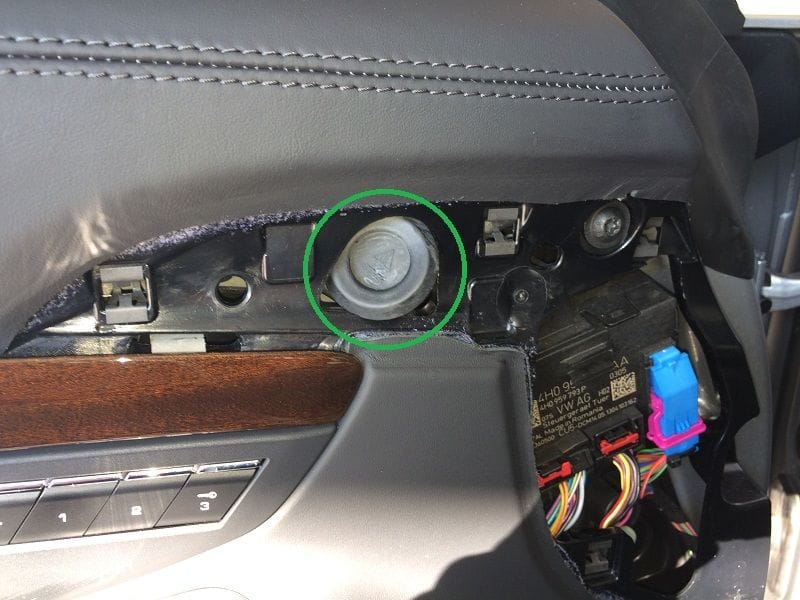
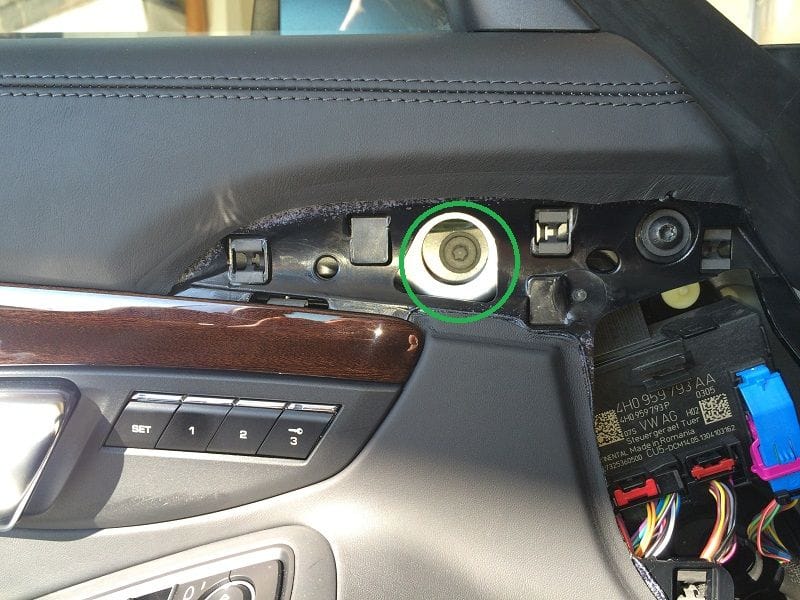
In the center, indicated in this pic, you should see a black rubber plug... circled in green.

Click the image to open in full size.

Directly beneath this plug is the bolt holding the mirror to the door. You want to gently pry the plug up and out of the hole. You can use a thin trim tool or something handy to get one edge up, then just pull it out with your fingers. Don't lose this!

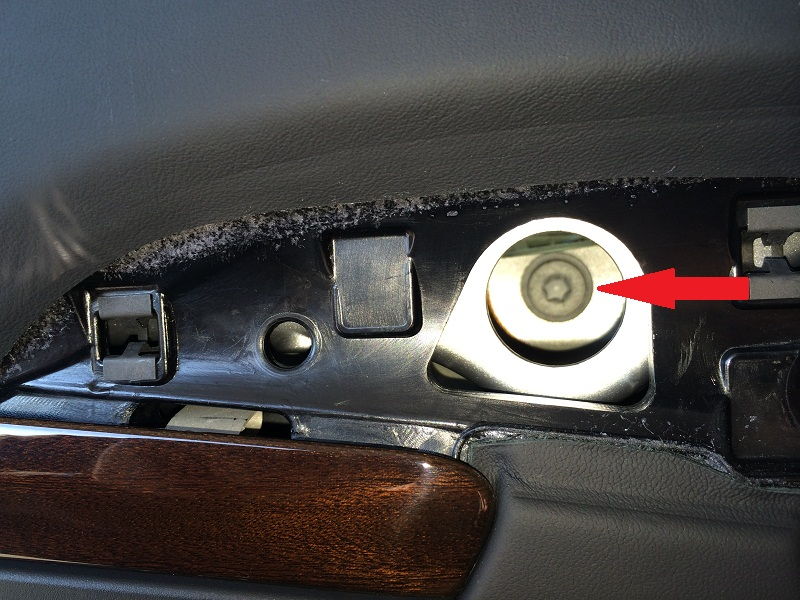
You should now see the opening through which you access the bolt.

Click the image to open in full size.

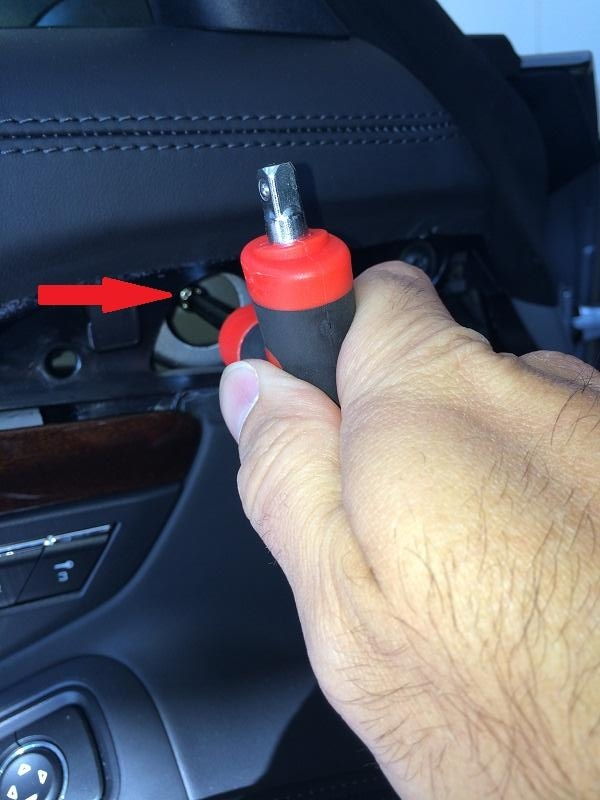
Step 4: Remove the retaining bolt. The bolt is a T-40. You will need an extension of at least 4" or a long handle to reach the bolt. Make sure if you are using a T bit that it is securely held in place in your tool, as you definitely don't want to have it fall out and down into the door! That would suck!

Click the image to open in full size.

Click the image to open in full size.

Before you get the bolt too loose, make sure to put something down on the side of the car to protect the mirror from falling and hitting the side of the car!
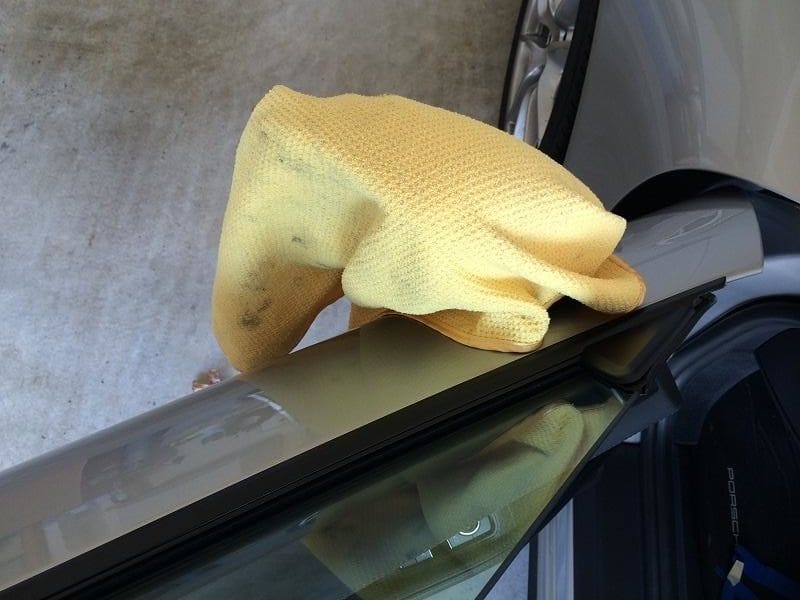
Click the image to open in full size.

I found the bolt to be VERY tight. I didn't need a breaker-bar or anything, but took some muscle to loosen. But once I did, the mirror starts releasing from the door as you loosen the bolt.
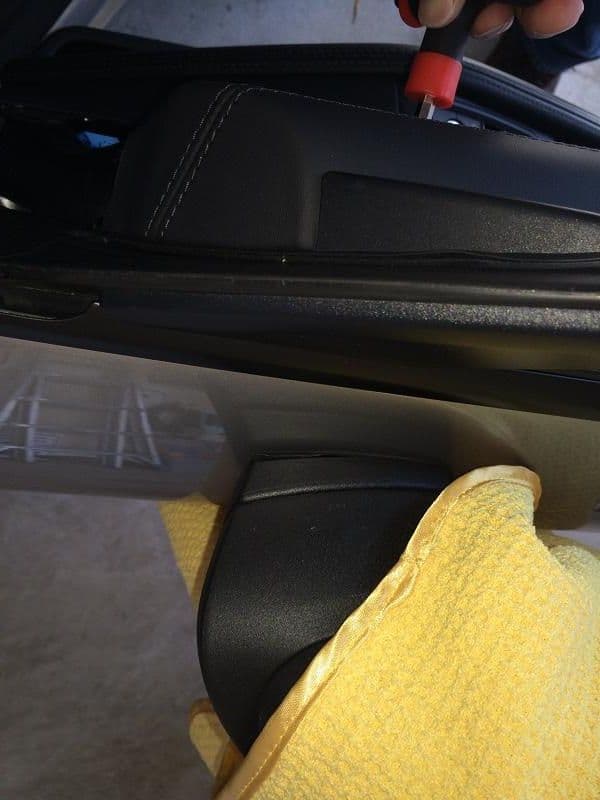
Click the image to open in full size.

I stopped there. Didn't have time to go any further and take the mirror completely off. I will do that later tonight and post some pics as an edit to this post.

Cheers!

Update:  Some additional details regarding disconnecting the wiring harness so that you can fully remove the mirror from the car...

There is a wiring harness connector that has to be released from the control module that you have to pull out of door when you pull the mirror away from the door surface.  To release the connector, you will have to return to the interior area just below the Airbag trim piece removed previously.

In the following picture, locate the mirror wiring connector in the black control module, just to the left (or right, depending on the door you are facing) of the blue connector -- I've indicated by circling to make it easier....


First, release the electrical connection.  Before you go any further, get a piece of cord, shoelace or similar, and tie one end to the connector that you just released.  You will want this for later, when you need to re-install.

Now, Locate the rubber boot where the wire harness goes through to the outer door shell.  In the pic above I've indicated with red arrows the wire bundle and the rubber boot.  You will have to push it through towards the exterior section of the door, while pulling the mirror up and off the body.  Once you have the mirror far enough out, you can disconnect the wire connector from the cord and leave the cord hanging from the door exterior hole.

The cord will be helpful when you re-install and have to route the wire connector back into the interior door panel.  You should be able to simply tie the end onto the connector and pull it through.  Sorry I don't have a picture of this.

To show you what a mirror looks like when completely removed, I found the following on one of the 991 forums 'for sale' sections.  I've circled the rubber boot and electrical connector for your reference.


Have fun!

Wednesday, January 21, 2015

DIY - Porsche 991 911 Black Headlamp Upgrade

(originally posted on 6Speedonline.com 11-26-2014)


I recently purchased an OEM/factory set of black headlamp assemblies from another member, and below are the steps I followed to install. Some steps of this procedure are super-simple and probably everyone knows how to do.

But for those who find themselves needing to change a light-bulb, or  replace a cracked headlamp, the procedures I detail below just might be useful! 

Primary goal of this DIY is to replace my factory, OEM 991 headlamp assemblies with the upgrade Black headlamp assemblies. To some, the difference may be subtle, but I was desiring adding some more contrasting black bits to my GT Silver C4S almost from the start. I've modified the mirrors to flat black, wrapped the roof in matte black, 'dipped the rear badging in flat black, and plan on changing the wheels to matte black in the near future. 

For the most part this is a plug-and-play type upgrade, and if everything is properly sourced you should be able to complete the change in 25 minutes or maybe even much less. My own experience detailed below is that it took me longer, about 45 minutes, since I had to swap the primary bulb, ballast, etc. before installing the black housings.

Tools Required:
Phillips Screwdriver
T-25 Driver / bit
Headlamp Release Tool from factory toolkit
NOTE: Since you are dealing with some electrical/electronics, please be careful and make sure that you ground yourself properly -- you could easily create a static electric issue if you are not careful, and zap one of the components (not that I believe this would be an issue as long as you don't open the metal boxes, you can never be too confident....).

NOTE: In my case I had to remove the primary bulb from my stock headlamps and move over to the upgrade housings -- you do NOT want to touch the bulb glass in any way, unless you have clean, cotton gloves on - and even then I would recommend you don't touch the glass. There isn't any reason to, but don't be too clumsy!

Let's get started!

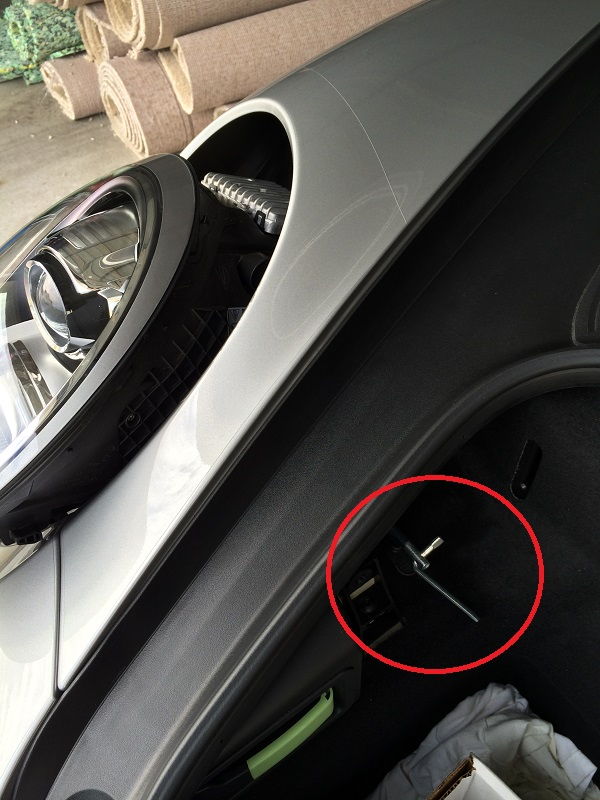
First, remove the stock headlamp assembly. Get the tool from the toolbox, insert into the guide hole, turn until you see the headlamp assembly begin to move forward, out of the fender.

Click the image to open in full size.

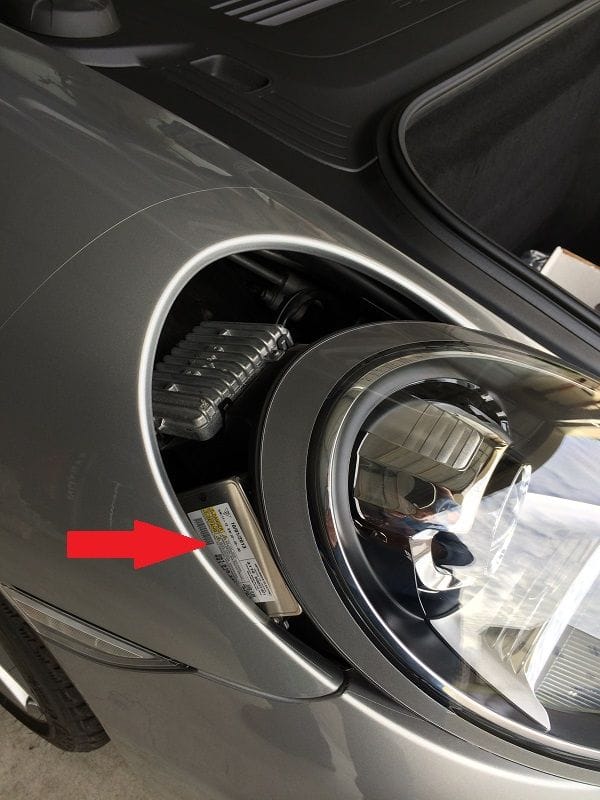
Once you have the unit released, be VERY careful how you pull the assembly towards you, as you don't want to scratch the lip in the fender around the hole! To clear the lip you should partially rotate the entire assembly so that the metal boxes mounted to the assembly don't hit anything on the way out. 

In this pic note the metal box that will hit the bodywork if you are not careful....

Click the image to open in full size.

Also, if you have never handled one of these big light assemblies, be warned that you need to have a good grip -- they are big, weird-shaped, clunky, not balanced at all, and you can easily mishandle and drop one.... If you do, and crack it -- well, I have an extra one to sell you!!! LOL

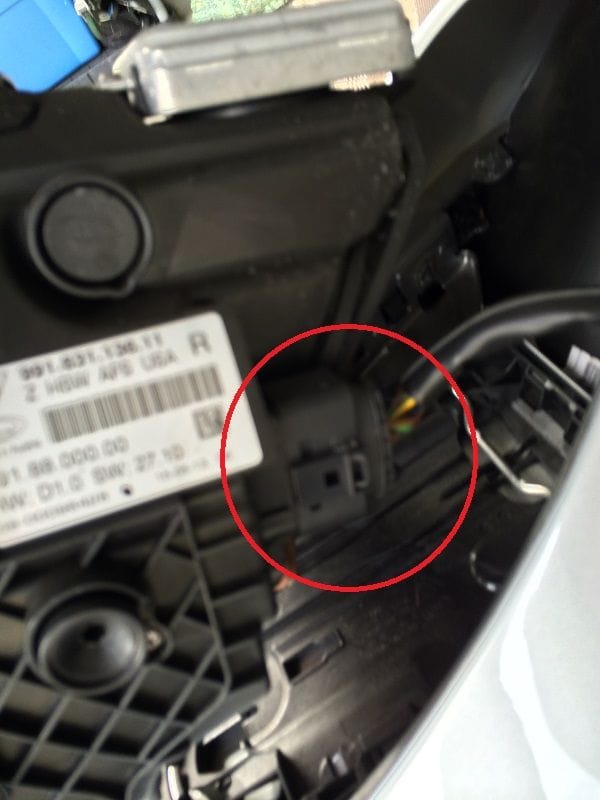
Before you can pull the assembly completely away from opening, you will need to release the wiring harness - just push the connector retention tab (indicated in the following pic) out a bit and the connector should easily come off. Sorry this came out blurry....

Click the image to open in full size.

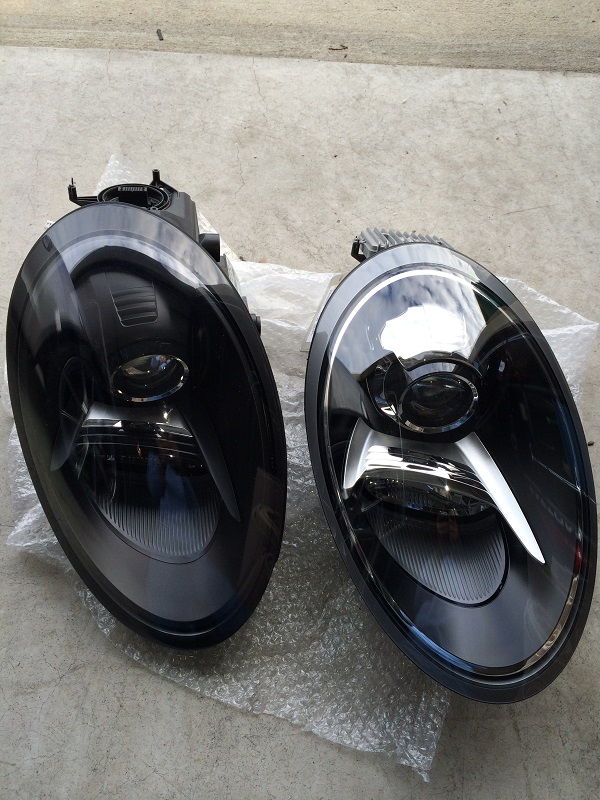
Once you have the stock unit free, make sure to put it down on the ground on top of something soft and non-scratching - microfiber, or in my case, a bunch of bubble-wrapping. Now we can take a look at the stock and upgraded black lights side-by-side!

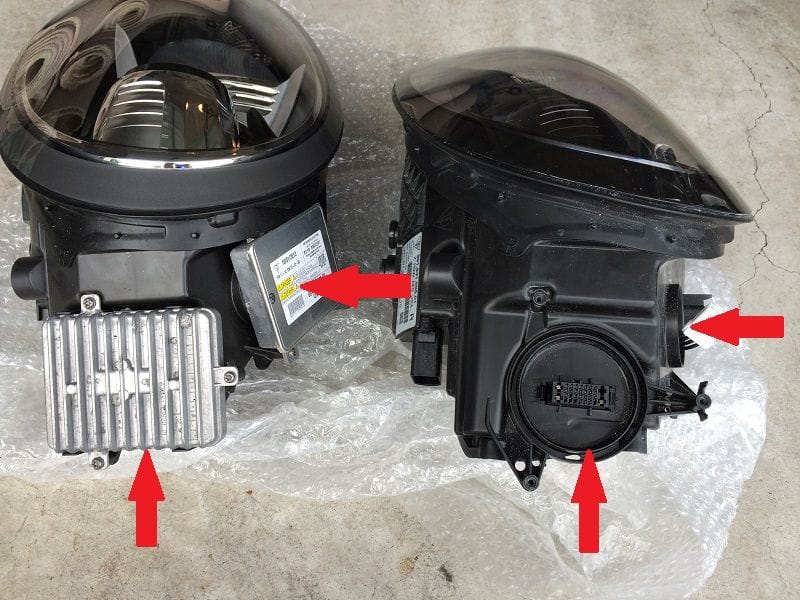
Here is a pic comparing the two housings: Stock PDLS bi-Xenon on the right, upgraded black PDLS bi-Xenon housing on the left. At quick glance, many won't immediately see much difference - just most of the chrome bits inside the glass are black. As I'll point out later, the change is subtle in these pics, but much more noticeable as the lighting conditions change....

Click the image to open in full size.

In the next pic (Stock on Left, Black upgrade on Right), you can see that the black housings I received do NOT include the controller w/directional beam (part # 99161832117 same for both Right and Left assemblies) or the control module (part # 99161832303 both R/L), or the primary Xenon bulb (part # 99963107090) both R/L I believe). I will have to remove these items from my stock housings and install on the black housings before I can continue. 

If you happen to purchase light assemblies that include these items, you can skip to the last few steps.

Click the image to open in full size.

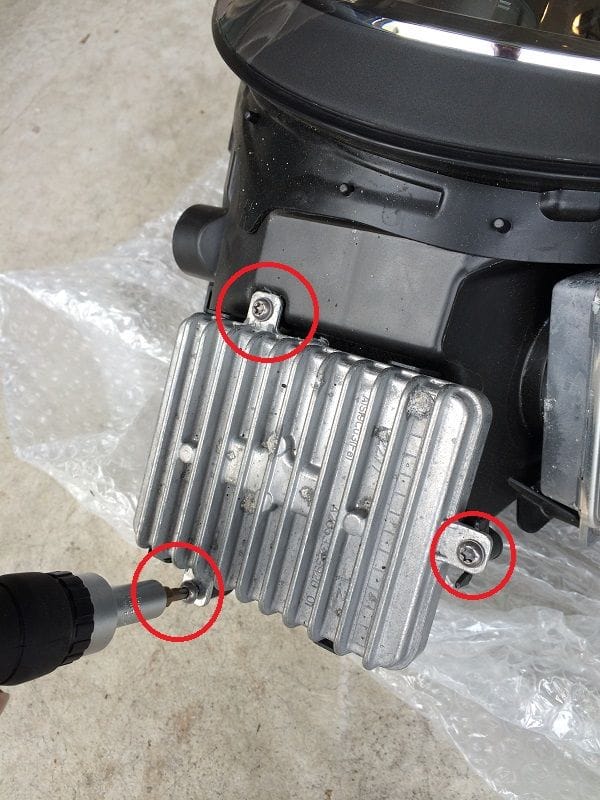
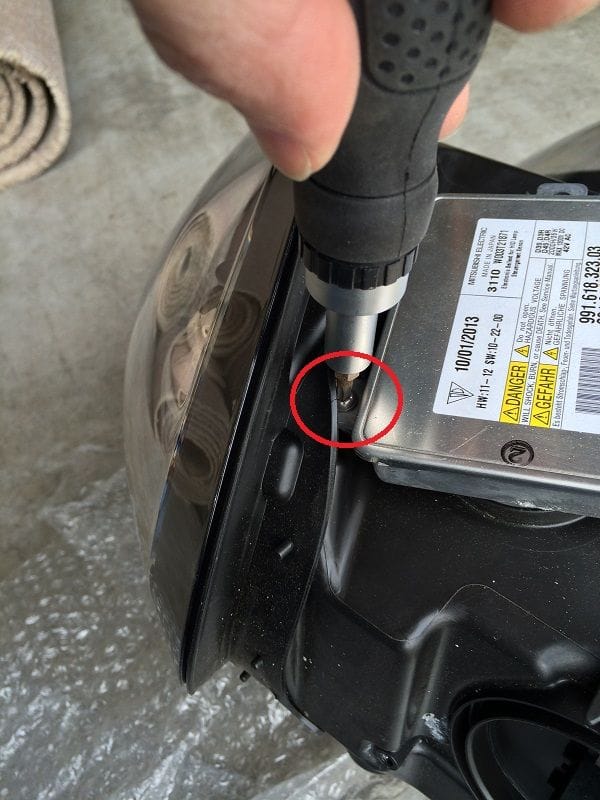
I started with the directional beam controller removal... There are three T-25s that you will need to remove, as shown in pic below.

Click the image to open in full size.

Again, be CAREFUL how you hold the light assembly, so that the clear lens doesn't get scratched!!!!

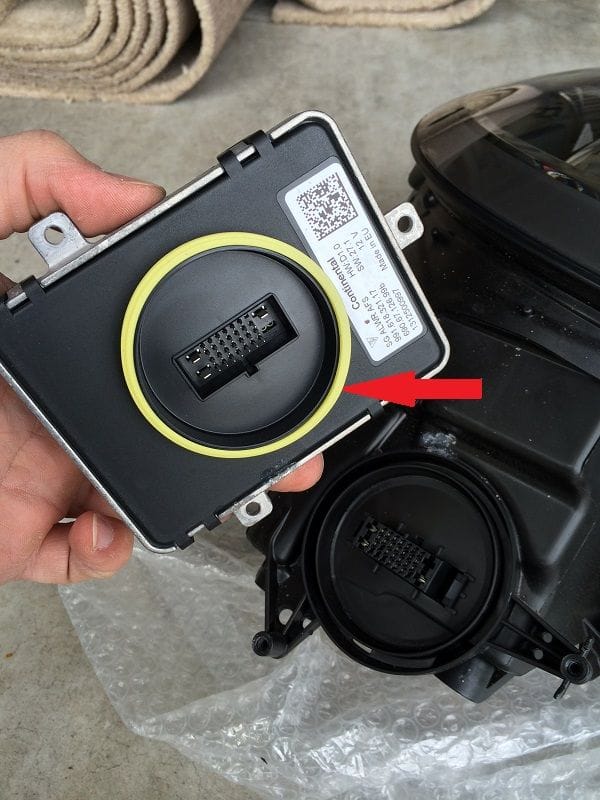
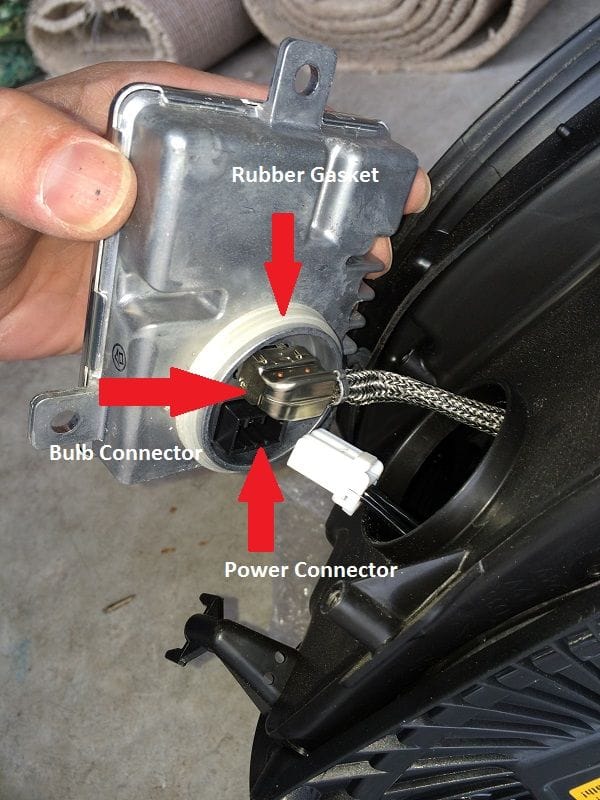
Once you have the 3 screws out, you simply pull the module from the light assembly -- you have to tug a bit, as it is sealed to the black housing with a connector and a rubber gasket (shown below) to make it weather-tight. 

Click the image to open in full size.

Set this aside.

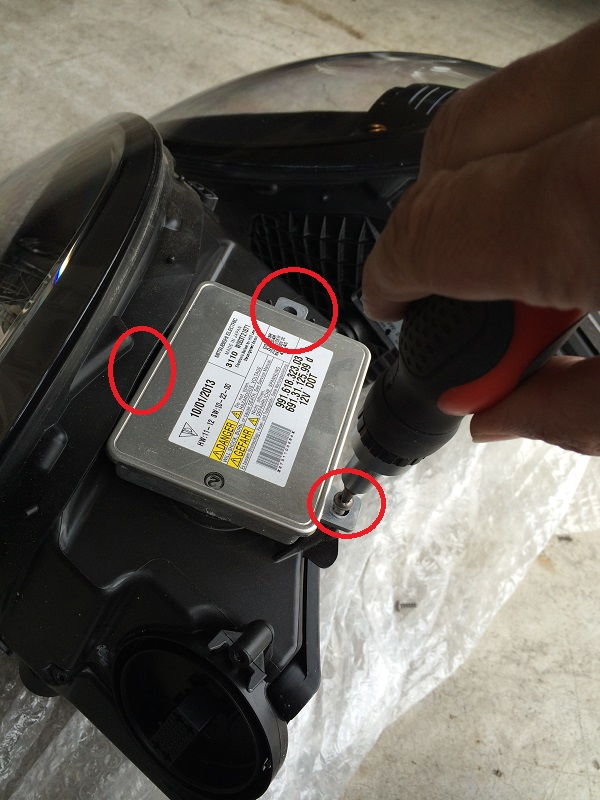
Next, I'll remove the control module. There are three more T-25s to remove. You will see 2 of the screws immediately, but the third is very well hidden from view by the lens sealing gasket rubber... See pic below. 

To access the screw you will have to hold the rubber back and get your screwdriver in there and seated. A bit tricky if you are trying to hold the light assembly securely -- so better-off if you have the assembly on a table or something so it won't slip or fall while you get the module screws out!

Click the image to open in full size.

Click the image to open in full size.

With the 3 screws removed, you will pull the module away, and immediately should see that there are two wire harnesses connected to the module - a white connector for power and a silver cable connected to the bulb. 

Click the image to open in full size.

The silver cable is to the Xenon bulb. Gently pull that off and then pull the white connector off (there is a small release tab that you need to depress first).

Set the module aside.

Now I need to remove my Xenon bulb and wire from the stock assembly.... Through the opening you just created, you can see where the bulb is located, but you won't be able to remove the bulb from this location. 

You have to remove the back of the headlamp assembly to pull the bulb out.

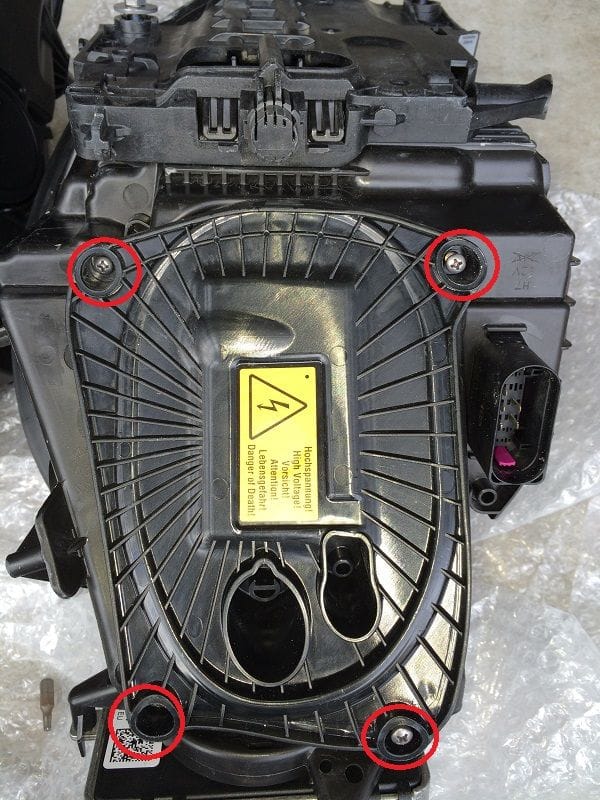
On the back of the stock headlamp assembly, there are 4 phillips screws that you must remove to remove the cover (pic below). You need to remove the black plastic cover so that you can access the bulb housing.

Click the image to open in full size.

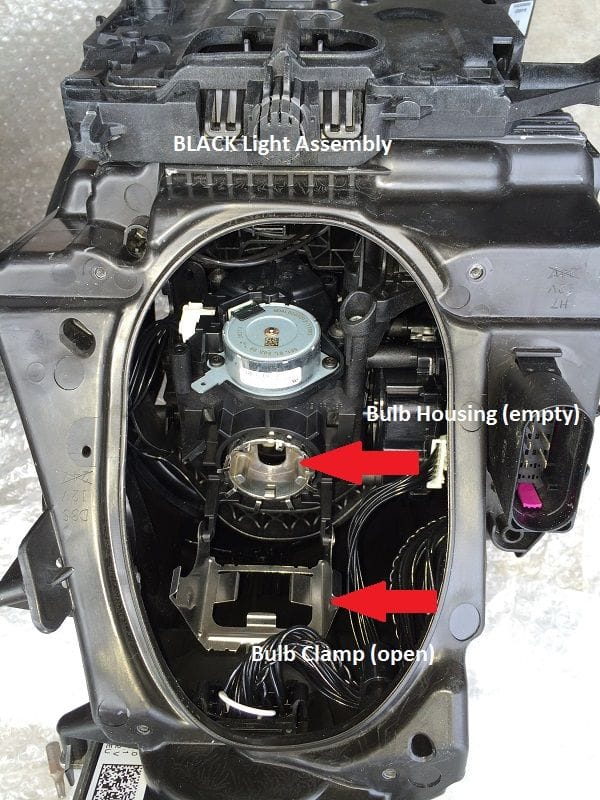
With the cover removed, you will see the bulb housing and clamp that holds it in place as indicated below...

Click the image to open in full size.

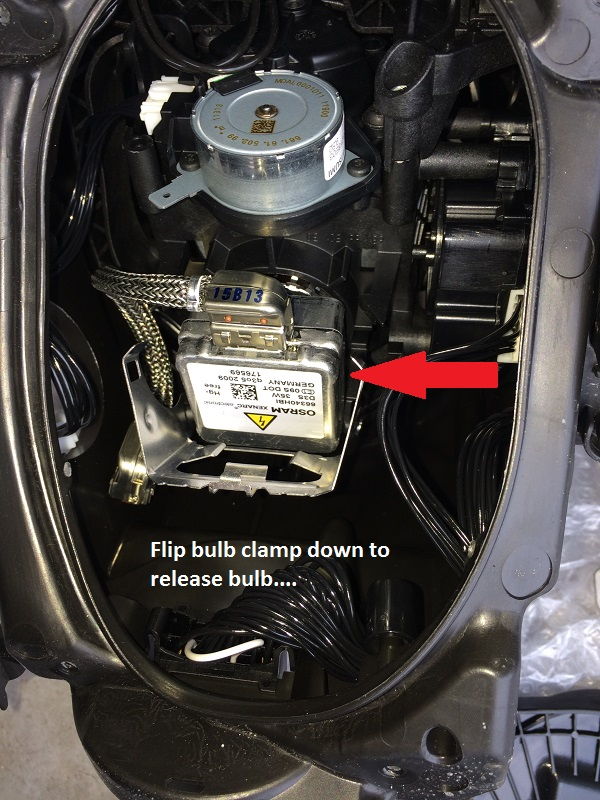
The metal clamp hinges on one edge. To lower the clamp away from the bulb, you must squeeze the two prongs on each side of the bulb, as shown in this pic:

Click the image to open in full size.

This releases the clamp and you can lower it. 

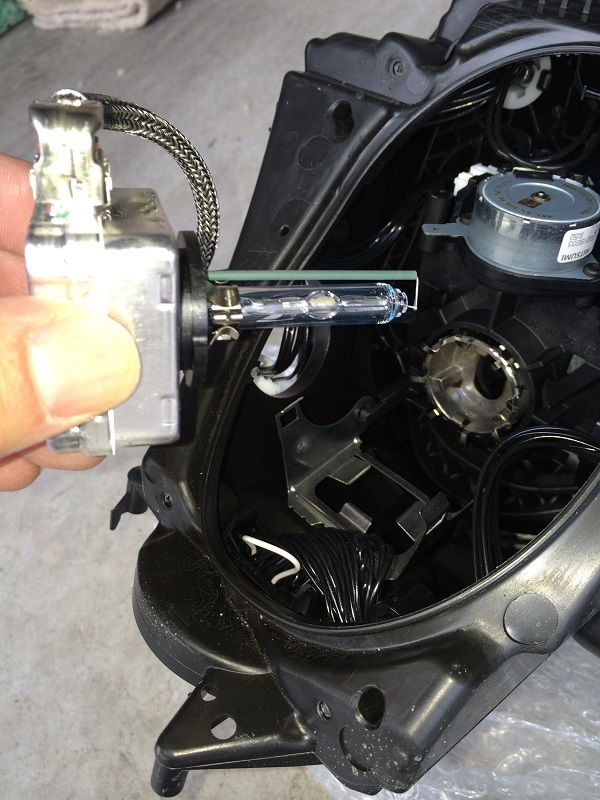
Once this is down, you should very gently pull the bulb out. Don't touch it with your fingers, or at all if you can avoid it....!

Click the image to open in full size.

Move over to the replacement / upgrade housing, and insert the bulb in the same location. You may need to push firmly on the back of the bulb to seat it in the opening. Then flip the clamp into place. You should here it snap into position...

Install the black cover, making sure all the screws line-up and the alignment pins find their holes. The cover should fit very tight, sealing the area off from the elements.

With the cover back in place, install the two metal boxes on the light assembly that you removed from the standard light unit. Tighten every thing down, and make sure all the gaskets are sealed in place.

You are now done getting the lamp assembly ready for install on the car! Carefully reverse the procedure to place the headlamp assembly back into the fender. Clamp the light assembly down using the tool in the frunk, and you are done!

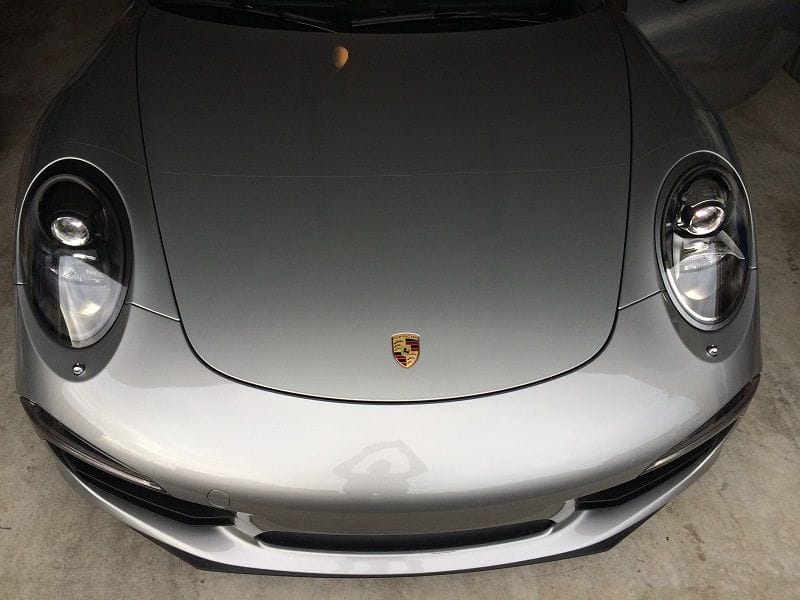
Here are a couple of pics comparing the standard lights to the upgrade black housings....

In these pics, the light on the left is the black upgrade, the right is standard. In my garage, doesn't seem so noticeable, right?

Click the image to open in full size.

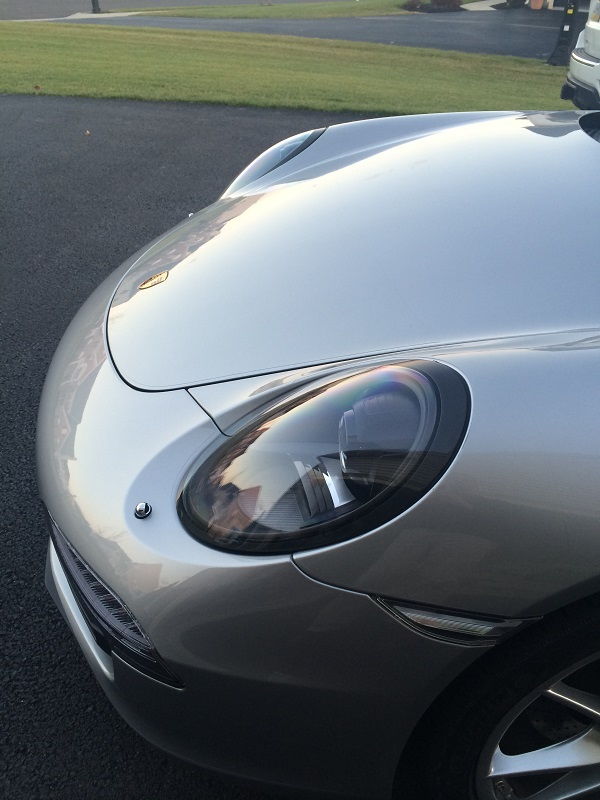
And in the following pics, outside on an overcast day, you can see more of the contrast....

Click the image to open in full size.

Click the image to open in full size.

All in all, a very easy upgrade, made longer only by the fact that the lights I purchased didn't include the electronics or bulb. Total install time for all the above steps was ~20 minutes per side, taking my time, taking pictures, etc. Nearly plug-and-play!

DIY -- Porsche 991 911 Exhaust Sound Hack

(originally posted on 6Speedonline.com 12-02-2014)

I was tinkering-around the garage the other day, and thought the following might be of interest to members who have had similar thoughts, or just curious about the vacuum lines to the "S" standard and PSE exhausts. 

The following Mod will eliminate the function of the Carrera S standard exhaust "flap" (well, at least one of them - see my note at the bottom of this post). The result is a sound that is deeper, a bit of drone, but definitely "on all the time" whether in standard, Sport, or Sport Plus modes.

This is a really simple DIY. Takes about as long as you need to get the rear of the car up off the ground, lay on the floor, and reach up to pull the vacuum line off. I spent about 10 minutes "exploring" and taking a few pics that follow.

Note that if you don't have a Carrera "S" car, or car with PSE, you can't perform this hack.  The base 3.4L Carrera does NOT have a vacuum system controlling valves to the exhaust....

STEP 1: Obtain some Vacuum hose end caps. You can pick-up some from your local auto supply shop (Pep Boys here in PA for me). I think these cost me $1.97 and come in variety of sizes. I happened to know that my stock vacuum hose was replaced recently by the dealer with a covered hose, so I needed a larger diameter cap opening than you might -- so getting a variety pack is the best way to go.

Click the image to open in full size.

STEP 2: Raise the rear end. I pulled my car in the garage and up onto my Rhino Ramps - then put the E-brake on and chocked the front wheels so the car wasn't going to move on me! You don't need ramps, but they are safer than a floor jack alone.

Couple of pics on the ramps...

Click the image to open in full size.

Click the image to open in full size.

For reference, I have a 2014 C4S with standard, non-PSE exhaust. In this form, the center muffler is different than PSE and non-S cars, but does have the valve controls and vacuum lines. Performing this mod on a car with PSE should be identical, and may sound even better/throatier all the time.

I should also note that I have twice in the past year had one of my vacuum lines separate from the valve, so I was already familiar with the sound effect and so on. The big difference between those times and this mod is that you can eliminate the "Coolant System Fault" or similar warning that will occur.

Before moving-on to the next step I should state the obvious -- Let your car cool-down before you start putting your arms and hands into the areas round the exhaust!! My car had been sitting for hours, and only started long enough to get on the ramps. Even still, I wore mechanics gloves and had on long-sleeve heavy shirt -- the space around the exhaust valve is tight and you will definitely come into contact with some hot surfaces! Please be careful! And while you're at it - wear some eye protection. You are looking straight-up into the bottom of a "dirty" area of the car and last thing you need is a bit of dust or worse falling into your eyes!

STEP 3: Locate the passenger-side exhaust valve. Approaching the car from the rear, get down flat-on-your-back on the floor behind the rear wheel and look up. Your vacuum line is likely clear in color, but could be other colors. I've seen white, blue and green. Currently, my vacuum line is clear with black insulating material - see pic below....

Click the image to open in full size.

The hose just slips on the exhaust valve. So a gentle tug or two and the line should be free....

STEP 4: Pull off the vacuum hose from the exhaust valve. Here you can see I've pulled it off and it is just hanging...

Click the image to open in full size.

STEP 5: Place a vacuum line end cap onto the vacuum hose end - use a cap that fits securely to the end of the hose. Too loose and it will fall off....

Click the image to open in full size.

STEP 6: Tuck the "loose" vacuum line up and out of the way so that it doesn't come into contact with any heat sources, etc.

Click the image to open in full size.

Final Pic:

Click the image to open in full size.


That's it! You are done! You can start the car and immediately you will hear the difference. Drive it and in any mode it sounds better to me. I've driven for several days now like this, and have yet to see any warnings. The trick is to make sure that the vacuum line hose is capped, so the system can't tell that you've disconnected.

If, for any reason you want to replace, just reverse the procedures above. I did just that and it took 5 minutes.

NOTE: The steps above are for a single exhaust valve. Yes, I know there are two, and perhaps performing the same mod on the driver-side line will result in an even throatier sound. But I found that the other valve line is much harder to access from this position. So, if you are up to it you can tackle that one -- or, the alternative is to disconnect both lines at the "T" intersection. You can find this just a bit above the exhaust valve on the passenger side. Pull the feed line from the T connector, and cap that. But again, I found that in my garage, laying on the ground, reaching the T with my big hands was going to be problematic. So, I "settled" for only disconnecting the one 
line....

I would love to hear from others if they've figured-out an easier way to 
access the drivers-side valve, or the T connector mentioned above....

Tuesday, January 20, 2015

991 C2S Cab Purchase Assistance....

I recently had the opportunity to help out a fellow Porsche 991 enthusiast in his quest to purchase a 991 C2S Cabriolet.  I came across Dan in the 6speedOnline 991 forum.  He was asking questions about and expressing stress over potential purchase as he was located in Los Angeles, and the car in Pensylvania.  I couldn't resist, and responded to his post that I would be more than happy to visit the dealer and check-out the car for him!  And that is exactly what I did!

First, some back-story:  The car Dan was interested in was being sold by a P-car dealer, as a 2014 new car.  It has ~420 miles on the odometer, yet was purchased by the dealer in 2013.  Build date was July 2013 and paperwork stated that it was purchased by the dealer late October of same year.  So, the first red flag is that this particular car has been sitting on the dealers lot for a year!  This fact raised questions about why, was there something wrong with the car, did someone refuse delivery, and so on.  All legit concerns with a car almost year-and-a-half old (from build).  Next, the dealer punched the warranty in December 2014, so that they could get it off their inventory as an unsold car and receive credit for future allocations.  This meant that Dan would be getting a "new" car, never titled, but would NOT get the full warranty!  Another legit concern....

As it turned-out, the dealer / car in question just happen to be the same location where I purchased my '14 C4S about a year ago!  And, better-yet it is located just 10 minutes from my house.  so stopping-over and checking-out the car would be a no-brainer.

A bit about the car:  It is as mentioned above a 2014 C2S Cab, in Saphire Blue Metallic exterior,  black convertible top, and two-tone grey and black interior.  Here's a list of the options:

911 Carrera S Cabriolet
176 Sport Exhaust System
250 Porsche Doppelkupplung (PDK)
423 20" Carrera S Wheels
446 Wheel center caps with colored Porsche Crest
603 Porsche Dynamic Light System (PDLS)
636 ParkAssist (front and rear)
640 Sport Chrono Package
658 Power Steering Plus
748 Power folding side mirrors
840 SportDesign steering wheel
970 Two-tone leather interior
BR Leather Interior in Black/Platinum Grey
N1 Sapphire Blue Metallic
P06 Power Sport Seats (14-way) with Memory Package
P3E Premium Package Plus i.c.w. Power Sport Seats (14-way)
P3H BOSE Audio Package
XDA Wheels Painted in Black

Sticker was in the neighborhood of $136k, and current price is roughly $122k.  Dan was looking to get an even better deal if the car checked-out.  So I made an appointment and visited the car on Friday.  Here's some pics I took of the car after I drove it!


Side mirror with painted lower trim option....
Convertible top in perfect condition...
VIN and build date...
Two-tone interior Black/Platinum Grey
Original sticker....
Showing dash with mileage, nice SD wheel with paddles, aluminum trim....
This car is configured very much like my own C4S (albeit a C2S cab!), so I found the car very familiar to get in and drive, and took it out for a 10 minute trip over some different road surfaces.  Car proved to be very solid!  No squeaks, rattles, or even excessive road noise.  The convertible top was fully insulated and did a great job keeping exterior noise to the minimum.

After driving, I did notice that there was one message in the computer - something about "Limited Steering" and the dealer wasn't quite sure what it was... Some type of fault code, and dealer promised to have it addressed / cleared before delivery.

Overall the car is in perfect, brand-new condition.  One small, tiny scuff mark on the nose (easily buffed-out), but otherwise the car is just beautiful and I wouldn't hesitate to buy it (if this were a car I wanted).  I suggested that Dan shouldn't have any hesitation trying to strike a deal if he felt it was the right car for him.