Showing posts with label lifting 911. Show all posts

Sunday, March 1, 2015

PCA Club Coupe Edition 991

Attended PCA Tech Tactics East Saturday Feb 28th.  I'll post other material from the event, but focus in this post on the special 991 Porsche created for Porsche Club of America's 60th Anniversary...

First, a disclaimer:  I took the pictures with an iPhone, which is bad enough -- but on top of that, the lighting conditions in the space where the car was located were just awful.  The area was a very clean service bay/training room in the PCNA facilities, but there were large windows on one side close to the car and a lot of sunlight was coming through.  So needless to say, some of the pictures came out quite crummy.  Oh well...

The car was revealed to the attendees as a 'surprise' -- it was hidden in an adjoining training facility, and at the proper moment on queue a large garage door opened and there it was!  This is apparently the first and only 991 Club Coupe edition at this time.

The car is quite beautiful.  I think they came up with a great color which is special for PCA -- Porsche AG officially named it 'club blau'.  This color is only available at the moment on the Club Coupe.  It was mentioned during the meeting that the color may be available in about 2 model years for PTS orders.  It was also interesting to hear about the process to create this special car.  Apparently took about two years, and PCA didn't know that the Club Coupe would be based upon a GTS until the GTS model was unvield.

In person, the color is both very bold and "muted" at the same time.  Kind of like a monochrome color but with a very shiny gloss to it.  It isn't neon, and not in-your-face metallic.  But it is a stand-out in a sea of white, silver, black, red spectrum colored cars on the road....  This blue is flat but not matte or "frozen".  As you can see in the following pics the tone is lighter in bright lighting and looks much darker in shade or darker lighting conditions.  Very cool.

Just a few other notes before we get to the pics....  What makes this car special is the color and a few styling bits.  Beyond that, the car is like a GTS.  The interior is nearly identical to my own 991 C4S, but for a red centering indicator stripe on the steering wheel....  I didn't take any pics of the interior for the simple fact that it wasn't anything special.

On the outside, aside from the color and the 50th model wheels, the only other visual was a small decal on the lower front of each door indicating "Club Coupe."  My personal opinion - they should have changed the rear badging to reflect the special edition -- but they left it as the normal GTS badging.

So here are the pics:


Notice the 'orange peel' in the door paint??!


One final note:  PCNA will be giving away (NOT a raffle) one of the 60 Club Coupe cars to a very lucky PCA member!  All active members will be eligible for the drawing, so make sure your PCA membership is paid up!  They didn't explain when the drawing would be however, so stay tuned to your PCA newsletter for the details.

Wednesday, January 21, 2015

DIY -- Porsche 991 911 Exhaust Sound Hack

(originally posted on 6Speedonline.com 12-02-2014)

I was tinkering-around the garage the other day, and thought the following might be of interest to members who have had similar thoughts, or just curious about the vacuum lines to the "S" standard and PSE exhausts. 

The following Mod will eliminate the function of the Carrera S standard exhaust "flap" (well, at least one of them - see my note at the bottom of this post). The result is a sound that is deeper, a bit of drone, but definitely "on all the time" whether in standard, Sport, or Sport Plus modes.

This is a really simple DIY. Takes about as long as you need to get the rear of the car up off the ground, lay on the floor, and reach up to pull the vacuum line off. I spent about 10 minutes "exploring" and taking a few pics that follow.

Note that if you don't have a Carrera "S" car, or car with PSE, you can't perform this hack.  The base 3.4L Carrera does NOT have a vacuum system controlling valves to the exhaust....

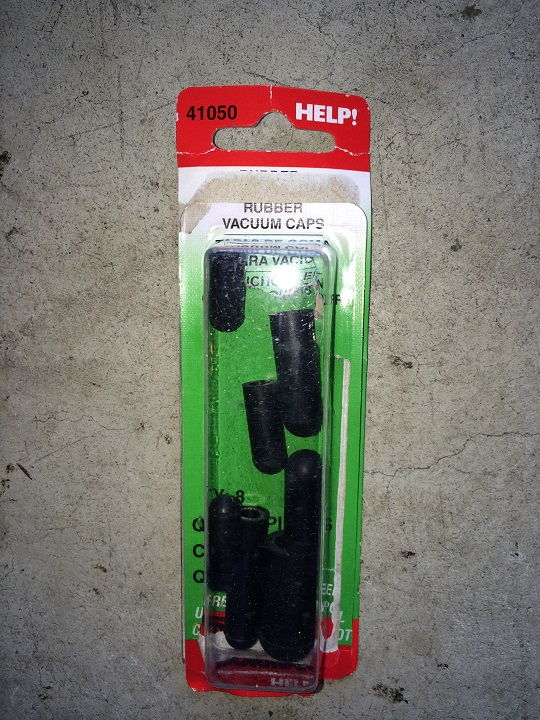
STEP 1: Obtain some Vacuum hose end caps. You can pick-up some from your local auto supply shop (Pep Boys here in PA for me). I think these cost me $1.97 and come in variety of sizes. I happened to know that my stock vacuum hose was replaced recently by the dealer with a covered hose, so I needed a larger diameter cap opening than you might -- so getting a variety pack is the best way to go.

Click the image to open in full size.

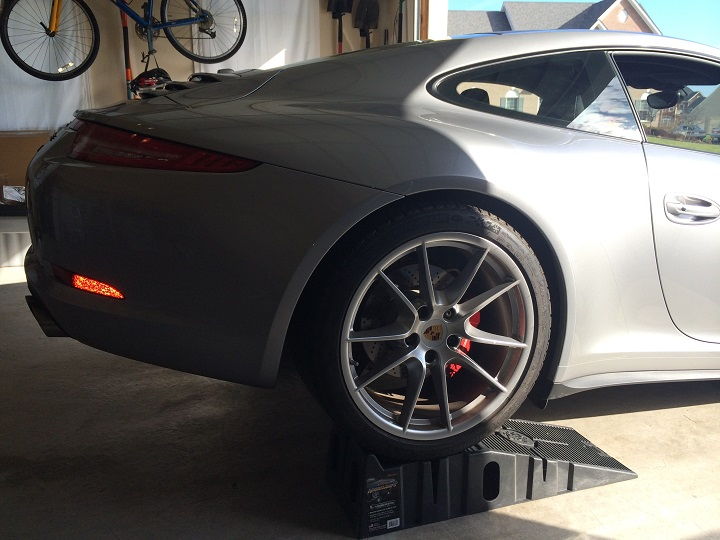
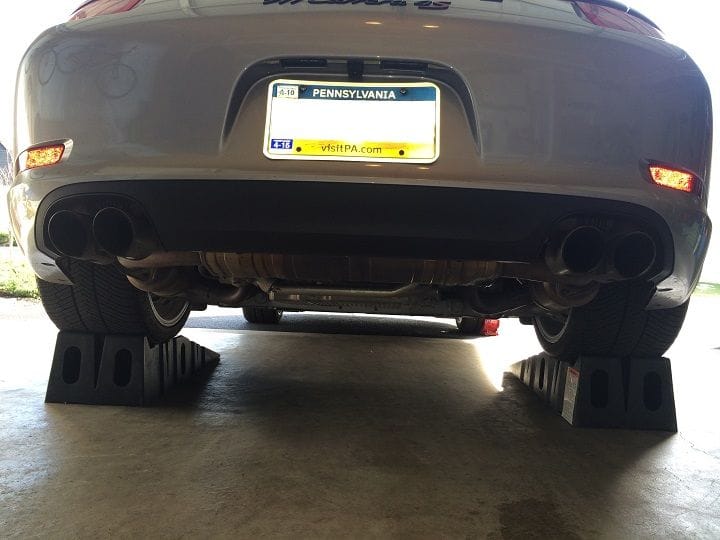
STEP 2: Raise the rear end. I pulled my car in the garage and up onto my Rhino Ramps - then put the E-brake on and chocked the front wheels so the car wasn't going to move on me! You don't need ramps, but they are safer than a floor jack alone.

Couple of pics on the ramps...

Click the image to open in full size.

Click the image to open in full size.

For reference, I have a 2014 C4S with standard, non-PSE exhaust. In this form, the center muffler is different than PSE and non-S cars, but does have the valve controls and vacuum lines. Performing this mod on a car with PSE should be identical, and may sound even better/throatier all the time.

I should also note that I have twice in the past year had one of my vacuum lines separate from the valve, so I was already familiar with the sound effect and so on. The big difference between those times and this mod is that you can eliminate the "Coolant System Fault" or similar warning that will occur.

Before moving-on to the next step I should state the obvious -- Let your car cool-down before you start putting your arms and hands into the areas round the exhaust!! My car had been sitting for hours, and only started long enough to get on the ramps. Even still, I wore mechanics gloves and had on long-sleeve heavy shirt -- the space around the exhaust valve is tight and you will definitely come into contact with some hot surfaces! Please be careful! And while you're at it - wear some eye protection. You are looking straight-up into the bottom of a "dirty" area of the car and last thing you need is a bit of dust or worse falling into your eyes!

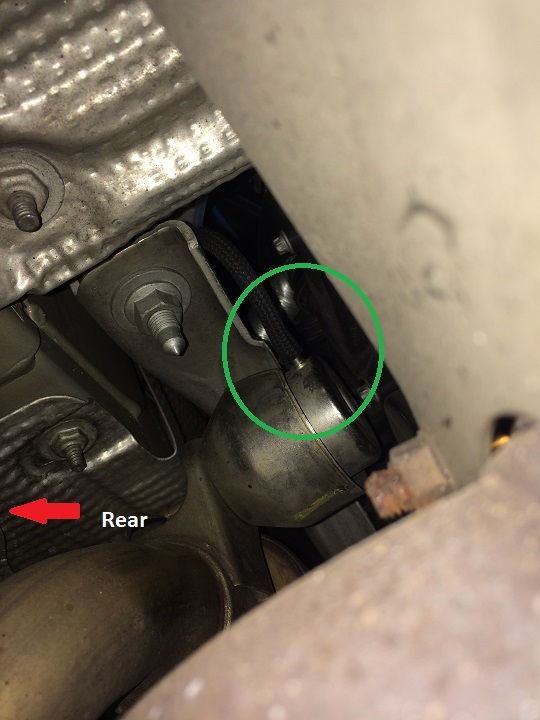
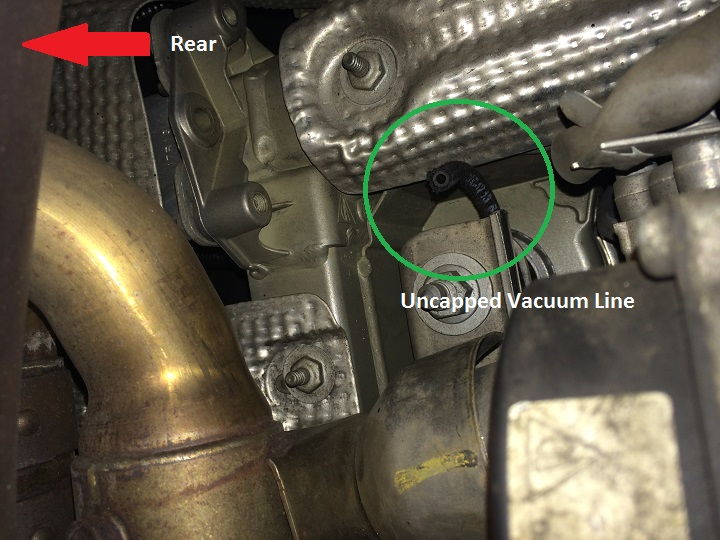
STEP 3: Locate the passenger-side exhaust valve. Approaching the car from the rear, get down flat-on-your-back on the floor behind the rear wheel and look up. Your vacuum line is likely clear in color, but could be other colors. I've seen white, blue and green. Currently, my vacuum line is clear with black insulating material - see pic below....

Click the image to open in full size.

The hose just slips on the exhaust valve. So a gentle tug or two and the line should be free....

STEP 4: Pull off the vacuum hose from the exhaust valve. Here you can see I've pulled it off and it is just hanging...

Click the image to open in full size.

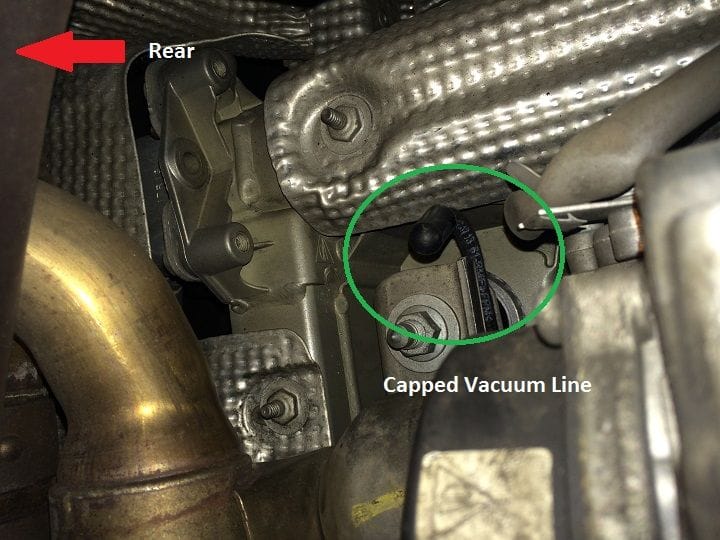
STEP 5: Place a vacuum line end cap onto the vacuum hose end - use a cap that fits securely to the end of the hose. Too loose and it will fall off....

Click the image to open in full size.

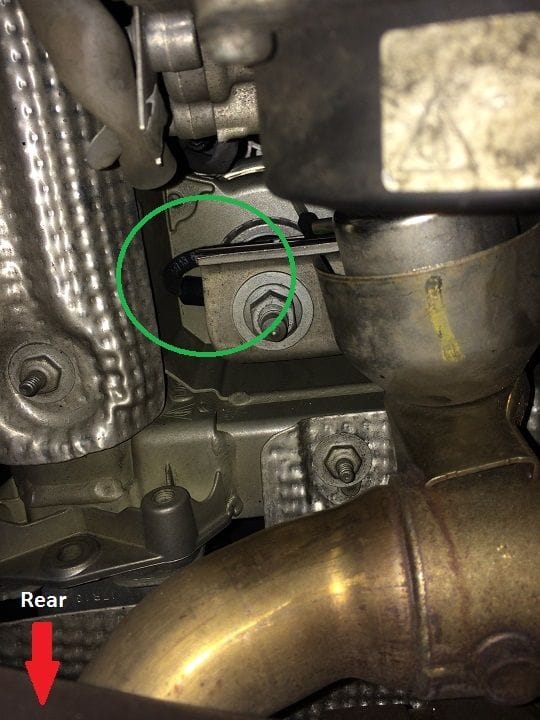
STEP 6: Tuck the "loose" vacuum line up and out of the way so that it doesn't come into contact with any heat sources, etc.

Click the image to open in full size.

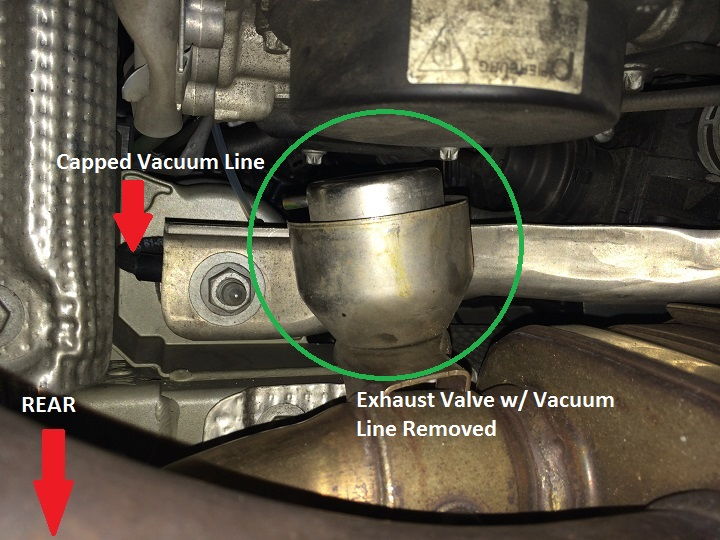
Final Pic:

Click the image to open in full size.


That's it! You are done! You can start the car and immediately you will hear the difference. Drive it and in any mode it sounds better to me. I've driven for several days now like this, and have yet to see any warnings. The trick is to make sure that the vacuum line hose is capped, so the system can't tell that you've disconnected.

If, for any reason you want to replace, just reverse the procedures above. I did just that and it took 5 minutes.

NOTE: The steps above are for a single exhaust valve. Yes, I know there are two, and perhaps performing the same mod on the driver-side line will result in an even throatier sound. But I found that the other valve line is much harder to access from this position. So, if you are up to it you can tackle that one -- or, the alternative is to disconnect both lines at the "T" intersection. You can find this just a bit above the exhaust valve on the passenger side. Pull the feed line from the T connector, and cap that. But again, I found that in my garage, laying on the ground, reaching the T with my big hands was going to be problematic. So, I "settled" for only disconnecting the one 
line....

I would love to hear from others if they've figured-out an easier way to 
access the drivers-side valve, or the T connector mentioned above....

Monday, January 19, 2015

Getting Your 991 Porsche Up on Jack Stands

I am planning a new project to lower my '14 911 C4S, and decided that I would get the car up on jack stands rather than work on one corner at a time.  Whenever I need to access the underside of the car, I will use my Rhino Ramps.  They are awesome, very stable, safe, and indestructible!  However, if you need to remove a wheel (or two or 4!) the ramps obviously won't work.  So in those cases where you need to remove the wheels, using floor jack and jack stands is the preferred method.

Here's my setup for stuff where I don't need to remove the wheels using my rhino ramps:


So, before I jumped into the project, I did a search on various Porsche boards and Google to get some ideas from others.  While I found a few mentions of how to jack stand the 991, and some great posts on how to get 993, 996 and 997 cars up on stands, there wasn't a definitive, easy to follow how-to guide.  So, I figured I would put one together!

Now, first some disclaimers....  I am not a professional mechanic, but someone who has some good skills and not afraid to try things out.  I take my time, I don't rush, and I always take safety very seriously!  So in some of my posts, I may not do things the way a "professional" might, or even to the personal preference of others who have done these types of things many times in the past.  I am not posting this information so that others can correct me, tell me I should buy a lift, or that their way is better!  All good, but I am not telling anyone they have to do it my way.  


This is information that should be considered when you are taking on your own projects, from which you can determine how you want to do things.  

First things first...  You will need the following to raise your 991 up on jack stands:
  • 4 jack stands (I do not own the "Jack Stands" product that many feel are superior, so I won't discuss here....  If you have those, great -- use them!)
  • 1 or 2 floor jacks (I have two)
  • 2 (or more) wheel chocks
  • Optional -- hockey pucks or other appropriate jack pads
I'll cover the three well-known techniques:
  1. You want to raise just the Front End
  2. You want to raise just the Rear End
  3. You want to get all four corners up on 4 jack stands
Raising just the Front End:  
First, put wheel chocks behind each rear wheel.  Then place a floor jack under the rear-wheel jack point on your car and raise the car high enough that you can place a floor jack stand under the front wheel jack point.  The 991 is so stiff, that raising the rear jack point raises the front at the same time!  

Make sure to position the jack stand so that you can lower the car onto the stand.  Also, I have hockey-pucks that I place on the flat part of each of my jack stands before lowering...  This means I have to raise the car a bit more to clear the top of the stand with the puck in place.  If you have jack stands that the "pad" area is a "V" shape and not flat, you may want to try another pad....

Once the stand is in place, slowly lower the floor jack so that the front jack pad comes to rest on the stand.  Once you are sure that the jack stand is placed perfectly, lower the car until the floor jack is all the way lowered.  Now move to the other side of the car, and repeat this procedure, starting with the floor jack lifting the car from the rear jack point high enough so that you can get a jack stand under the front jack point on the same side.  You'll notice that with the other side front already on a jack stand, the wheel is up already!  Lift until you can clear the top of the stand.  Lower the car onto the stand and you now have a car raised only in the front on stands....  If all you needed was to get the front up, you are now in business!


Raising just the Rear End:  
Similar steps to those above, but start with the floor jack under the forward or front side jack point and place the jack stand under the rear jack pad once the car is up high enough.  Once you lower on the stand, move to the other side and repeat.  You should have the rear up on stands easily.

All 4 Corners Raised:  
This is a bit "trickier" but very simple and very similar to what you've just learned to raise one or the other end.  First, raise the front end of the car onto jack stands as described in the first method above.  

Now, there are two methods of getting the rear raised high enough to put your jack stands in place.  I'll describe both here -- and tell you that honestly I used to use the first method almost exclusively, until I gave the second method a try and realized how much time it saved me!:  

Method 1:  Place your floor jack/lift in FRONT of the rear wheel jack point/pad just enough so that you can place a jack stand under the pad once you lift the rear. You can place right on the pinch weld, just put a hockey puck or something on your floor jack plate so you don't bend the weld.  I use a puck, and it doesn't bend the pinch weld at all.  Slowly lift the rear with your floor jack, place the jack stand, and lower.  You now have three corners up, and need to get the fourth up!  With three corners up, the car may rock back onto the one wheel that is not supported by a stand....  Don't worry - the weight of the car will keep it on the other two floor jacks, and if you placed them correctly the stands won't move at all.

Method 2:  Go to the rear of your car, get down and move your jack so that the jack pad is just under the rear cross-member.  Also you should be in the center of the cross-member.  Be absolutely sure that your floor jack is in the right position -- you DO NOT want to place it in the wrong spot and risk damaging anything!  Sounds scary - but once you do it a few times you won't even think about it anymore....  Now raise your jack, and both rear wheels should be off the ground, supported in the center by your floor jack.  You can then place your jack stands and lower onto them. I've added a picture below that illustrates where to place your floor jack plate.

Central location on rear cross-member - place your floor jack directly in the middle...

Move your low-profile floor jack under the car from the rear, and position the pad directly in the center of the cross-member.

Positioning the jack pad in center of rear cross-member...

Begin raising the car.  Make sure that you have a jack that will get the car up high-enough to put your jack stands in place under the rear jack points....

As noted above, once you have the car up and slid the jack stands into place, you can slowly lower the floor jack, leaving the car resting on the jack stands.

Begin raising.  Make sure your floor jack handle doesn't bang against rear bumper!

The other positive of using #2 above for raising rear is that if done properly this is a more stable method when you have the front of the car already up on jack stands.  More stable = safety!

Here is the same jack point but on a 996/997...

Another pic of rear lifting location on previous generation 911
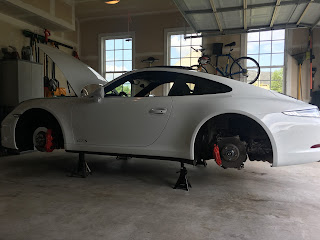
'15 911 991.1 GTS up on stands!


Monday, January 5, 2015

Porsche 991 Underbody Panels....

Needed to gain access to the area just above the underbody panels on my 911 front end (don't ask me why!) yesterday, and thought I'd share with y'all my experience.  First, if you may ever have a similar need, know that the procedure is really quite simple!

For those who have never seen the underside of a modern 911, a brief description of just what I am talking about in this post....  If you were to flip a 911 over onto its' roof, you'd find that the underside or "belly" of the 911 is almost entirely covered by smooth black panels.  You would see very little of any mechanical bits at all the entire length of the car, with just a few glimpses near the far rear and nose of the car.  The panels have been included on 911's for some years now, with the objective being more aerodynamics than anything else.  Most that I've seen have channels and other features to smooth air movement under the car at speed.

Here's an example - albeit from a scale model of a 911 GT2:
(not sure of where this pic came from - found it on web)

Panels such as these are common on supercars and race cars.  The purpose is to enhance the aerodynamics of the car at especially higher speeds.
But, back to my own car...  So, I had need to gain access to the space directly above the forward or front underbody panel on my '14 911 Carrera 4S.

You should have the following tools handy:
  • Ramps / Floor Jack / Lift
  • Wheel blocks
  • T20 male bit
  • 11mm deep-socket and ratcheting wrench
  • Vacuum (!)
Here's a copy of the underbody panel diagram from the PET 991 catalog:
I was only interested in the Front panel, labeled "1" in the PET diagram.  From what I can tell all of the panels are secured to the car in the same way, and in certain spots overlap.  So the experience I share here of removing the front panel should apply for the other panels as well!

On the front panel, the diagram above indicates fastener locations - If I recall correctly there are 10 Torx screws and 2 11mm nuts holding the panel up to the car.

So I set out to remove the panel....

First, I ran the front of the car up on my Rhino Ramps.  If you can get the car up higher, great.  You will need to reach a number of fasteners to release the panel, and on ramps I found the maneuvering space to be tighter than I would have liked.  I also blocked the wheels once the car was on the ramps, and also put a jack stand on the sides just in case the car moved while I was underneath.

Here's a pic I took when first getting the car into position:

I took the shot while lying on the ground under the nose of the car, looking to the rear.  Lighting was poor, flash only bounced off the metal area just in front of the panels....

My first impression was "wow."  For being on the underside of a daily driver, in the NE where we get all sorts of poor weather and road conditions, I was surprised by how these panels looked.  The material is some type of "felt" over pressed board, or maybe even some kind of plastic.  Very rigid, stiff, but feels to me like felt paper used in roofing or laying floors.  No stains of any kind, and just a couple of very small marks from objects deflecting off the surface.  The only visible sign of use was the dirt stuck to the surface, and road grit.

I tapped on the middle of the front panel, and could hear all sort of noise like gravel in a plastic cup.  As I looked at the surface, I could see several openings that allow air to pass through, and I imagine those holes act as funnels to scoop road debris and other stuff up from the road.  So I expected that upon removal of the panel, I would find a lot of dirt....

So I set about removing the connectors.  Not hard at all to find, and very simple to release.  I used the PET diagram as a guide before I went under the car, so knew where to look.

In the following pics I've circled some of the fastening points.  Nearly all are Torx - with the exception of two 11mm nuts along the rear edge of the panel that you can remove with a deep socket.

The front panel has a leading-edge that is inserted into a recessed area to hold it in place, remember that when re-installing!  It's hard to see in the pictures I took, but here is a shot that shows the panel installed -- I've also pointed-out one of the Torx screws that you will have to remove.

And here is a shot of one of the Torx screws removed from the panel.  They came out fairly easily.  I used a ratcheting screwdriver and had each one out quickly.

After you remove all of the screws, the panel doesn't just fall off.  I had to work the front edge out a bit, and then pull the panel down from the rear over the two studs where the 11mm nuts held it in place.  Just in case, I had placed a few pint paint cans stacked under the panel so that it wouldn't just fall onto my head -- and boy an I glad I did that!

I don't have any pictures of just how dirty the "insides" were, but man, the panel was holding a TON of small gravel and other dirt that had made it's way up onto the panel through the airflow holes (you can see a few of the openings in the pictures above).  My clean garage floor was just covered with the stuff when it fell out!  I carefully pulled the panel out from under the car, and took it out in the yard to dump the stone and dirt collection.  If the weather were warmer, I probably would have hosed it off too, but since it was only about 40 degrees out I simply took a stiff brush and removed as much of the stuff as possible.

Re-installing the panel was a breeze -- you just need something to hold the panel up close to the screw holes from below, or a friend to hold it while you start one of the screws.   Oh, and push the front-edge into place first, as it needs to insert into place before the other holes line-up.  Then just remember to put all screws back in, and tighten-down!

So that's it!  The panels are nice, the seams between panels fit together snugly, and the material is seemingly indestructible.  I didn't have any fear of bending the panel, breaking off any tabs (there are none!) or other connectors we typically find in other parts of the car....  So you shouldn't have any fear of removing the panels.