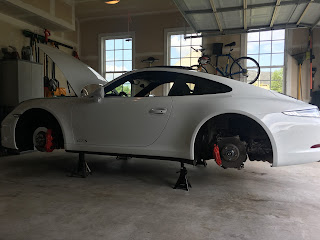
Here's my setup for stuff where I don't need to remove the wheels using my rhino ramps:

Now, first some disclaimers.... I am not a professional mechanic, but someone who has some good skills and not afraid to try things out. I take my time, I don't rush, and I always take safety very seriously! So in some of my posts, I may not do things the way a "professional" might, or even to the personal preference of others who have done these types of things many times in the past. I am not posting this information so that others can correct me, tell me I should buy a lift, or that their way is better! All good, but I am not telling anyone they have to do it my way.
This is information that should be considered when you are taking on your own projects, from which you can determine how you want to do things.
First things first... You will need the following to raise your 991 up on jack stands:
- 4 jack stands (I do not own the "Jack Stands" product that many feel are superior, so I won't discuss here.... If you have those, great -- use them!)
- 1 or 2 floor jacks (I have two)
- 2 (or more) wheel chocks
- Optional -- hockey pucks or other appropriate jack pads
I'll cover the three well-known techniques:
- You want to raise just the Front End
- You want to raise just the Rear End
- You want to get all four corners up on 4 jack stands
Raising just the Front End:
First, put wheel chocks behind each rear wheel. Then place a floor jack under the rear-wheel jack point on your car and raise the car high enough that you can place a floor jack stand under the front wheel jack point. The 991 is so stiff, that raising the rear jack point raises the front at the same time!
Make sure to position the jack stand so that you can lower the car onto the stand. Also, I have hockey-pucks that I place on the flat part of each of my jack stands before lowering... This means I have to raise the car a bit more to clear the top of the stand with the puck in place. If you have jack stands that the "pad" area is a "V" shape and not flat, you may want to try another pad....
Once the stand is in place, slowly lower the floor jack so that the front jack pad comes to rest on the stand. Once you are sure that the jack stand is placed perfectly, lower the car until the floor jack is all the way lowered. Now move to the other side of the car, and repeat this procedure, starting with the floor jack lifting the car from the rear jack point high enough so that you can get a jack stand under the front jack point on the same side. You'll notice that with the other side front already on a jack stand, the wheel is up already! Lift until you can clear the top of the stand. Lower the car onto the stand and you now have a car raised only in the front on stands.... If all you needed was to get the front up, you are now in business!

Raising just the Rear End:
First, put wheel chocks behind each rear wheel. Then place a floor jack under the rear-wheel jack point on your car and raise the car high enough that you can place a floor jack stand under the front wheel jack point. The 991 is so stiff, that raising the rear jack point raises the front at the same time!
Make sure to position the jack stand so that you can lower the car onto the stand. Also, I have hockey-pucks that I place on the flat part of each of my jack stands before lowering... This means I have to raise the car a bit more to clear the top of the stand with the puck in place. If you have jack stands that the "pad" area is a "V" shape and not flat, you may want to try another pad....
Once the stand is in place, slowly lower the floor jack so that the front jack pad comes to rest on the stand. Once you are sure that the jack stand is placed perfectly, lower the car until the floor jack is all the way lowered. Now move to the other side of the car, and repeat this procedure, starting with the floor jack lifting the car from the rear jack point high enough so that you can get a jack stand under the front jack point on the same side. You'll notice that with the other side front already on a jack stand, the wheel is up already! Lift until you can clear the top of the stand. Lower the car onto the stand and you now have a car raised only in the front on stands.... If all you needed was to get the front up, you are now in business!

Similar steps to those above, but start with the floor jack under the forward or front side jack point and place the jack stand under the rear jack pad once the car is up high enough. Once you lower on the stand, move to the other side and repeat. You should have the rear up on stands easily.
All 4 Corners Raised:
This is a bit "trickier" but very simple and very similar to what you've just learned to raise one or the other end. First, raise the front end of the car onto jack stands as described in the first method above.
Now, there are two methods of getting the rear raised high enough to put your jack stands in place. I'll describe both here -- and tell you that honestly I used to use the first method almost exclusively, until I gave the second method a try and realized how much time it saved me!:
Method 1: Place your floor jack/lift in FRONT of the rear wheel jack point/pad just enough so that you can place a jack stand under the pad once you lift the rear. You can place right on the pinch weld, just put a hockey puck or something on your floor jack plate so you don't bend the weld. I use a puck, and it doesn't bend the pinch weld at all. Slowly lift the rear with your floor jack, place the jack stand, and lower. You now have three corners up, and need to get the fourth up! With three corners up, the car may rock back onto the one wheel that is not supported by a stand.... Don't worry - the weight of the car will keep it on the other two floor jacks, and if you placed them correctly the stands won't move at all.
This is a bit "trickier" but very simple and very similar to what you've just learned to raise one or the other end. First, raise the front end of the car onto jack stands as described in the first method above.
Now, there are two methods of getting the rear raised high enough to put your jack stands in place. I'll describe both here -- and tell you that honestly I used to use the first method almost exclusively, until I gave the second method a try and realized how much time it saved me!:
Method 1: Place your floor jack/lift in FRONT of the rear wheel jack point/pad just enough so that you can place a jack stand under the pad once you lift the rear. You can place right on the pinch weld, just put a hockey puck or something on your floor jack plate so you don't bend the weld. I use a puck, and it doesn't bend the pinch weld at all. Slowly lift the rear with your floor jack, place the jack stand, and lower. You now have three corners up, and need to get the fourth up! With three corners up, the car may rock back onto the one wheel that is not supported by a stand.... Don't worry - the weight of the car will keep it on the other two floor jacks, and if you placed them correctly the stands won't move at all.
Method 2: Go to the rear of your car, get down and move your jack so that the jack pad is just under the rear cross-member. Also you should be in the center of the cross-member. Be absolutely sure that your floor jack is in the right position -- you DO NOT want to place it in the wrong spot and risk damaging anything! Sounds scary - but once you do it a few times you won't even think about it anymore.... Now raise your jack, and both rear wheels should be off the ground, supported in the center by your floor jack. You can then place your jack stands and lower onto them. I've added a picture below that illustrates where to place your floor jack plate.
 |
| Central location on rear cross-member - place your floor jack directly in the middle... |
 |
| Positioning the jack pad in center of rear cross-member... |
As noted above, once you have the car up and slid the jack stands into place, you can slowly lower the floor jack, leaving the car resting on the jack stands.
 |
| Begin raising. Make sure your floor jack handle doesn't bang against rear bumper! |