All of the procedures I cover follow the official Porsche NA Work Manuals, to which I provide reference with each post.
So let's get on with it!
First up is a very basic How to Check your brake fluid level in the 991.
NOTE:
The brake fluid level must not exceed the MAX
marking.
Check brake fluid quality. Use only new DOT 4 brake
fluid.
Brake fluid can be ordered using
the Porsche Electronic Parts Catalogue (PET).
The brake fluid reservoir is located under the
cover that is fitted over the brake components (brake booster, brake master
cylinder and hydraulic unit)
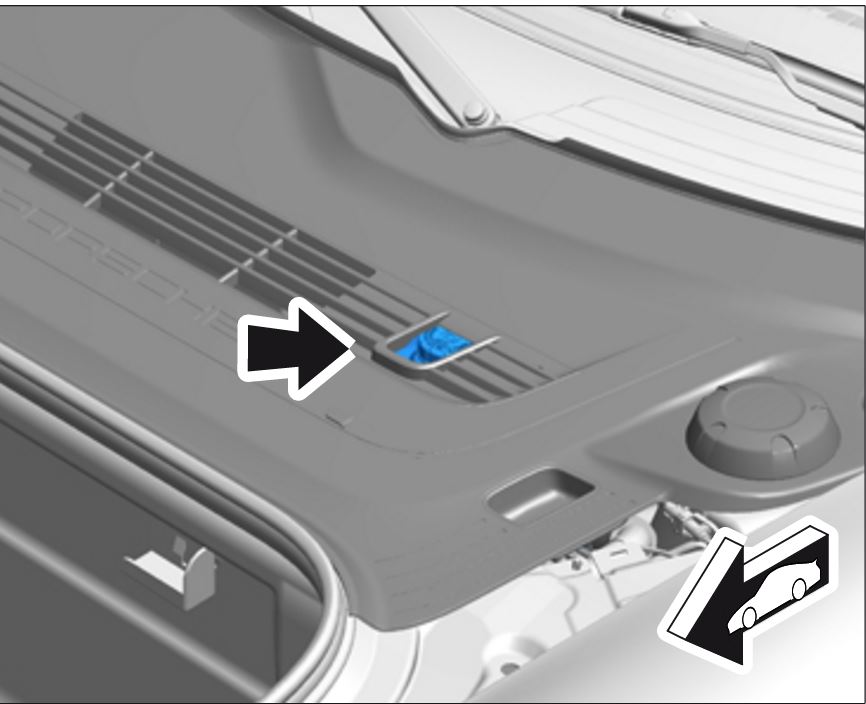
The brake fluid level can be checked through the
opening in the cover (arrow) just forward of the (LHD) drivers position.
The brake fluid level should be between the MIN and MAX markings (shown below) which are marked on the sides of the brake fluid reservoir.
fff
1. If the brake fluid level has to be corrected,
move the protective plastic cover as shown below into the service position to expose the brake fluid reservoir.
1.1 Lift up the cover and engage the yellow support in the luggage compartment lid.
2. Correct the brake fluid level (see post Flushing Brake Fluid).
3. The cover is fitted in reverse order.
The above details and illustrations are from the official Porsche Work Manuals for the 991 platform. In this case the document you should obtain is "WM 470801 Checking brake fluid level"
I've come across soooooo many posts online asking questions about vacuum lines, exhaust valves, change-over valves and related that I thought I'd put together an overview with some pictures and illustrations....
Probably the 2 most prevalent discussions about the vacuum system in the 991 are centered on Change Over Valves (COVs), and periodic "failures" that 991 owners have reported (myself included!). Also keep in mind that the S cars, and cars with Porsche Sports Exhaust (PSE) rely on COVs to open-and-close the exhaust valving.
Here is a link to one of the Rennlist 991 conversation threads that covers COV failures / replacements: "Heater quit working again" Search Rennlist, as well as the 6Speedonline boards, for more details....
Here is an illustration and picture of the COV part:
1. Fresh Air Connection
2. Vacuum Line for the Actuator
3. Vacuum Connection
Here's a pic as posted on Rennlist 991 forums by member STG:
As you can see in this picture, the part # is clearly visible imprinted on the side of the device.
Schematic, showing the basic relationship of each COV and vacuum...
The above schematic is straight from the official Porsche Service Information Book, and posted to 6SpeedOnline forums by member SM_ATL. I'll get more into the vacuum line routing later in this post.
As for how many COVs are on a 991 (MY2012.5 through MY 2016), # ranges from 7 to 10 per below:
1. Air Cleaner Flap 2. Acoustic Simulator 3. Heater Shut-Off Valve 4. Exhaust Flaps 5. Coolant Shut-Off Valve on Engine Bypass Circuit 6. Tuning Flap 7. Shut-Off Valve on Heat Exchanger for Gear Wheel Set Oil 8. Shut-Off Valve for Clutch Fluid Heat Exchanger (PDK ONLY) 9. Tuning Flap (cars with full X-51 Power Kit ONLY) 10. Tuning Flap (cars with full X-51 Power Kit ONLY)
#9 and 10 are not a mistake on my part.... cars with X-51 option have multiple tuning flaps apparently. And here is an illustration from Porsche with locations of each of the COVs listed above:
The most common complaints of COV failures are the Exhaust Flaps and Heater Shut-Off Valve. As a 991 owner I've experienced multiple failures of both....!
Here are some vacuum line routing illustrations:
For PDK cars:
For MT cars:
Exhaust Flap line routing....
In the above, the top part of the picture is the 3.8 standard exhaust, whereas the bottom-half of the picture is for the 991 with PSE option.
Based on feedback from nearly all who've posted to 991 enthusiast forums on the topic of COV failures, it seems that no matter what the root cause, the service departments at dealers will NOT proactively replace COVs that haven't failed yet. There have been multiple part # revisions, perhaps indicating attempts at mitigate future failures -- but other than a brief campaign for the earliest MY 2012 991s there has NOT been any recall or service bulletins to replace suspect parts. The SB that I refer to here is #TI-64-12 and NHTSA ID #10048760 if you'd like to look it up.
If you'd like to replace yourself, know that there isn't a WM specific to the procedure. However, there is WM 2400IN, which provides a lot of good pictures and location detail.
I'll continue to compile other COV resources, and post updates from time-to-time. Contact me, or comment below, if you have questions or want to share any other experiences of your own! Thanks!
I am always looking to "tinker" with my toys, and can't leave well enough alone! Hence the following DIY.
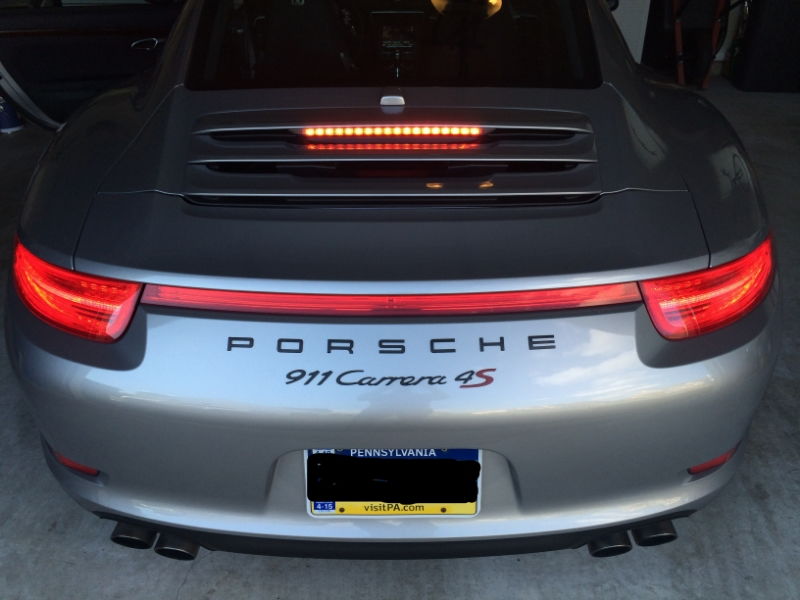
I completed the following project about a year ago, never had a chance to post this up, but recent questions by members PorscheCrazy and others reminded me. Maybe someone will find this useful... If you'd like to see a video of the blinking upper brake light in action, jump to the bottom of this post for a link to my YouTube channel GTSilver....
This DIY covers modification to my upper third brake light wiring to alter the LED from a single constant "on" steady state to a blinking light when brakes are applied.
I actually got this idea from a member of a non-6Speedonline Porsche forum that is very popular. ;-)
I had always thought that having a blinking third brake light would be a great safety enhancement, and more so for smaller sports cars. SUV and mini-van drivers don't realize they just can't stop in the same short distance, this is for them or even those tailgaters and morons who love to ride up as close as possible to prove a point or something...
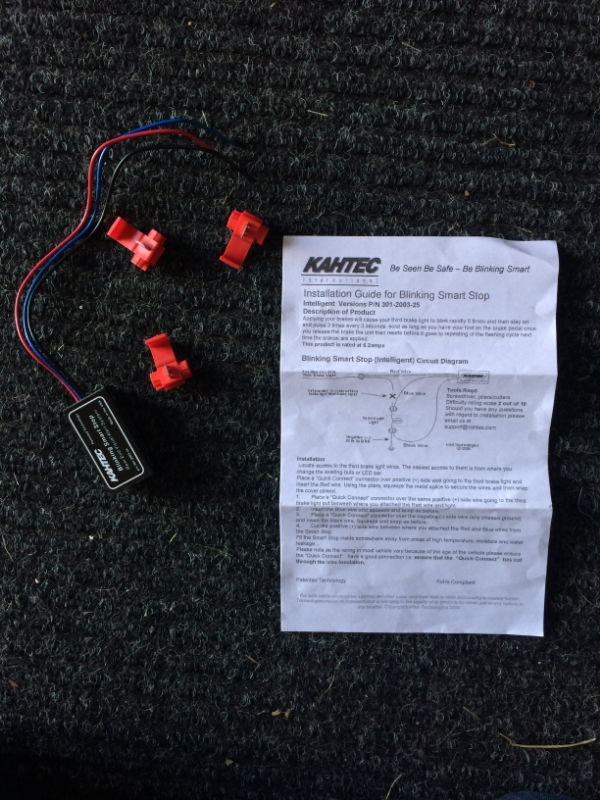
Anyways, I found a small company that produces a controller that when tapped-into your brake light wiring modify from steady to blinking. The company is Kahtec Technologies International. www.kahtec.com This US company produces several products all focused on safety modifications for brake lighting. Someone recently mentioned that there are other products out there -- I do not have any knowledge of them or experience.
I went with the Kahtec "Intelligent" product, which when added claims to flash the third brake light 6 times rapidly when first hitting the brakes, then a steady 3 blinks every 6 seconds for as long you keep your foot on the pedal.
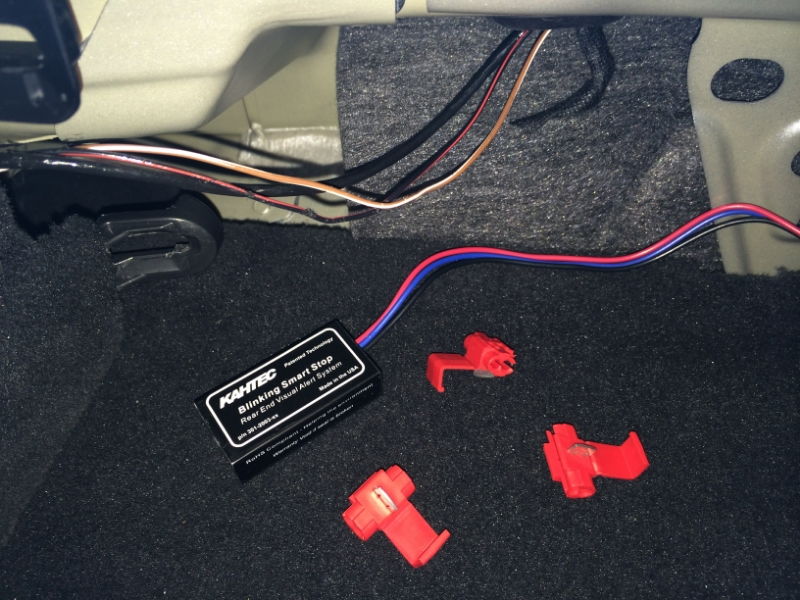
I ordered on the Kahtec web site, and in a couple of days the small box arrived as advertised. The box contained a small wired black box with Red, Black, Blue wires, set of wire taps, and instruction sheet.
The instructions are very clear, easy to read and I felt comfortable that tapping into my wiring would be reversible should I have to switch back. So I set off in search of the best location to grab the wires in my car ('14 C4S coupe). I originally went about pulling the third brake light entirely from the rear vent grill lid (see my other DIY DIY: 991 Upper Third Brake Light Removal but after doing so, decided that there just wasn't a good location back there to mount the Kahtec black box. Also, Kahtec states that the box is NOT weather proof.
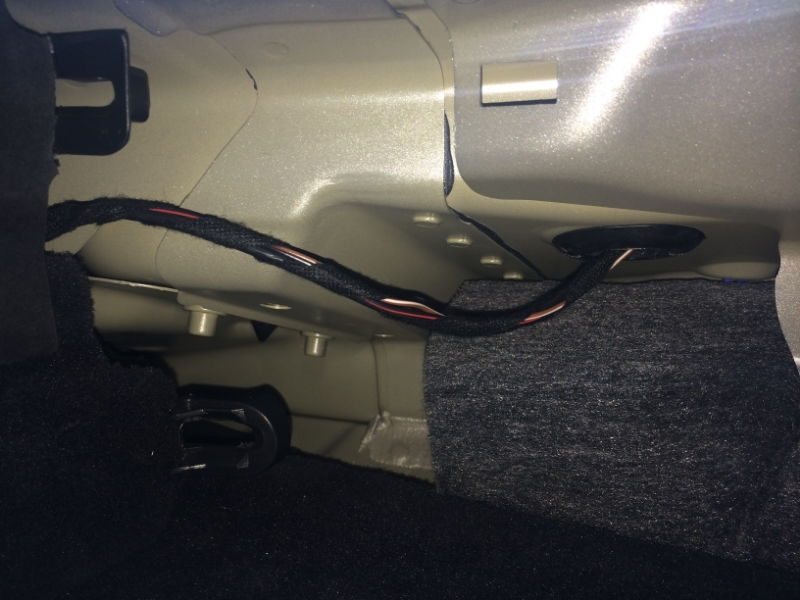
So, I recalled locating the wiring harness for the third brake light and antennae bump back when I was wiring my car for the back-up camera. I went back into the interior, passenger side under the back window... I pulled the trim off, and right in front of me was the wiring bundle I needed! It was great not to have to dig and search for wires for once!!
Here's the bundle -- there are three wires. Black/Red, Brown/White, and a larger solid black cable. The cables run from the passenger side of the car up into a rubber grommet (upper right side of pic below), which leads into the trunklid area and up to the grill where the upper third brake light resides.
For reference - in the pic below, LEFT is the passenger-side rear corner under window, RIGHT is near the Sound Symposer opening under the center of the rear window.
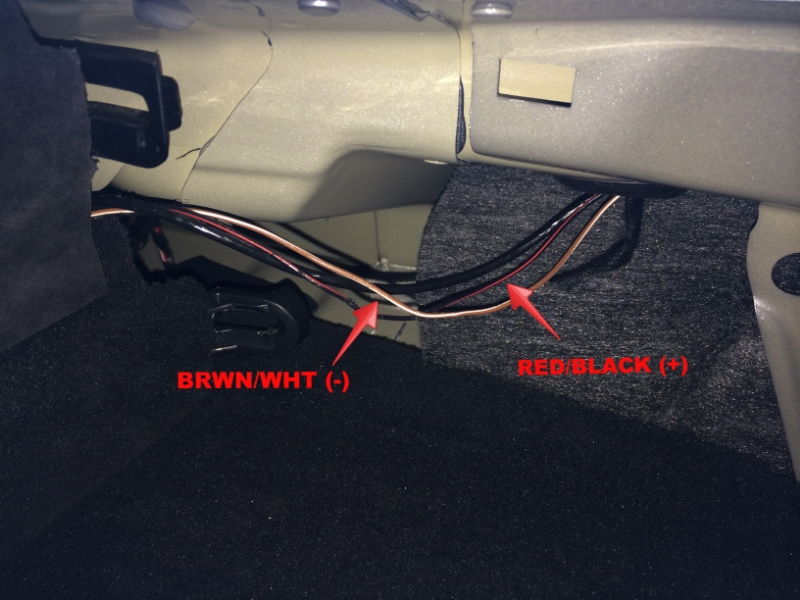
You'll need to slit the wrapping-tape to separate the wires...
I quickly determined that BLK/RED is power (+) and the BRWN/WHT is ground (-). The solid black cable is for SAT/NAV antennae so I didn't mess with it (hmmm.... what project might I need THAT wire for???).
With the wires separated, the next few steps are easy to follow right from the Kahtec instructions included...
Get the Kahtec black box, and the three red plastic wire taps ready. (NOTE: I've since modified the wires further. I don't like using the clamp wire taps, so I went back and replaced with soldered bullet disconnects. Much more reliable, easy to disconnect if necessary, and will maintain a much "cleaner" connection. I'll post some new pics of the modification to the connectors when I get a chance.)
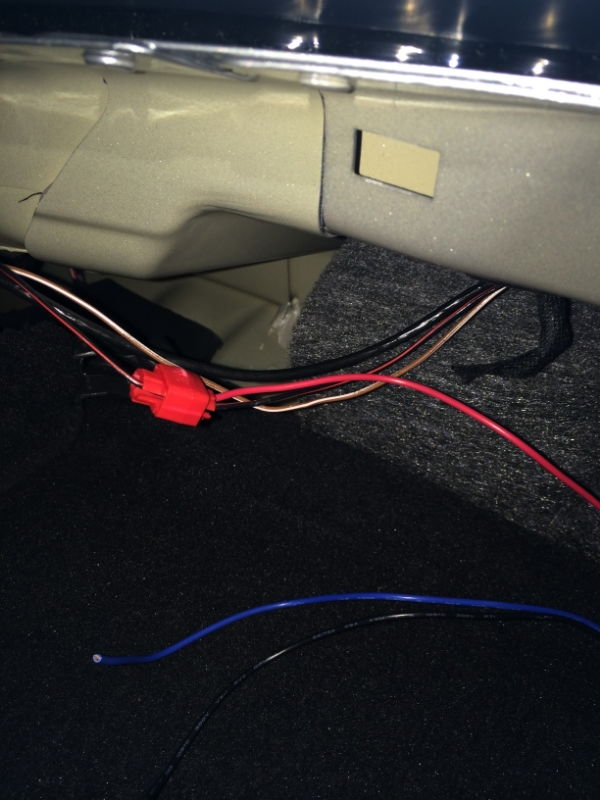
Hold the BLK/RED wire, pull it into the red wire tap.
Take the RED wire from the Kahtec black box and push it into the red wire clamp.
Clamp down on the red tap until you hear it "snap" and use a pair of pliers to make sure you've pushed through both wires.
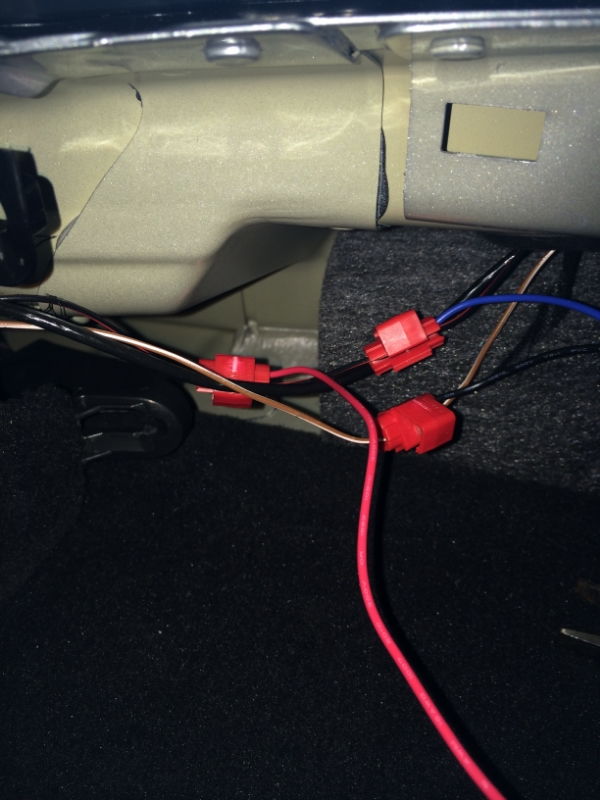
Now take hold of the BLK/RED wire about an inch away from the tap you just installed, and push the wire into another red wire tap.
Take the BLUE wire from the Kahtec black box and push the end into the red wire tap.
Clamp down to complete the splice connection.
Take the third red tap, and holding the BRWN/WHT wire push it into the tap.
Take the BLACK wire from the Kahtec box and push it into the red tap and clamp down.
The last very important step? Make sure you follow the directions, and CUT the BLK/RED wire somewhere between the first and second red taps you just added in the steps above. Doing so now causes all power to run through the Kahtec black box to the upper third brake light. If you forget this last step, your brake light will continue to function as normal, without the blinking.
If for some reason you didn't get the wiring correct, you can disconnect the taps and re-try. Try to leave as much wire length as possible in case you need to restore to original state without the module. Also, when using clamp taps, it is possible that you didn't get a clean cut through both wires -- so if you are not getting the module to work, or you get any dash warnings about "third brake light not functioning" you can start your troubleshooting with the clamps.
If you take-on this project, please post your end results and experience here for all to share!
I have a video of the brake light blinking... As well as the removal and setting everything back to "stock". More on that later - but short story is I wanted to return the light to original factory before selling the car.... ;-)
Just posted-up a reply to fellow enthusiast on RennList looking for a DIY on replacing the steering-wheel. Thought I'd share that here on my blog as well.
The DIY original post is up on 6SpeedOnline 991 forum. I am just linking to it here....
I posted a walk-through video on my YouTube Channel "GTSilver" the other day, walking through the official Porsche AG information system, known as PIWIS TSI. If you haven't already watched that video, check it out here:
Since I've posted that walk-through, I've been asked a number of times about the cost for accessing and using the application... and what plan I think is the best deal. So I thought I'd post another quick video update to the channel where I talk about pricing, show the pricing table, and my thoughts on value, etc.... So please, go check it out!
And please, subscribe to my channel, hit the "like" button and I will keep vlogging!
UPDATED October 5th, 2018: I've added links to two additional documents that are comprehensive PDF of various WMs for 2012-2015 991.1's.
I am posting a complete listing of all the "official" Porsche Work Manuals that I have saved for reference so that others may get an idea of what I have available for various DIY projects, etc. I've also included some other reference materials (such as fault code tables, after-sales training, etc.). Nearly all of the documents I have obtained from the official Porsche PIWIS TSI application, and for the most part all documents are going to be specific to my 2014 MY C4S -- but most all documents will also apply to other 991's, except in obvious cases for CABs, GT3s, and TTs. PIWIS TSI requires an account and is not for free -- there are various payment options, including unlimited annual, pay-as-you-go in blocks of time, and by-the-document.
If you have any questions about the documents, want to chat about the procedures included, etc. please comment. I'll also be posting a short video walkthrough of the PIWIS TSI application online soon so that you can observe how I've obtained the documentation over the past year or two.
Thanks!
Document #
Title
Notes
WM 3X00IN
Technical Values
A rather exhaustive listing of tightening torque settings for transmission, differential, clutch, various covers and brackets, cardan shaft, front final drive (since this is for the 4S), and many more….
WM 1X00IN
Technical Data -- Engine
Another exhausting list of technical specs and values for parts specific to the MA 103 and MA 104 (3.4 and 3.8, respectively) engines, including things like engine weight, crankshaft bearings type and diameter, diameter of intake valves, valve lift, and so so much more! LOL
WM 031400
Intermediate Maintenance (A Markets)
A market only… A long list of regular interval maintenance items, specifically referencing and WMs necessary to perform the maintenance (such as “check headlight adjustment” which in turn refers to WM 941519 “Removing and Installing Healights - section on ‘Information’.”
N/A
Maintenance Checklist
Covers a broad array of ALL maintenance items in the form of a checklist. Doesn’t provide anything additional in the way of technical specs or details.
N/A
991 + 981 MY 2012 + Diagnosis Information -- PDK
Not sure my source on this, but lists all fault codes that might appear in logs for diagnosis purposes
N/A
TCU PDK Table for Sports Cars MY14
From Porsche AG, but I can’t vouch for authenticity. Nice table of PDK fault codes specific to 2014 991
WM 3734N0
Eliminating Transmission Symptoms - Reworking PDK transmission (Repair measures in the event of various symptoms/SY0213)
Bulletin #27/12, Bulletin Group 2 2601
Sports Exhaust Install / Retrofit
This covers most 991’s, except W/ X-51 Powerkit
WM 2400IN
Overview of Vacuum System, Line Routing and Change Over Valves
Good overview, covers ALL COVs on vacuum system
PNA P95 003
AfterSales Training: Advanced Electrical Systems
This is not specific to the 991…. Ed 5/06
PNA P00 103
AfterSales Training: General Servicing & Repair -- Sports Cars
This is not specific to the 991… Ed 5/07
WM 647519
Removing and Installing Rear Side Window
WM 927219
Removing and Installing Spray Nozzle for Headlight Cleaning System
WM 405019
Removing and Installing Front Wheel Bearing Housing
WM 427119
Removing and Installing Rear Spring Strut
WM 605419
Removing and Installing Seal for Roof Assembly
WM 636819
Removing and Installing Rear Skirt
These are trim pieces around the tailpipes
WM 663319
Removing and Installing Roof Moulding
WM 665055
Replacing Rear Logo
Rear badging- You must have the Porsche Special Tools for placement of rear badging, but removal is explained as well.
WM 668919
Removing and Installing Rearview Mirror
Exterior door mirror… Standard mirror only, Non-SD and Non-Folding
WM 691119
Removing and Installing Front Three-Point Belt
WM 705919
Removing and Installing Front Door Panel
WM 707519
Removing and Installing Rear Side Trim Panel
WM 708519
Removing and Installing Rear Roof Trim Panel
WM 947119
Removing and Installing Auxiliary Headlight
LED DRLs
ATI Bulletin Group 0, #1302
PIWIS Tester II Overview
Advanced Technical Information bulletin….
WM 706719
Removing and Installing B-Pillar Trim Panel
WM 681719
Removing and Installing Centre Console
WM 706819
Removing and Installing C-pillar Trim Panel
WM 900319
Removing and Installing Dashboard Inset
WM 705819
Removing and Installing Dashboard Moulding on Driver’s Side
WM 571719
Removing and Installing Door Lock
WM 574519
Removing and Installing Door Opener
WM 963819
Removing and Installing Front Camera
I believe this is specific to 2015+ TT (NOT MY 13, 14, or 15 non-Turbo)
WM 577319
Removing and Installing Front Door Control Unit
WM 571119
Removing and Installing Front Door Handle
WM 705919
Removing and Installing Front Door Panel
WM 573019
Removing and Installing Front Door Sub-Frame
WM 340819
Removing and Installing Gearshift Bracket
WM 914319
Removing and Installing Reversing Camera
This does NOT include a retrofit guide, so it assumes the vehicle was already optioned with the necessary wiring harness. Also only applies to TT’s
WM 341220
Removing and Installing Shift and Selector Cables
WM 340419
Removing and Installing Shift-Lever Knob
This is manual tranny only...
WM 481319
Removing and Installing Trim Panel (Steering-Column Switch)
WM 665819
Removing and Installing Upper Part of Rear Spoiler
WM 4X00IN
Lifting the Vehicle
WM 0850IN
Symptoms - Body Interior
Covers some basic issues reported by owners with reference to service bulletins for resolving.


 If you'd like to see a video of the blinking upper brake light in action, jump to the bottom of this post for a link to my YouTube channel GTSilver....