This is the 2nd part of the Rear View Camera Install project. If you haven't already, please visit Part 1.
In previous steps, we've removed the PCM, wired-up the NAV-TV adapter and harness, run video/power cable to rear of the car, and connected same to power and ground in the dash.
Let's keep going!
I forgot to mention in the previous step, that after connecting power wire, I wrapped the connection with electrical tape.
I checked all of my connections with a digital multi-meter to make sure I had proper power levels and such. You don't have to, but why wait until you think you are finished to find out something is screwy???
Leave everything at the dash for now. Once you have the rear camera installed you will have to access the CAM module to program the PCM unit, so just leave the wires as-is for now.
Install the Rear Camera:
1. At rear of car, remove license plate.
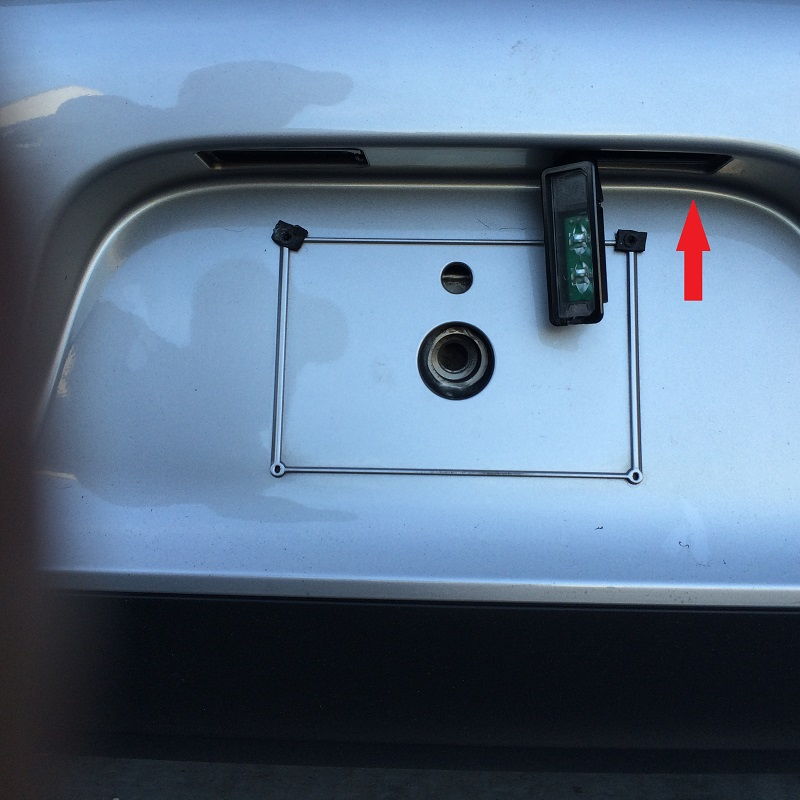
2. Remove one or both license plate LEDs (I only removed the one on the right)
Disconnect the light and place aside. Push the light wire out of the way using your fingers poking up and directly above where you are going to drill the camera mounting hole.
3. Mark the center point between the LEDs. In my crude measurement, I found that the distance between the inner-edge of each light housing to be 4". I marked center with a grease pencil. This is where you will start your hole. Oh, by the way, the CAM 6 comes packaged with a cutting template and weather seal sticker. I didn't use the template for anything more than measurements of the diameter. But you could stick it on and cut-out from there. I didn't.
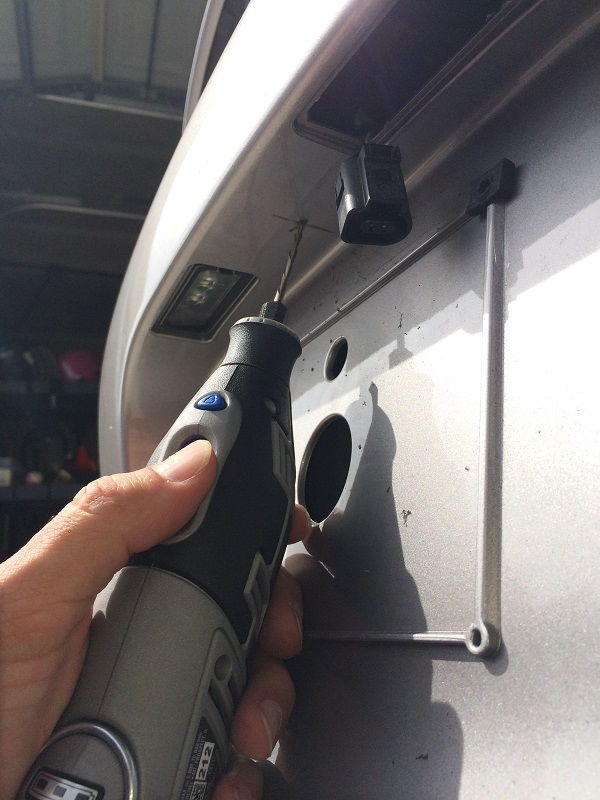
4. Using an appropriate drill bit, make your center point hole. I used a Dremel tool -- be careful to keep the speed appropriate so that you aren't just melting the plastic around the bit. Punch through and remove.
5. I then took a progressive-diameter drill bit, and began widening the hole. I found that the bit was very sharp and using just my hand and gentle pressure I was able to expand the hole to nearly the correct diameter for the camera without using my drill. To get the hole just right (you definitely don't want to go too big!) I then used a couple of Dremel cutting bits appropriate for plastic to quickly get the diameter just slightly smaller than required. I wanted a weather-tight fit! Smooth-out any rough edges around the hole. I also checked up inside the hole for any obstructions just to be sure, then test-fit the camera.
6. Mount camera: First, take the camera and attached cable, and put the weather-seal sticker onto the back of the camera. Just pull-off one side of the paper (I chose the white side!) and stick it on. Of course you need to pull the cable through the hole to get the sticker down on the camera base....
Then pull the cable up and through the new mounting hole, and out from the LED light housing opening.
Make sure to thoroughly clean the mounting surface area. Then pull the weather seal backing off, and push the camera housing into place through the mounting hole. Press firmly. If you got the hole centered right, the camera should look factory...
Take the mounting screw ring, put the camera cable through the center, and push the ring up into the LED light opening. This next part is tricky, but take your time! You have to blindly position the screw-ring into place so that it threads onto the camera mounting threads, and tighten-down. You will only be able to do this with one or two fingers -- but if you remove the left-side LED unit you may be able to use a finger from either hand to position. After a few minutes, I was able to get the threads engaged and tightened it down. The camera housing is now fully-mounted!
7. Pull camera video cable/connector through to taillight area: I used a plastic zip-tie that I modified to use for pulling the cable. Pull the wire out to the taillight cavity. There is a LOT of space in the bumper cover area -- just keep the cable to the "outside" of the air filter housings and away from any of the heat shields further below.
When you have the cable through, you can connect the small molex connectors.
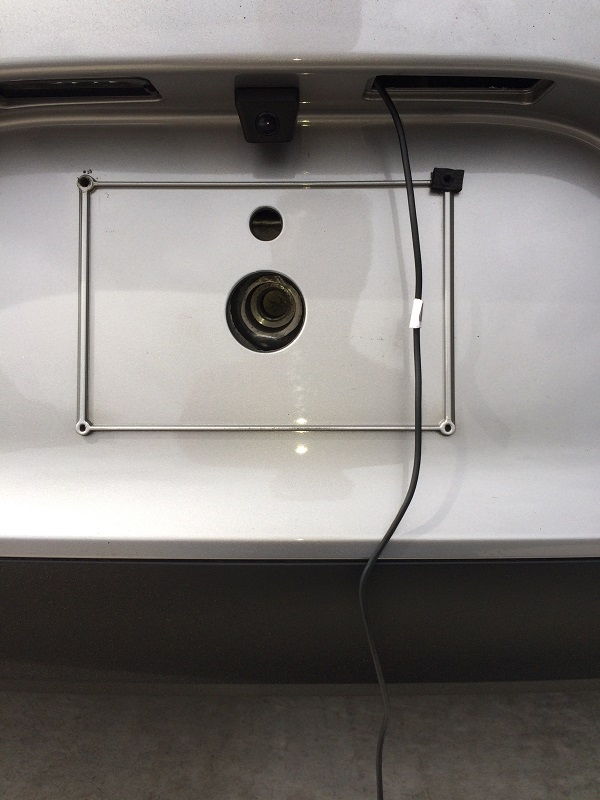
In this picture I've pulled the cable through, and I chose to install cable conduit to protect further from any environmental issues like heat or water. Note I did the same to the cable running out from the car interior...
I also plugged the hole in the taillight cavity to keep the wire from rubbing and possibly cutting through the insulation on the hole opening.
8. Carefully push the video cables down into open space in the bumper cover, and out of the way from the taillight mounting points. Once all is hidden, you can replace the taillight.
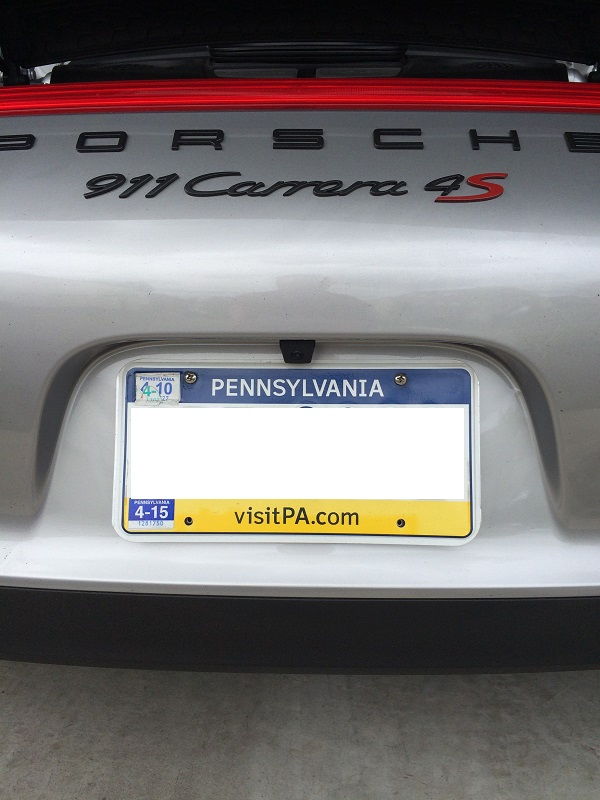
Here is the finished camera install, with my license plate back in place. I thought it came out "factory!"
And here is a pic of a Turbo S with the camera from factory -- looks the same, right????
But wait! We are NOT done just yet! We have to go back to the cabin, connect the PCM unit, program the camera, and TEST!
Program and Test:
1. Back at the dash, grab your PCM unit and connect the NAV-TV Plug-and-Play harness 40-Pin connector into the back of the unit. Then connect each of the remaining factory cables you removed previously. You can check the unit by simply turning it on, making sure that radio, other features still work as expected.
Leave the PCM unit turned "ON" for the next steps...
NOTE: As mentioned at the start of this DIY, some of the steps I follow to program the PCM unit to recognize the camera are specific to the fact that I do NOT have factory Park Assist or Multi-Function Steering wheel. If you have either of those options, you should consult the NAV-TV instruction booklet to complete programming.
In previous steps, we've removed the PCM, wired-up the NAV-TV adapter and harness, run video/power cable to rear of the car, and connected same to power and ground in the dash.
Let's keep going!

I forgot to mention in the previous step, that after connecting power wire, I wrapped the connection with electrical tape.
I checked all of my connections with a digital multi-meter to make sure I had proper power levels and such. You don't have to, but why wait until you think you are finished to find out something is screwy???

Leave everything at the dash for now. Once you have the rear camera installed you will have to access the CAM module to program the PCM unit, so just leave the wires as-is for now.
Install the Rear Camera:
1. At rear of car, remove license plate.
2. Remove one or both license plate LEDs (I only removed the one on the right)
Disconnect the light and place aside. Push the light wire out of the way using your fingers poking up and directly above where you are going to drill the camera mounting hole.
3. Mark the center point between the LEDs. In my crude measurement, I found that the distance between the inner-edge of each light housing to be 4". I marked center with a grease pencil. This is where you will start your hole. Oh, by the way, the CAM 6 comes packaged with a cutting template and weather seal sticker. I didn't use the template for anything more than measurements of the diameter. But you could stick it on and cut-out from there. I didn't.
4. Using an appropriate drill bit, make your center point hole. I used a Dremel tool -- be careful to keep the speed appropriate so that you aren't just melting the plastic around the bit. Punch through and remove.
5. I then took a progressive-diameter drill bit, and began widening the hole. I found that the bit was very sharp and using just my hand and gentle pressure I was able to expand the hole to nearly the correct diameter for the camera without using my drill. To get the hole just right (you definitely don't want to go too big!) I then used a couple of Dremel cutting bits appropriate for plastic to quickly get the diameter just slightly smaller than required. I wanted a weather-tight fit! Smooth-out any rough edges around the hole. I also checked up inside the hole for any obstructions just to be sure, then test-fit the camera.
6. Mount camera: First, take the camera and attached cable, and put the weather-seal sticker onto the back of the camera. Just pull-off one side of the paper (I chose the white side!) and stick it on. Of course you need to pull the cable through the hole to get the sticker down on the camera base....

Then pull the cable up and through the new mounting hole, and out from the LED light housing opening.
Make sure to thoroughly clean the mounting surface area. Then pull the weather seal backing off, and push the camera housing into place through the mounting hole. Press firmly. If you got the hole centered right, the camera should look factory...
Take the mounting screw ring, put the camera cable through the center, and push the ring up into the LED light opening. This next part is tricky, but take your time! You have to blindly position the screw-ring into place so that it threads onto the camera mounting threads, and tighten-down. You will only be able to do this with one or two fingers -- but if you remove the left-side LED unit you may be able to use a finger from either hand to position. After a few minutes, I was able to get the threads engaged and tightened it down. The camera housing is now fully-mounted!
7. Pull camera video cable/connector through to taillight area: I used a plastic zip-tie that I modified to use for pulling the cable. Pull the wire out to the taillight cavity. There is a LOT of space in the bumper cover area -- just keep the cable to the "outside" of the air filter housings and away from any of the heat shields further below.
When you have the cable through, you can connect the small molex connectors.
In this picture I've pulled the cable through, and I chose to install cable conduit to protect further from any environmental issues like heat or water. Note I did the same to the cable running out from the car interior...
I also plugged the hole in the taillight cavity to keep the wire from rubbing and possibly cutting through the insulation on the hole opening.
8. Carefully push the video cables down into open space in the bumper cover, and out of the way from the taillight mounting points. Once all is hidden, you can replace the taillight.
Here is the finished camera install, with my license plate back in place. I thought it came out "factory!"
And here is a pic of a Turbo S with the camera from factory -- looks the same, right????
But wait! We are NOT done just yet! We have to go back to the cabin, connect the PCM unit, program the camera, and TEST!
Program and Test:
1. Back at the dash, grab your PCM unit and connect the NAV-TV Plug-and-Play harness 40-Pin connector into the back of the unit. Then connect each of the remaining factory cables you removed previously. You can check the unit by simply turning it on, making sure that radio, other features still work as expected.
Leave the PCM unit turned "ON" for the next steps...
NOTE: As mentioned at the start of this DIY, some of the steps I follow to program the PCM unit to recognize the camera are specific to the fact that I do NOT have factory Park Assist or Multi-Function Steering wheel. If you have either of those options, you should consult the NAV-TV instruction booklet to complete programming.
Next few steps are specific to my situation and install!
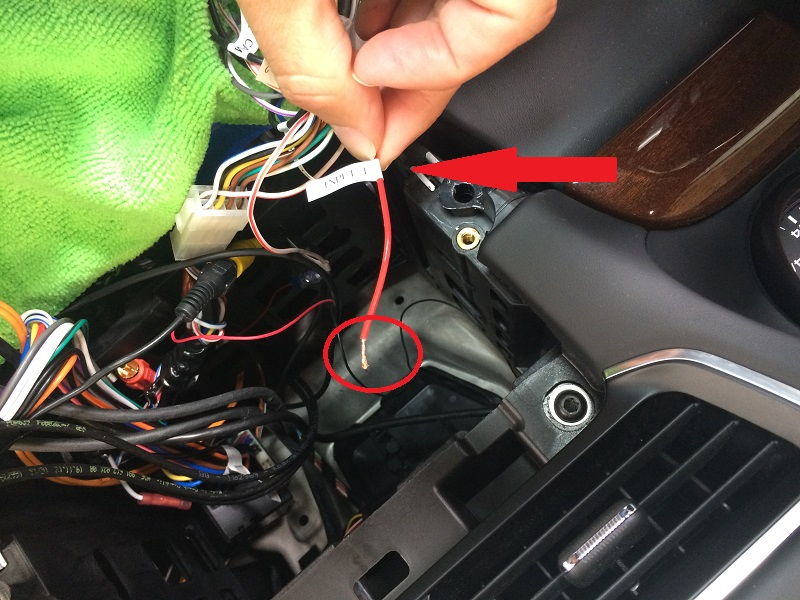
2. Locate a RED wire that has the label "INPUT 1" coming-off the CAN Adapter harness.
Cut-off the female connector that is on the end, and strip the wire as shown in the pic below:
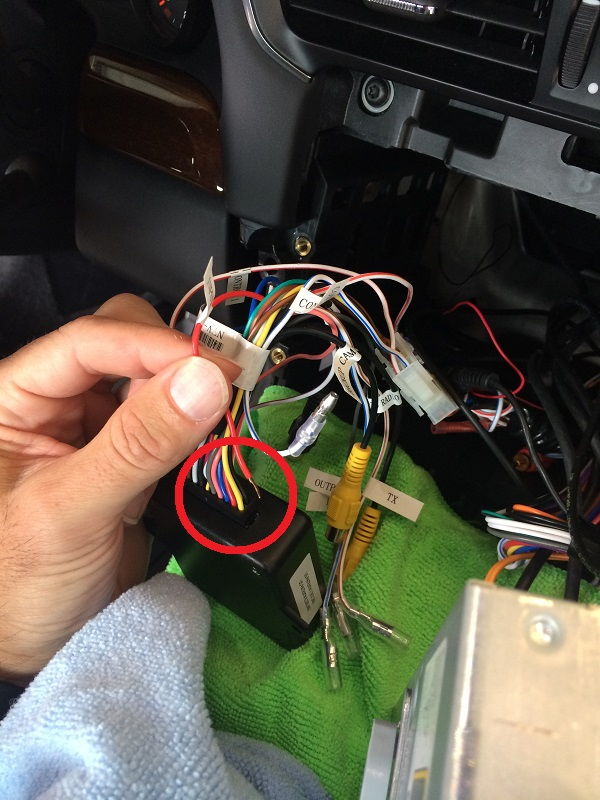
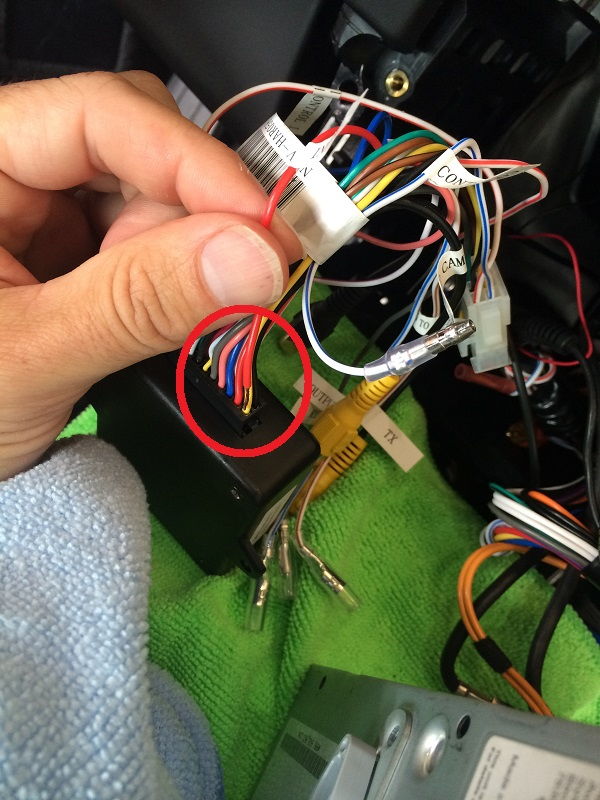
3. Take the black 18-pin connector attached to the CAM module and locate the yellow wire in the lower-right corner (see pic- I am not sure if this is pin 1 or 18 to be honest....)
To set the PCM programming for the camera, you will have to "PULSE" INPUT 1 to 12v within 10 seconds.... To do this, take the stripped-end of the INPUT 1 RED wire and simply push down into the pin connection between the yellow wire and the module (see pic)
There are other ways to do this, such as stripping a portion of the yellow insulation and touching to the bare wire, but I didn't want to do that, so I pushed down into the connection pin.
If you get the PULSE right, you should see your PCM unit reboot. It may take several minutes to come back-up. If it doesn't reboot at all, you didn't get the PULSE right, or something else is wrong. Took me two attempts!
Once the PCM unit reboots, you can check that the programming worked as follows....
4. Go to the CAR menu screen, and then choose OPTION.
5. On the OPTION screen, you should select SET CAR
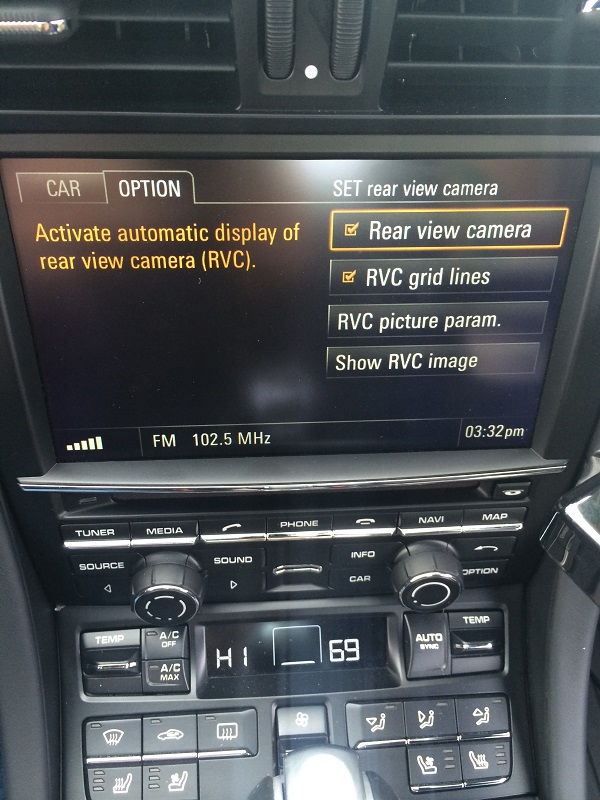
6. On the next screen, you should now see a new menu option - SET REAR VIEW CAMERA
Select this option.
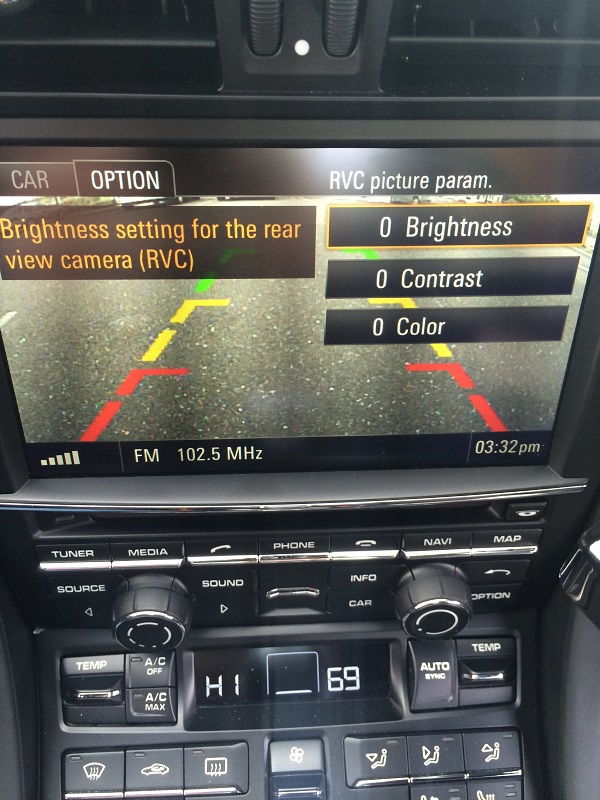
7. You should now see a new menu screen with options for activating the automatic display when selecting reverse gear, camera settings, and even an option to force camera on (more on that one later).
Here is a pic of the RVC picture parameters...
If you see all this, your programming was successful!

So let's button things up and complete the project!
1. Make sure to "cap" the INPUT 1 RED wire you stripped for the programming. I clipped-off the exposed wire, folded the wire back and wrapped with electrical tape. Boom.
2. Carefully push the NAV-TV black box and all wiring as far back into the dash cavity as you can. Try to push the black box down as well, all the way at the rear. I found there is a lot of open space just behind the driver-side dash to store the NAV-TV black box. If you don't get the box and wires far enough back and out of the way, you won't be able to get the PCM head unit back in, and you don't want to push too hard (potentially crimping a wire, or breaking something....). I chose to strap-up as much of the wiring as possible neatly so that there wouldn't be any stray connectors getting in the way of the PCM unit.
3. With all the wiring safely tucked away, carefully fit your PCM unit back into the dash and tighten-down with the 4 screws. Re-install the console trim pieces, and pat yourself on the back for completing your project!!!

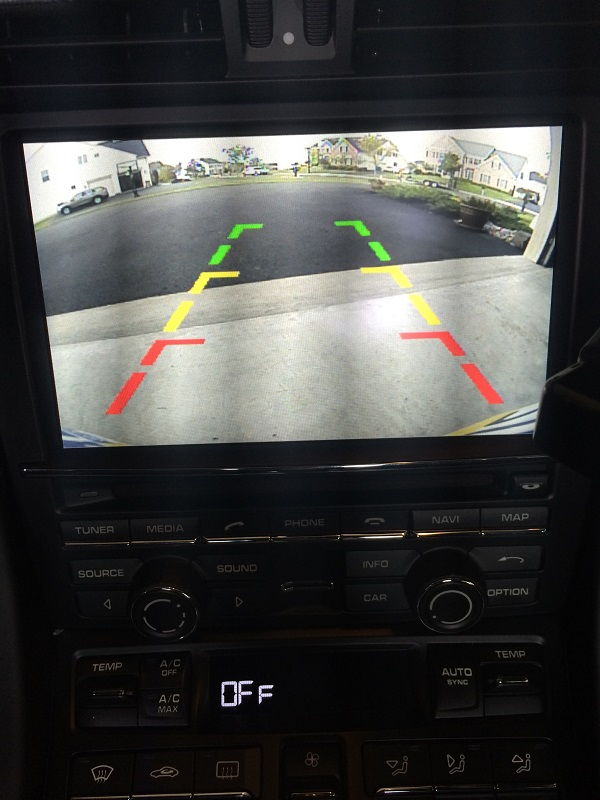
Finally, moment of truth, I started-up the car, moved the PDK to reverse, and within a second the rear picture popped-up on the screen! Looks good IMO, and brightness was perfect. The quality of the image is better than I expected... (my iPhone picture quality isn't all that great tho! )
My license plate was bent a bit, so it is appearing in the lower corners of the image -- I've bent it flat so now I don't see the plate at all. The camera has a good field of view.
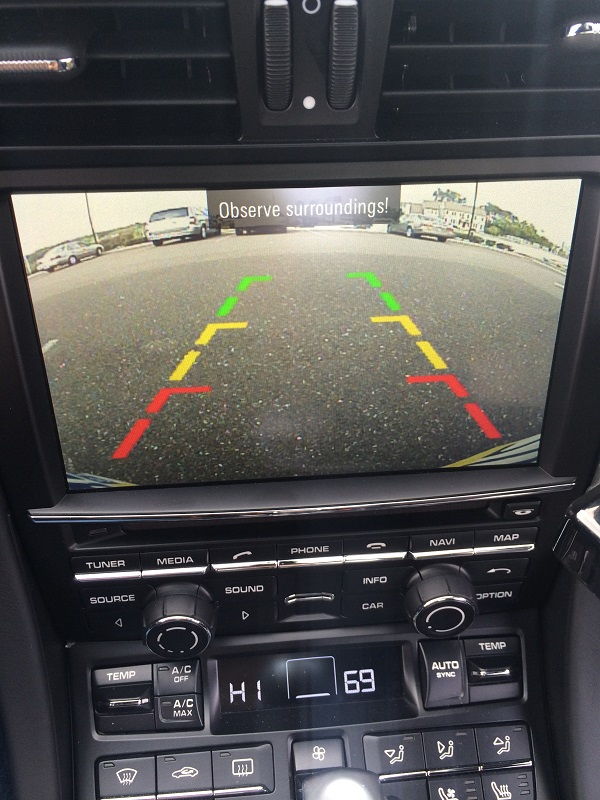
Here is another, while out for a test-run...
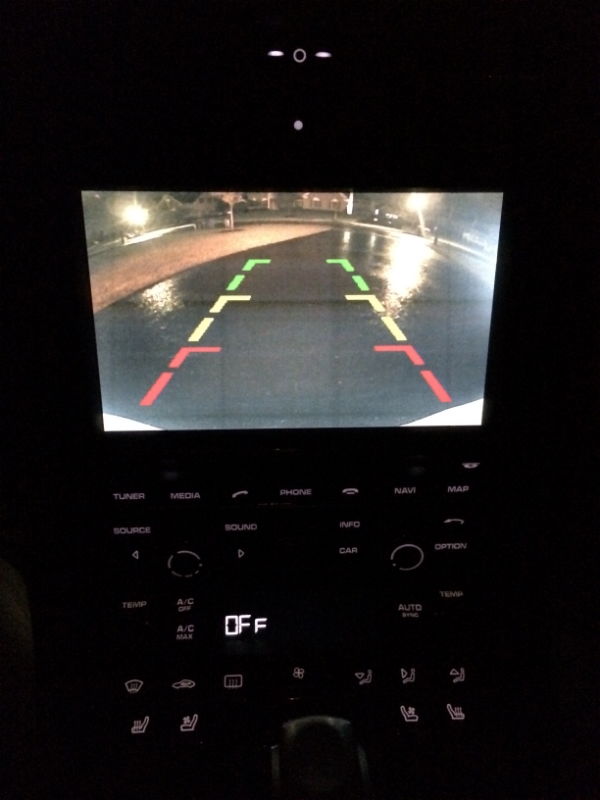
And for reference, for those of you wondering as I was, here is how the image looks at night (dark, rainy night!)...
I found that the image is always coming-up within a second or so when putting car into reverse. What I found tho is that when moving into Drive, the camera will stay "on" longer than I was expecting. I was thinking that maybe something is wrong and the camera was stuck on. But then I noticed as soon as I got to 10-12 MPH the image clicked-off. I actually like this.... As sometimes in maneuvering around the driveway I would like the image to stay-on.
Also, I found that if you are stopped, even if you are not in Reverse, you can force the camera on by going to the Camera Setup menu, and hitting the "Show RVC Image" option.
The image will remain active on the screen until you begin driving, at about 10-12 MPH. Cool!
Well, I hope you found this DIY helpful in your own project. Thanks for reading through!







Great follow-up to Part 1! The step-by-step breakdown makes the installation process feel much more approachable, even for someone tackling this for the first time. I especially appreciate the wiring explanations—those can get tricky. Did you notice any noticeable lag or resolution issues with the camera after installation, or does it integrate seamlessly with the factory display? Looking forward to more DIY upgrades!
ReplyDeleteDash Cam